• If you are new to GiantScaleNews.com, please register, introduce yourself, and make yourself at home.

    We're 1st in Giant Scale RC because we've got the best membership on the internet! Take a look around and don't forget to register to get all of the benefits of GSN membership!

    Welcome!
  • Unless you are a paid advertiser NO more posting advertisement in the individual vendor forums. You may post in the Manufacturer's Announcements section only but only ONCE a month unless your a paid advertiser.

My 3DHS BIGFOOT build

joshgluck

100cc
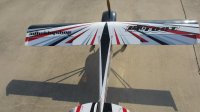
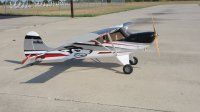
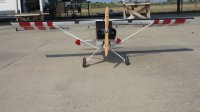
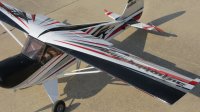
Got a little more done today, I finished up the engine install, made my choke rod bracket, and bent the rod to where it sits in the side opening by the prop shaft. I just used a piece of straight aluminum, drilled a 5mm hole for the mounting bolt, and a 3/32 hole for the rod and mounted it. Next I mounted the ignition, I shortened the the spark plug wire by about 6 inches, that way I did not have to worry about bending, and routing it around stuff, comes straight off the plug up to the box. The location I mounted it in works fine, it can be turned sideways if you wanted to. I installed my optical ignition kill switch under the top of the cowl/fuse , basically behind the dash, that position allows for the wires to be close to everything, and not have to run extensions on all the leads. I used foam, and double sided tape. The kill switch has a RED LED that lets you know when it is armed, I decided I wanted it in the dash, and not on the outside of the fuse, this location allows a quick look to easily see and verify the ignition is armed.
I also installed the reciever, I had this reciever from another plane, its a 9 channel, Even though I fly with a DX-8 I use the higher ch. recievers because they have extra aux satt rx on them, this one has two antennaes on the main reciever, and tow extra satts. I mounted it on the tray that is used for the pull-pull rudder setup ( electric power setup) I like this location as it is right under the roof panel, allowing easy access to the reciever, and thats a good thing because You will be plugging in the ailerons and flaps when you install/remove the wings, its nice to have those connections. ONE THING I did, I do not like using extensions, however sometimes you have to,, I used a Y connector for the flaps, I use a dedicated channel for each aileron, I did use a HD short extension for the ailerons out of the rx,,WHY? becuase I dont believe it is good to constantly be plugging and unplugging connectors into the reciever, I use a short extension and plug into that and then use servo safety clips on that connection.
Thats it for today,,
Getting closer
the Optical kill switch cost me 20$
the 9 channel rx cost me around 130 when I bought it so
current cost of plane
plane 540
engine 270
servos 493
kill switch 20
reciever 130
$1453

Any reason you didn't use the motor's built in guid for the choke? Did you have to rotate the cab so I would not work anymore? The one thing I liked about the 35ra is that it has the built in choke rod support. Used it on my 74 edge and plan to on the 72 extra as well. Will be going with another 35ra on my BF if VVRC doesnt get the 40twins in soon.

thanks again for the write up!
Josh
 

njswede

150cc
Dude - pretty sure the epoxy in the elevator slot is from putting the joiner in there. This happens to most people and is a good reason to put the horns in first. Was this on the half that came pre-joined or the one you joined?

Good write-up so far! I'm still going through it.

Thanks!
Josh

Yup. I was equally upset when I put together my 72" Extra until I figured out the epoxy had leaked in from the control horn slot. It's better to put in the joiner before the horns.
 

joshgluck

100cc
Yup. I was equally upset when I put together my 72" Extra until I figured out the epoxy had leaked in from the control horn slot. It's better to put in the joiner before the horns.

Haha, your build thread on the 72 is where I found this out :)
I appreciate your hassle saving me the hassle
 
Joshgluck, Good questions,, the glue in the slots was from the plane factory, Not me I know better than to do something like that,, they were not paying attention and ended up getting epoxy in the elevator control horn slots, the elevator control horn slots are on the joiner side that THEY assemble at the factory.
ALSO, I did not use the built it choke guide because I bought the engine used, and the previous owner had some kind of bolt or something that he drilled a hole in the center of,, I did not want to drill it out (not worth having the bit walk around and get too far over, or break the tab off) took me about 2 minutes to make the tab I put on,, easy enough.
No I did not have to rotate the carb ,everything worked out perfect on that, the engine sits pretty close to the side of the engine box, but lines up great with the cowl on.
 
I am posting up pics of the plane fully assembled on the flight line...ON the graphics they come with a white backer,, I did not use the backer I thought it looked cartoonish, I just layed the top layer of the graphic, I like the way it looks like this much better,, but that's just my opinion...
 

Attachments

  • IMG_3257.jpg
    IMG_3257.jpg
    416.7 KB · Views: 309
  • IMG_3258.jpg
    IMG_3258.jpg
    410.5 KB · Views: 343
  • IMG_3259.jpg
    IMG_3259.jpg
    418.1 KB · Views: 275
  • IMG_3260.jpg
    IMG_3260.jpg
    422 KB · Views: 323
I have a video now,,

First off let me apologize,, this video is not the greatest,, the qaulity of my video is better but after converting it and then posting it on YOUTUBE it lost some clarity. My wife tried her best, took about 17mins of video and a little over 4 was actually usable, but I luv her.. I will get a better video when I get back (going on vacation)

Looking at the video I can see that I was coming in too fast on the landings, and turning too early not realizing the plane was carrying that much speed,,,YOU HAVE TO GIVE ME A BREAK remember I worked a 12 hour midnight shift, and then went flying afterwards, it was hotter than the blazes, and humid as a sauna, not to mention I had to stand on the other side of the field due to the morning sun being in my face on the flightline, Oh and we are having our jet ralley this weekend and plenty of those guys are already here, and all were watching, I guess I was the only thing happening that morning,,,,,OK I THINK I GOT MY EXCUSES COVERED:cool:
Like I said I will get better video, I went over the camera AGAIN!!! with her and I think she understands trying to keep the plane in the screen on full zoom is not easy or a good Idea.
Oh well heres the vid until next time happy flights,, :flyer:

[video=youtube;5dzWqryUNM8]https://www.youtube.com/watch?v=5dzWqryUNM8&feature=youtu.be[/video]
 
Last edited by a moderator:

SnowDog

Moderator
It's all good Ronnie! Finding a good camera person is really tough! I give a lot of credit to those who take good videos. That will get beter with practice anyway.
Sure looks like your setup is rock solid...takeoffs in about 2 feet or so? wow.
Seems like plenty of power for the servos and the motor.
Congrats and thanks for posting!
 

Murocflyer

70cc twin V2
Please thank your wife for videoing that for us! I think she did fine.

And Thanks for posting your video.

Frank
 

Stevo

30cc
Hi everyone, Bigfoot is on its way! Would anyone have a photo of the cowl with a dle30 installed with a stock muffler setup?
Thanks,
SS
 
Top