• If you are new to GiantScaleNews.com, please register, introduce yourself, and make yourself at home.

    We're 1st in Giant Scale RC because we've got the best membership on the internet! Take a look around and don't forget to register to get all of the benefits of GSN membership!

    Welcome!
  • Unless you are a paid advertiser NO more posting advertisement in the individual vendor forums. You may post in the Manufacturer's Announcements section only but only ONCE a month unless your a paid advertiser.

My 3DHS BIGFOOT build

SnowDog

Moderator
wow Ronnie this is an incredibly detailed and thorough build! Really glad you are pointing out all the issues you find to help others.
Also, I've been told that 3DHS is keeping track of Bigfoot build threads and will take steps to resolve reported issues with this plane just like they do with their other airframes.

Thanks SnowDog,, and thats great that they are keeping tabs on the problems of the builds,,Maybe make it a little easier for the guy who is not prepared to deal with them..
 
Ok, just an update, I am still trying to get my wings sorted out, got the ailerons dialed in, linkage and throws setup, using my Fromeco digital quad current meter. The flaps have proved to be a problem for me though, since I am not using a programmable servo for the flaps, I can not change rotation of the one flap servo, so I am left with a few options, use a reversing y harness, NOT going that route, remove the servo, open it up and reverse the motor and pot leads, thought about that, BUT COULD NOT GET THE SERVO OUT OF THE DANG HOLE ans was scared I would break the wood..
What I have decided to do is use a smartfly equalizer II that I have from another one of my planes, that will allow me to set the servos up just the way I need to, and only use one channel of the tx..

I KNOW WHAT YOU GUYS ARE THINKING,,why not just use another channel of the rx and mix it in with the flaps,,
here is why,, I fly with a spektrum dx8, sure I would like the 18 but I dont see that happening any time soon so I have to use my 8,,so no matter how many channels I have on the rx, the tx will only allow me 8 different functions.
I have 8 channels available,

1.throttle
2.elevator
3.rudder
4.aileron (right aileron)
5.gear
6.aux1- (left aileron)
7.aux2- Flaps
8.aux3- Optical ignition kill


you are noticing i have one extra channel,, I do not want to use that channel because I have plans for a smoke system on this plane and I run my smoke off my gear switch on my other planes,, So I need to keep that channel open,,, Now ya know.
I will post some more pics when I get a chance,, dont look like I am going to get this plane done this week as planned, but next week I will....
 
Last edited by a moderator:

gyro

GSN Contributor
Ok, just an update, I am still trying to get my wings sorted out, got the ailerons dialed in, linkage and throws setup, using my Fromeco digital quad current meter. The flaps have proved to be a problem for me though, since I am not using a programmable servo for the flaps, I can not change rotation of the one flap servo, so I am left with a few options, use a reversing y harness, NOT going that route, remove the servo, open it up and reverse the motor and pot leads, thought about that, BUT COULD NOT GET THE SERVO OUT OF THE DANG HOLE ans was scared I would break the wood..
What I have decided to do is use a smartfly equalizer II that I have from another one of my planes, that will allow me to set the servos up just the way I need to, and only use one channel of the tx..

I KNOW WHAT YOU GUYS ARE THINKING,,why not just use another channel of the rx and mix it in with the flaps,,
here is why,, I fly with a spektrum dx8, sure I would like the 18 but I dont see that happening any time soon so I have to use my 8,,so no matter how many channels I have on the rx, the tx will only allow me 8 different functions.
I have 8 channels available,

1.throttle
2.elevator
3.rudder
4.aileron (right aileron)
5.gear
6.aux1- (left aileron)
7.aux2- Flaps
8.aux3- Optical ignition kill


you are noticing i have one extra channel,, I do not want to use that channel because I have plans for a smoke system on this plane and I run my smoke off my gear switch on my other planes,, So I need to keep that channel open,,, Now ya know.
I will post some more pics when I get a chance,, dont look like I am going to get this plane done this week as planned, but next week I will....

Maybe you could use the y harness on the ailerons, and use two channels for flaps?
 
Gyro, I thought about that,,but I may want to play with the ailerons in a spoileron setting once I an used to the plane and mix in a little crow setup and see how slow I can get it..
 

gyro

GSN Contributor
Gyro, I thought about that,,but I may want to play with the ailerons in a spoileron setting once I an used to the plane and mix in a little crow setup and see how slow I can get it..

Understood! Just seemed like an easy way to get you flying sooner :)
 
Ok,, I got the wings all sorted out I used the equalizer to reverse my servo flap, then adjusted the equalizer center and end points of that flap servo to match the other,, Easy enough, and works perfect. Have it mounted inside that wing. I routed my wires through the passage in the wing to the other side and then back through to keep them away from the flap linkage. TIP::to secure servo wires in hard to reach spots what I will do is wrap some electrical tape around the servo wire, then put some thick Ca on the tape and put that wire where I want and hold it there till the ca grabs,, Never had a problem, and if you ever need to remove it, a quick tug will pull it loose and not damage the wood,,this way you don't have any glue on the wires and they will be held in place. I got all my linkages set up as best as I can, to be honest with you, the geometry on the flap control horn is not good, the angle of the horn puts the linkage in a weird spot, If I had noticed this before hand, I probably would have turned the horns around facing the opposite way, but I already had them epoxied in, so I was commited. I did not use the linkage that came with the plane, I had some better linkage in my build box that I used, You can use the supplied linkage, I just wanted something a little more solid. Once you have all the servos in the plane and are happy with the linkage and throws,, You need to check the throw angles of every surface and see how much current they are pulling at full deflection to be sure you are not over stressing the system. To do this I use an angle gauge I got from harbor freight, and to measure current I use my fromeco quad current meter, its one of the best tools I have ever bought for this hobby, you will hear a lot of opinions on how to do it and what numbers are correct,,personally for me,, I make sure mine are at 0 draw when sitting with no inputs, and I keep my draw to .5 an amp max at full deflection, I run life batteries and know that they can easily support this amount.
as far as how much throw to put into the surfaces its always good to use the manufactures numbers, at least to start with. I set mine up using 3dhs ratings
ailerons 15 degrees low 30 degrees high
elevator 15 degrees low 30 degrees high
rudder, I maxed it out as much as I could without it hitting the tailfeathers
FLAP 40 degrees stage 1 75 degrees stage 2 (I ended up at 70 degrees to keep my servos from pulling too much current)
 

Attachments

  • IMG_3256.jpg
    IMG_3256.jpg
    405.2 KB · Views: 290
  • IMG_3226.jpg
    IMG_3226.jpg
    387.5 KB · Views: 317
  • IMG_3227.jpg
    IMG_3227.jpg
    401.7 KB · Views: 276
  • IMG_3229.jpg
    IMG_3229.jpg
    386.7 KB · Views: 312
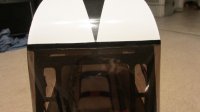
OK, so now its time for all the windows,, all of the windows sit inside a precut area and all of my windows fit terrific, absolutely no problems on the windows, I glued them in place with pacer formula 560 canopy glue, its easy to use, and it will clean up with water easily if you get it before it sets up. If it starts to dry hit it with some plain old rubbing alcohol and that should do it,, Use whatever method you want to put them in, you can glue and tape, or whatever. The way that I did it was set the plane where it could lay with the side down, ran my bead of glue, then carefully and precisely put the window in place,, then from the inside of the plane I set a glass from the cabinet on the window to hold it, when its dry 24hrs. flip it over and do the other side (you can glue the window in the door off the plane if you like), I DID.

Now the front windshield is a different story
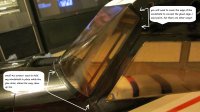
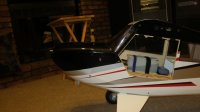
It will take a plan to get it installed, it sits on top of the cowl area, the curve matches fine, then it lays against the front of the cockpit and wraps around the sides, and glues to that,, I didn't like the idea of just trusting tape to hold all that in place so I broke direction a little bit..
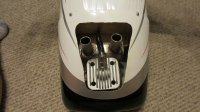
so first I laid the windshield where it goes, taped it in place and put some small screws in where it sits on the cowl area, and then some small screws on the side where it sits against the fuse. Then I removed the screws layed my bead of glue all around the edge, installed the windshield in place then put the screws back in, and taped all the edges I could while cleaning up all the glue that came out, and keeping it clean before taping, the screws really payed off, This helped me do two things, make sure that I put the windshield where it goes, and hold the thing in place while it dries.. You can use tape, you may be better at it than me, this is the way I did it.
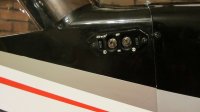
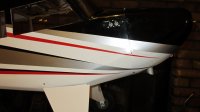
once the windshield is installed and dried, clean it all up and deal with the edges, you will see the glue on the inside where it stuck,, You can go to your local auto parts store and get some black pinstriping tape in the width you need and use that.. Personally I painted my edges with gloss black spray paint. That included the screws I used to mount the windshield,, I am happy with the way it turned out.
 

Attachments

  • IMG_3241.jpg
    IMG_3241.jpg
    400.1 KB · Views: 317
  • IMG_3249.jpg
    IMG_3249.jpg
    408.9 KB · Views: 328
  • IMG_3250.jpg
    IMG_3250.jpg
    364.4 KB · Views: 324
Last edited by a moderator:
I got my switch installed in where I want it and really like the way it looks, got all my wiring done, and secured, ONCE AGAIN A TIP THAT AN OLD MAN TOLD ME ABOUT,, when you have some wires running somewhere that you want to secure them but don't really have a good way to do it, what you can do is wrap some electrical tape around those wires, then put some thick CA on the tape, and push it against where you want It to stay. Once it sets it aint moving. and if you need to remove it, a quick tug will pull it loose and wont tear the wood up, unless its REALLY THIN.
 

Attachments

  • IMG_3231.jpg
    IMG_3231.jpg
    386.8 KB · Views: 298
Cowl

I cant really tell you how to mount your cowl because it all depends on what you have under it,, I have the dle-35 under mine so here is what I did. First I put the cowl on the plane with my muffler removed, then pushed it on as far as I could, got a look at what was touching, then with some measuring, eyeballing, and guessing started my cuts, to clear the head of the engine, then put the cowl where it was going to be. Doing the best I could to center the output shaft of the engine, and keep the clearance between the prop and cowl at a reasonable distance, AND keeping the lines as close to possible from the cowl to the fuse, once happy with the placement, I taped it into place and drilled for screws, 2 on top and bottom and 2 on each side, I then installed the screws, and had a good look at the fit,, the lines did not line up perfect but they were pretty close and that's good enough for me,, I have had a lot worse. I then removed the cowl, and re-installed the muffler on the engine. I did some measuring and figured out how far back I had to cut to clear everything, I decided to make a big opening,, WHY?? well because I live here in Texas and the two things we have that always get hot are our women,, and our weather. I wanted to be sure that I got enough air across the engine to keep it cool and give it a way out.. I then put thin CA in the holes for the screws, put nylon washers on the screws and installed the cowl. Once done, the black bolts on the cowl got a coat of black paint to help blend.

What I do not like is that the wood my cowl screws go into is very thin, and I am not happy with the two on top, I wish there was more wood. Knowing what I know now,, I would have epoxied some small hardwood blocks on the firewall, and put my screws into those.. But I am committed to this way, so that's my direction at least for now..hopefully it will hold up.
I then installed my prop (I balanced it before install) and then my spinner.
 

Attachments

  • IMG_3232.jpg
    IMG_3232.jpg
    367.7 KB · Views: 332
  • IMG_3234.jpg
    IMG_3234.jpg
    385.7 KB · Views: 301
  • IMG_3254.jpg
    IMG_3254.jpg
    393.5 KB · Views: 315
  • IMG_3248.jpg
    IMG_3248.jpg
    404.1 KB · Views: 307
Last edited by a moderator:
Top