• If you are new to GiantScaleNews.com, please register, introduce yourself, and make yourself at home.

    We're 1st in Giant Scale RC because we've got the best membership on the internet! Take a look around and don't forget to register to get all of the benefits of GSN membership!

    Welcome!
  • Unless you are a paid advertiser NO more posting advertisement in the individual vendor forums. You may post in the Manufacturer's Announcements section only but only ONCE a month unless your a paid advertiser.

My 3DHS BIGFOOT build

Finishing UP,,,
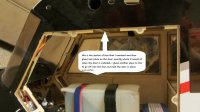
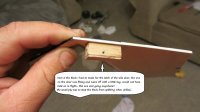
The door is held on with some magnets, a latch on the side and two CA hinges on top. I decided I want to be able to remove my door completely, Not be limited by the hinges, So I have to find a way to secure the top of the door to take place of the CA hinges. What I did was I trimmed a piece of the fuse where the door sits against on the top off,, then I layed out where it goes on the door, then I glued it on the door, I then test fit the door to be sure the piece I removed and glued on the door was still all in place and allowed the door to close, Once I did that, I removed the door again, and glued a piece of light ply to the piece I had glued on the door, only this one sticks up further, going into the fuse a little over 1/8 inch, then it hits a former above it. So to install the door, I slide the tab I made up into the slot, put the door in place, and install the latch, and its in place...
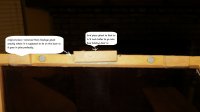
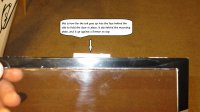
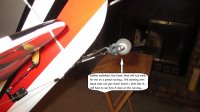
The latch is a nice piece, however I noticed that the piece it went into on the door had a lot of movement, and I didn't trust it, a quick light tug, and it came off,, just as I suspected.. I cut a piece of hardwood square stock, lined it up and glued it in place, then put the door on, I then slid the latch back, and let go, the spring will shoot the pin outwards, causing an indentation in the wood block I just installed. I then drew a line on the outside of the door so I could duplicate the angle the latch goes into the block. I removed the door, and drilled the correct size hole at the correct angle for the latch, I reinstalled the door and tested fit, Perfect, tested latch alignment, Perfect, Now the door is secure and can be removed completely.

I am a member of a great club here in Waco Texas,, HOTMAC and we have a 800' paved runway,, so these little foam tires that came with this plane are not going to work,, I removed the rear tailwheel and installed a dubro hard rubber tailwheel, drilled the holes out so I could use a bolt and a nut instead of the retaining pin they use with e-clips. Then I installed a set of dubro 4.5 lightweight wheels on the mains,, the supplied 3" wheels look too small.. I wanted to use the dubro 6" inflatables on this plane as I believe they would look fantastic, but I read that they are about 12 oz each and that's just too much weight for me for wheels.. The 4.5 wheels look good on this plane.
TOTAL COST OF PLANE!!!
I WILL NOT INCLUDE THE EQUALIZER I USED TO REVERSE THE FLAP SERVO, BECUASE I HAD IT ALREADY, AND THERE ARE A COUPLE OF WAYS AROUND IT THIS IS JUST THE ROUTE I CHOSE.

plane 540
engine 270
servos 493
kill switch 20
receiver 130
prop 26
spinner/switch 50
ign. battery 30
Life battery 65
4.5 main wheels 20
tail wheel 5
$1649

WHATS LEFT???? MY NEXT POST WILL BE OF THE PLANE COMPLETELY ASSEMBLED ON THE FLIGHT LINE,IN FLIGHT READY CONDITON, I WILL ALSO POST A VIDEO OF THE FLIGHT, HOWEVER I AM MARRIED TO THE CAMERA WOMAN AND KNOW ALREADY THAT THE VIDEO WILL NOT BE HOLLYWOOD QUALITY, MAY MAIDEN IT TOMORROW OR THURS WEATHER AND TIME ALLOWING,,TILL THEN
 

Attachments

  • 1.jpg
    1.jpg
    404.5 KB · Views: 356
  • 2.jpg
    2.jpg
    283.3 KB · Views: 386
  • 3.jpg
    3.jpg
    405.6 KB · Views: 351
  • 4.jpg
    4.jpg
    395.2 KB · Views: 349
  • IMG_3233.jpg
    IMG_3233.jpg
    390.8 KB · Views: 369
  • IMG_3237.jpg
    IMG_3237.jpg
    391.2 KB · Views: 357
Last edited by a moderator:

gyro

GSN Contributor
Simply awesome Ronnie, thanks so much for sharing all this. I feel like I was building it with you. Can't wait to see the final photos and video
 

Murocflyer

70cc twin V2
I'll say. This is one of the finest build threads I have ever seen and I have seen a lot and have done many myself.

Very nicely done! You need some kind of award for your efforts here.

Frank
 

gyro

GSN Contributor
I'll say. This is one of the finest build threads I have ever seen and I have seen a lot and have done many myself.

Very nicely done! You need some kind of award for your efforts here.

Frank

Actually Frank, you'll notice that Ronnie has the Lumberjack award in his showcase now :) Thanks for nominating him!
 
Thanks for the award Gyro,, and Thanks guys,, If just 1 person learned 1 thing from this it was worth it,,,
I am working 7p-730a tonight, I have the bigfoot in the truck, and when I get off in the morning my wife is meeting me at the field,, so I will get some video and then post it up asap,, just hold tight
 
Flew it today!!!!

Ok, as soon as I can figure out how to get my camcorder to connect with my computer,,,my wife did some recording, it was about 98% humidity I swear and just plumb rotten,, typical Texas morning, wife complaining about sweat in her eyes, fighting the camera etc,,

HOW DID IT GO???
It went well, I set the CG up on the mark that 3dhs recommends,, ON that mark the plane is definately NOSE Heavy, I took off and had to add elevator trim got it leveled out and then added 1 click of aileron and she was flying straight, took it around a couple times, seeing how my triple rates responded,, I can tell this, On high rates this plane rolls alot faster than I expected, I did a couple rolls, and a loop all good, leveled it out and then hit the first stage flaps,, plane ballooned up real fast,, I leveled it out and on a straight pass I scrolled thru my tx and added elevator in it took about three times and I had it flattened out with the flaps,, then I hit full flap,, same thing ballooned up pretty hard,, added some elevator until it leveled out at just above idle,,, give it some throttle and it climbs like a rocket.
Time to land it and give it a full check,, took my downwind pass 1st attempt going with NO FLAPS,, Lined it up and started cutting throttle,, I will tell you this,, it does not float,, it comes down pretty fast, landing it with no flaps it comes in pretty hot, settled it in on the mains, chopped throttle and let it slow, keeping on the elevator a little bit, because it acts like it wants to nose over,,,

I put it back on the stand, and did a full check, all linkages and connections on control surfaces. I took my ignition battery out and put it in the back, On top of the flight pack to try and bring the CG aft. put it all back together and refueled..

THE DLE35-RA is a powerhouse for this plane,, climbed up and leveled out,,put it in about a 45degree climb put it inverted to check CG,, It nosed down a little, still just a little nose heavy but much better, leveled it out inverted, same thing nose coming down some, I will play with the CG a little more

--gonna take off using full flaps STOL line it up in the center of the runway NO wind,, come to a stop, hit full flaps, bump the throttle trim up about 3 clicks dont want to risk a stall,,, plane still sitting still flaps full down, engine sounds good,, ITS GO TIME,, HIT WOT plane rolls about 3/4 of a fuselage length and tires come off runway, nose comes up and in about 2 seconds the plane is in a full vertical climb, I know the flaps are causing this angle, I flip the flaps off, and keep it in a full vertical climb, I keep pulling straight up (LOVIN THE DLE POWER NOW) get up about 40 feet or so go to half throttle and push down elevator,, nose comes down plane levels out, and I goose it again, pulls straight and level,, I hear the guys behind me now,, they loved it,, ME TOO,, thats the way to take off,, It would have been even better if there was a little wind,

NOW ITS TIME TO PLAY,,
I took it up high and pulled some tumbles, lomcevaks, snap rolls, continuos rolls and tight loops, I was really impressed with how this plane does these, it does them alot quicker than I expected, it really performs alot like an aerobatic plane, not used to seeing a plane that looks like a cub do these manuevers and do them so quickly,, I like it,,
- took it back up high, straight vertical bled speed off to a stall pushed full down elevator and right rudder, plane flipped over and with a little throttle did a very good inverted flat spin, had to add aileron and a little throttle to keep it flat but it looked good, pulled it out and all was well,, It takes a little more time to recover than an aerobatic plane so give it some room.
- took it back up to do a flat spin,, it will do one but the nose stays down even with full up elevator,, throttle helps settle it out a little and slow the spin,, looked pretty good though..
- took it up about three mistakes high, level flight slowed down and tried to do a wall,, didnt want to do it, kinda rocked and didnt stand straight up more of a curve, once the nose was straight up, I added throttle and locked it in a hover, it held it fine, I was at about 75% throttle, holding my spot, did a little torque roll, its kinda slow on that but does it, full throttle and came out of it, leveled out,, Plane hovers fine, and looks good doing it too
-went to the end of the field climbed and did a hammerhead, had to add a little aileron but it looked good, leveled out and picked up some speed, rolled left and added rudder for a knife edge pass,, THE PLANE DEFINATELY NEEDS SOME MIXING WITH THE ELEVATOR,, but I got it pretty decent, a little time and some mixing and I will have it,, No doubt that it will knife edge well,,, I was really surprised at the rudder input needed for knife edge, Not nearly as much as I thought it would need,, My earlier fears about this plane not having enough rudder were immediately dismissed, has plenty of rudder in the air.
-took it up about 3 mistakes high chopped throttle and added full flaps,, plane flies incredibly slow,, looks like its hanging there, controls were still responsive I was flying just off Idle with quick blips to keep it there,, when I get more comfortable I will do this lower but for now if I stall it I want to be able to recover.
-Ok ROLLING CIRCLES,,,,sorry guys I didnt do any simply because I cant do them, still trying to learn them on the simulator..
- landing, this time I am going to land on 1st stage flaps,,, downwind pass, hit the flaps, slowing down, make my turn line up with the runway, the flaps pull the plane down pretty quick, nose down descending quick, add some elevator level it out still going a little fast, settle it on the mains and it rolls,, NOW IT DEFINATELY WANTS TO NOSE OVER,, I kill the flaps give it some more throttle and take off again, want to practice landing again, same thing, line up again, make my turn 1st stage flaps, slowing down plane coming down nose first trying to keep it level, slower slower, mains touch, let off the throttle, plane rolls a little and then noses over, I add elevator too late, prop hits runway and breaks off a tip, dammit. end of day
Happy with the way the plane flies, I dont like the way it behaves on landing,, I was hoping for a plane that would float in, so my wife could land herself,, but at this point I am not too sure about that,, a little more time and I will have a better opinion. I have no doubt that on low rates my wife will be able to take off and fly this plane, and feel comfortable,

GRIPES!!!
1. The plane was outside for about 1.5 hour,, during that time the covering wrinkled up like a 90 year old woman,, everywhere from rudder to cowl, ailerons,,everything,, little time with a heat gun and hopefully it will all come out

2. the tailwheel assembly Sucks,, it does not have a good turnign radius at all,, I will look into a different setup for that,

Thats if for today fellas,, I will post the video she shot when I get it converted
 
Last edited by a moderator:

gyro

GSN Contributor
Excellent write up! Very descriptive, and trust me when I say it was hot and humid 150mi south down here in SA... I was flying and sweating today too!

Congrats on the successful maiden, and again, thanks for letting us share in the experience with you.

G
 

joshgluck

100cc
OK,, now I am kinda mad,, I had a few minutes to work on it and decided I was going to epoxy the control horns in the rudder and elevator. the process is pretty simple, they have two slots cut into the surface, You remove the covering, slide the two horns into the retaining plate, put the ball end link in,with the screw and nut, tighten it, then put epoxy into the two slots, and epoxy on the control horns and plate, and push it into place. Simple right?? Well it was for the rudder, however the elevator was another story, why??? Well it started with me only being able to locate 1 of the two slots,,WHY?? because when they put it together apparantly they got Epoxy in one of those slots. this created a problem, How to get dried epoxy out of a slot, with not much room on either side,, first I tried a small bit and a dremel,, NO good TOO close to the sides of the slot. Then I heated up a real small pick, and was able to burn out most of the epoxy but not all, and not enough to get the HORNS all the way in the slot, I ended up picking and trying and trying and trying, EVENTUALLY what happened was the little bit of wood between the slots ended up breaking loose, so now there is not much support there. I got all of the epoxy out, sanded the control horns and plate, then filled the hole with epoxy, and brushed epoxy on the horns and plate, pushed it all in, and wiped all the excess off. It is in I am not sure about the strength yet, I Am still letting it dry, I am pretty sure that it is going to be plenty strong, but If I have any doubt what I will have to do is drill thru the plate, thru the epoxy, and on the other side of the elevator put a backer, then put a nut and bolt to be sure that the horn stays put,, I DOUBT I will have to do this, but I wont know for sure till everything dries,,the rudder horns were a piece of cake,, I hope that the ailerons and flaps dont have this issue.
I think this problem is COMPLETE BS,,, its not the kind of thing I would expect from such a high dollar ARF,, I understand people are people and mistakes happen, it just makes me angry to have something like that happen on such a critical control surface, to me the elevator is the absolute most important surface on a plane, without it INSTANT DESTRUCTION. And as you are probably learning I am a very picky man when it comes to my planes I want things a certain way!!

Dude - pretty sure the epoxy in the elevator slot is from putting the joiner in there. This happens to most people and is a good reason to put the horns in first. Was this on the half that came pre-joined or the one you joined?

Good write-up so far! I'm still going through it.

Thanks!
Josh
 
Top