• If you are new to GiantScaleNews.com, please register, introduce yourself, and make yourself at home.

    We're 1st in Giant Scale RC because we've got the best membership on the internet! Take a look around and don't forget to register to get all of the benefits of GSN membership!

    Welcome!

Scale Balsa USA 1/3 Scale Super Cub Kit " NIB "

fencelake

70cc twin V2
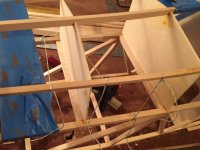
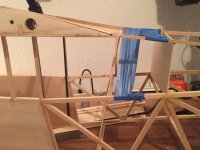
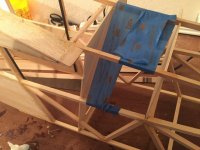
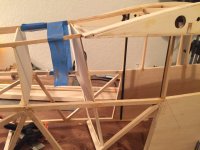
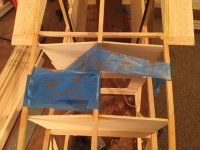
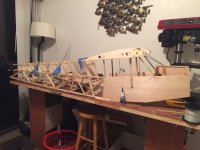
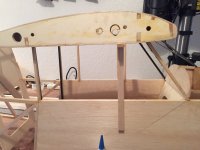
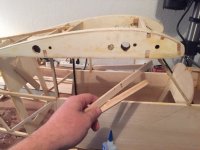
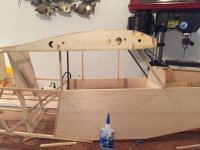
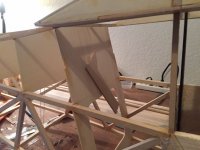
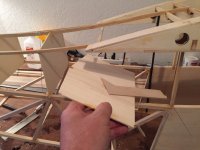
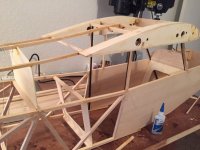
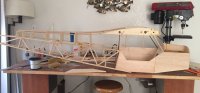
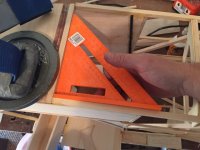
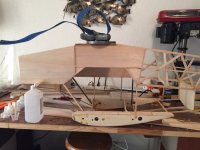
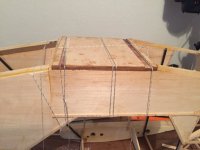
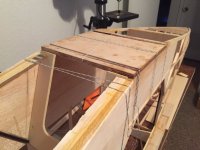
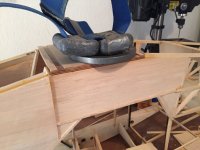
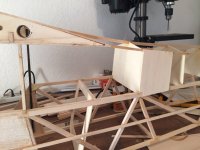
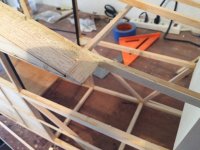
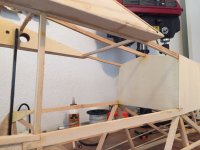
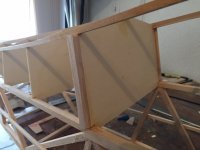
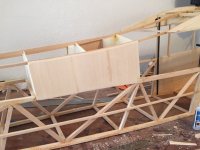
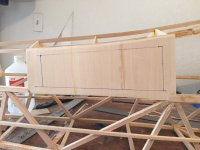
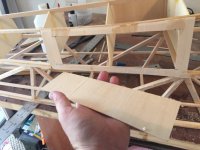
The next step was to add the stringers to the aft section of the fuselage. A couple of things about this: First, for my particular modifications the side stringers connection to the rear of the cabin top was very important because the former F4 will be removed. So I was pretty careful with this. Second, the installation of the stringers was a little more tedious than I thought it would be because of the bends, so I actually glued certain sections in stages and then shaped it as it dried. I started with tape but instead, I had some dacron line (leftover from renewing my hi-start) which I used to secure pieces in place, and this works great! You can tie it off tight, it doesn't stretch or come undone, and when the pieces dry, simply cut it away.
 

Attachments

  • dacron 2.jpg
    dacron 2.jpg
    85.4 KB · Views: 355
  • LFT Stringer at Rear Win.jpg
    LFT Stringer at Rear Win.jpg
    85.1 KB · Views: 327
  • LFT stringer.jpg
    LFT stringer.jpg
    84.8 KB · Views: 340
  • RT rear window stringer.jpg
    RT rear window stringer.jpg
    87.8 KB · Views: 363
  • stringer joint at wings.jpg
    stringer joint at wings.jpg
    86.9 KB · Views: 336
  • entire fuselage.jpg
    entire fuselage.jpg
    81.8 KB · Views: 384

fencelake

70cc twin V2
Time to remove the crutch from the cabin top! It's starting to come together!
 

Attachments

  • Crutch Removal 1.jpg
    Crutch Removal 1.jpg
    79 KB · Views: 336
  • Crutch Removal 2.jpg
    Crutch Removal 2.jpg
    75 KB · Views: 330
  • Crutch Removal 3.jpg
    Crutch Removal 3.jpg
    82.4 KB · Views: 319

fencelake

70cc twin V2
Also, it's time to remove the top half of former F4 to begin to create the aft cabin and the L-21 style windows.
 

Attachments

  • F4 Removal 1.jpg
    F4 Removal 1.jpg
    79.4 KB · Views: 322
  • F4 Removal 2.jpg
    F4 Removal 2.jpg
    80.6 KB · Views: 327
  • F4 Removal 3.jpg
    F4 Removal 3.jpg
    87.7 KB · Views: 330

fencelake

70cc twin V2
As with what to do with the bottom half of former F4, well... I'm still deciding what to do for scale purposes. I may leave it, or cut away certain parts of it... Stay tuned!!
 

fencelake

70cc twin V2
Here's a shot of the fuselage without all the tape and dacron line. I also added the sheeting in front. I went ahead and removed the door because I'm going to use it as a template to build an all glass bottom door. It will be framed up the same way as the top.
 

Attachments

  • 01db85eb656ad40a07730b6f5dd61a4ce93ae41852.jpg
    01db85eb656ad40a07730b6f5dd61a4ce93ae41852.jpg
    83.6 KB · Views: 312

fencelake

70cc twin V2
I added the fairing strips. A little bit of studying the instructions and the plans had to be done for this. It seems like a really simple step, but the directions are a little vague, for example: It says to add 1/16" x 1/4" fairing strips to the bottom longeron, then it says to add 1/8" x 1/4" fairing strips on top. In the photo a knife is pointed to the bottom longeron, and on the plans the arrow points to the bottom longeron... but I wasn't sure if it was referring to the top longeron... because there's a 1/8" x 1/4" strip up there. NEW RULE: When in doubt... do the same thing to both sides! haha!

The fun part of the fairing strips was getting to use my planer and sand down the ends to match on both sides. It was like carving a boat hull or something for a few minutes. It felt good.
 

fencelake

70cc twin V2
The next step was adding the landing gear mount. This step truly lets you know whether you built the fuselage true and square or not! When you lay that piece on you realize... "Oh man! I hope this is 90 degrees all the way around!" Fortunately, I was very, very close. I used my trusty dacron again while the 20 min epoxy set. I actually let it sit over night. I also added 15lbs of dive weights and a 5lb gym weight... and I was happy to see the supports holding everything upside down without a problem!
 

Attachments

  • 01f5c1469fec7184ebfe043a1254a5f1aa9e0383cb.jpg
    01f5c1469fec7184ebfe043a1254a5f1aa9e0383cb.jpg
    82.3 KB · Views: 349
  • 016f97bc744402f5da2dfa6ddd69aca0b7da0b4df9.jpg
    016f97bc744402f5da2dfa6ddd69aca0b7da0b4df9.jpg
    92.1 KB · Views: 313
  • 011c44e515a08b14eafb5bb9dedcf75c6d5e3060a3.jpg
    011c44e515a08b14eafb5bb9dedcf75c6d5e3060a3.jpg
    67.2 KB · Views: 310
  • 0114077e75da0655aae40a9e7e79456c1097081535.jpg
    0114077e75da0655aae40a9e7e79456c1097081535.jpg
    81.9 KB · Views: 327
  • 0140653302541a71aa3a968320d4a51150d85da485.jpg
    0140653302541a71aa3a968320d4a51150d85da485.jpg
    83.6 KB · Views: 346

fencelake

70cc twin V2
So now, we've reached the point where this project goes off the rails a little bit and the customization begins. Since I'm putting in L-21 windows, I added some custom fairings while putting on the fairing strips, and I had to frame the windows. The other thing, on this particular plane there's a hatch behind the windows on the right side, I'm adding this hatch to access my power switches, etc. I had to add a little balsa material to make a solid connection at the former. I used 3/8" x 3/8" balsa and just sanded it down to fit.

So I added some light ply to begin this process. Here are some photos of adding the windows, and hatch.
 

Attachments

  • 01cf2cb022b72068f9a809f31d237b56683c669324.jpg
    01cf2cb022b72068f9a809f31d237b56683c669324.jpg
    89.9 KB · Views: 305
  • 018f327a4ea59bd22093d615d5185a7e5dc46a5226.jpg
    018f327a4ea59bd22093d615d5185a7e5dc46a5226.jpg
    79.8 KB · Views: 307
  • 01d1d5338bd9ea67509316a13ac491cc01e36effa0.jpg
    01d1d5338bd9ea67509316a13ac491cc01e36effa0.jpg
    81.5 KB · Views: 313
  • 01b9d3fa3cf8f48a6342b1297f067d5246a44c5bd4.jpg
    01b9d3fa3cf8f48a6342b1297f067d5246a44c5bd4.jpg
    60.1 KB · Views: 324
  • 01790ec66f7a1c308ebb5648e03d5f955f23ed1c61.jpg
    01790ec66f7a1c308ebb5648e03d5f955f23ed1c61.jpg
    91.8 KB · Views: 322
  • 01d1d5338bd9ea67509316a13ac491cc01e36effa0.jpg
    01d1d5338bd9ea67509316a13ac491cc01e36effa0.jpg
    81.5 KB · Views: 306
  • 0107c20de272d0ba9f68e7ed8d6829c7c459a5ec9c.jpg
    0107c20de272d0ba9f68e7ed8d6829c7c459a5ec9c.jpg
    80.3 KB · Views: 353
  • 0110761373f8826fd5e3718c19af347f2fc053de09.jpg
    0110761373f8826fd5e3718c19af347f2fc053de09.jpg
    85.9 KB · Views: 357
Top