• If you are new to GiantScaleNews.com, please register, introduce yourself, and make yourself at home.

    We're 1st in Giant Scale RC because we've got the best membership on the internet! Take a look around and don't forget to register to get all of the benefits of GSN membership!

    Welcome!
  • Unless you are a paid advertiser NO more posting advertisement in the individual vendor forums. You may post in the Manufacturer's Announcements section only but only ONCE a month unless your a paid advertiser.

Extreme Flight 60" Laser Build Thread

Ohio AV8TOR

Just Do It
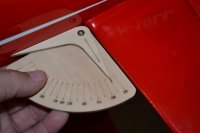
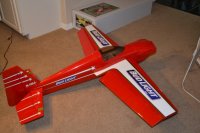
On to mounting and aligning the stab. The laser cutouts for the stab fit the stab very nice. I just had slight gaps at the leading edge which I filled with my baking soda method from my Edge build down a ways on the first post. [/URL]

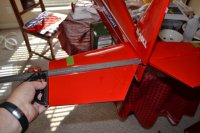
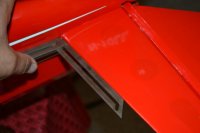
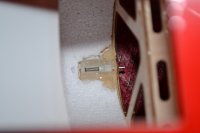
I am pretty anal about alignment and have used lots of methods. On this one I used a 24" rule on a Starrett sliding square to ensure equal spacing on the side to side. I mentioned the laser cutouts fitting good, well they are also very accurate. Sighting down the stab line I look to see a perfect alignment to the wing tube installed in the fuselage and it was. Then I like to measure for tilt alignment. You can use a 48" ruler if you like or even string if you like but on this I used a Starrett bevel gauge and it is a trail and error of pushing or pulling to tilt to where the angle is exact from the fuselage to the leading edge of the stab. After I got this matched I double checked with a 48" rule and it was right on. I know some won't have this bevel gauge but I double checked to see if you could use it with something simple like 3DHS provides for measuring incidence and it looks like it will work. This is a good tool to have and I searched and here is one cheep at Sears. So after going back and forth umpteen times to satisfy planetary alignment I CA'd it in place.
 

Attachments

  • DSC__0269.jpg
    DSC__0269.jpg
    100.4 KB · Views: 327
  • DSC__0266.jpg
    DSC__0266.jpg
    53 KB · Views: 300
  • DSC__0264.jpg
    DSC__0264.jpg
    58 KB · Views: 310

Ohio AV8TOR

Just Do It
Okay curiosity is getting the best of me now so I had to see how its going to look so on with the rest of the graphics. Stars and stripes yes starting to look like Leo's Laser.
 

Attachments

  • DSC__0271.jpg
    DSC__0271.jpg
    97.1 KB · Views: 311
  • DSC__0272.jpg
    DSC__0272.jpg
    108 KB · Views: 297

Ohio AV8TOR

Just Do It
Been a report of the hatch latch coming off in flight so I thought I would add some extra glue to it. I flipped it over on the table and you can look through the cooling hole cutout. Move the latch back ad fort and familiarize your self with areas that need to be free of glue. Seeing that this switch is nylon I chose to use Welders adhesive which as you can see attacks the foam. What ever the factory uses also attacks the foam because some of the foam melt was already there.
 

Attachments

  • DSC__0274.JPG
    DSC__0274.JPG
    373.8 KB · Views: 302

Ohio AV8TOR

Just Do It
I am going to have to update this slide at the end of the month when I install the September 85A ZTW Gecko ESC but in the meantime I have mounted my B-Series ZTW ESC. I tried both the bottom (which is where the manual show it) and the side of the motor box and for now at least I will leave it on the bottom because the mounting points are much more solid. What draws me to the side is the massive inlet scoops on the cowl and I do fly in Texas with many consecutive 100º+ days. Any way the Laser is real easy to mount your ESC so feel free to experiment.
 

Attachments

  • DSC__0275.jpg
    DSC__0275.jpg
    88.6 KB · Views: 282

Ohio AV8TOR

Just Do It
For those flying Futaba here is my receiver setup with nice location option to glue in some small plastic antenna tubes to route and secure your rx antenna's at nice 90º positions. If you have not used these tubes they are at your LHS for a dollar for 36". I think it is polypropylene which does not glue well but Welders glues it just fine. A lot of room in this fuse so it should not be a problem to make your aileron connections
 

Attachments

  • DSC_0001_009.JPG
    DSC_0001_009.JPG
    156.4 KB · Views: 294
  • DSC_0002_008.JPG
    DSC_0002_008.JPG
    140.5 KB · Views: 317
That's what I like about long antennas, it's easier to keep them oriented perfectly once you spend a few minutes properly locating them. Thanks for the info on the antenna tubes. I used coffee stirrers, not knowing any better.
 

Fast3D

50cc
I just double checked and on the MXS the short horn goes in the elevator. So im gonna guess that's where it goes on the Laser also.

I wondered about that but I did check mine and all 4 were the same. This is something that got be once and I always make it a point to look at them now. Thanks for adding the picture as it for sure will help others.

Yes, you are right. The small one goes to the elevator. Thanks.
 

Fast3D

50cc
I am using Edge Lite 100 and BEC with the Torque MKII motor. I will be using 6s likely 4000 mah. I was wondering if anyone has used Dean connectors for this setting. Is it safe to use the deans for 6s? or should I use EC5?
 
Top