• If you are new to GiantScaleNews.com, please register, introduce yourself, and make yourself at home.

    We're 1st in Giant Scale RC because we've got the best membership on the internet! Take a look around and don't forget to register to get all of the benefits of GSN membership!

    Welcome!

30cc profile from the ashes of a 70" RIP AJ Slick - Build Log

3dNater

3DRCF Regional Ambassador
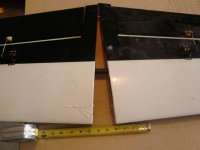
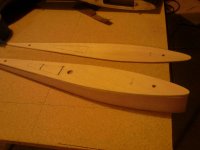
ugh... struggling with the wing extensions... I found that freehand sanding is not a real easy way to figure it out so I ended up making some new ones that I cut the angle on with the scroll saw. I'm not happy with the way they turn out on the hot wire... I think I'm going to make another set and use the scroll saw for everything. The hot wire is a really cool and romantic way to cut foam... but I have decided it is not a precision instrument... at all. The good news is I have the right angle. The two wings fit on the wing tube without any gaps. I have enough foam left to do about a bazillion of these so I'm sure I'll get it right... sometime.

On the current iteration the wingspan would be about 68 1/4" I think I'll make them a tad thicker and come in right around... 70" :D
 

3dNater

3DRCF Regional Ambassador
Finally after making my third set (learned a lot on the first two :p) I'm ready to sand. Word to the wise... hot wires are great for quick cutting and making wing chords etc... but really hard to use for any kind pr cut that requires precision.

The steps required to make these is to put the wings on the wing tube and bring the wings together until the long part of the wing chords are together. You might need a broken wing tube like mine ;).

Next measure the gap at the tip of the other end of the chord. In this case it was 2.5". Divide that distance in half. The angle is from zero to 1.25" over the length of the chord. I added a half inch to each end to give a tad more wingspan as well as giving the extensions a little more substance. Use a scroll or band saw to make your cuts... no hot wires ;)
 

Attachments

  • uploadfromtaptalk1381286036600.jpg
    uploadfromtaptalk1381286036600.jpg
    45.6 KB · Views: 417
  • uploadfromtaptalk1381286063211.jpg
    uploadfromtaptalk1381286063211.jpg
    57.2 KB · Views: 403

3dNater

3DRCF Regional Ambassador
Thanks... my only regret is not being able to get it maidened before I start having to travel out of town for work. I'm already starting to need to put in extra hours to get rdy to leave on Sunday afternoon. I can see a Saturday in the office coming my way.
 

3dNater

3DRCF Regional Ambassador
Always a good day when I can get a 1/8 x 12 x 24" sheet of birch ply for $4.77 when tower wants what tower wants. I recommend trying your local Michaels or whatever craft store is close by when shopping for wood.
 

3dNater

3DRCF Regional Ambassador
I spent another short evening on the build tonight. I got the foam wing extensions sanded so they are ready to accept covering. I also got the 1/8 ply end caps cut out and got one of them sanded to perfectly match the original wing root. I ended up bolting it onto the wing with the wing bolt so the anti rotation pins were holding the ply in position. The finished product turned out really well.

I also made some ply pieces to mount the rudder and elevator servos to.
 

3dNater

3DRCF Regional Ambassador
Here are pics from tonight. Tapatalk doesn't seem to let me post pictures when editing a previous post.
 

Attachments

  • uploadfromtaptalk1381383214913.jpg
    uploadfromtaptalk1381383214913.jpg
    34.5 KB · Views: 425
  • uploadfromtaptalk1381383232794.jpg
    uploadfromtaptalk1381383232794.jpg
    87.6 KB · Views: 397
  • uploadfromtaptalk1381383249197.jpg
    uploadfromtaptalk1381383249197.jpg
    49 KB · Views: 377
  • uploadfromtaptalk1381383258370.jpg
    uploadfromtaptalk1381383258370.jpg
    58 KB · Views: 410
  • uploadfromtaptalk1381383271236.jpg
    uploadfromtaptalk1381383271236.jpg
    62.2 KB · Views: 388
  • uploadfromtaptalk1381383281030.jpg
    uploadfromtaptalk1381383281030.jpg
    31.6 KB · Views: 378
Top