• If you are new to GiantScaleNews.com, please register, introduce yourself, and make yourself at home.

    We're 1st in Giant Scale RC because we've got the best membership on the internet! Take a look around and don't forget to register to get all of the benefits of GSN membership!

    Welcome!

Scale Plans built P-51

Red Raider

70cc twin V2
I hope so. I've never done this before, so I'm just kinda going through and talking about what I'm doing. I wouldn't have even considered doing it on RCU or even RCGroups. Too many hateful, critical people. So far, I love this site and truly enjoy the conversations that I'm having with my new GSN friends. :)
 

Red Raider

70cc twin V2
If the curves are compound, the only way I know to get the desired shape is by planking.

I've found an example of a P-51B fuselage at the link below:
http://www.rcscalebuilder.com/forum/forum_posts.asp?TID=18459&PN=1
I think you're right. All of the top and bottom of the nose of this plane are planked. Only the side pieces "bent".
BTW - I said I had made a mess out of the bottom rear part of the fuse trying to cut and bend those pieces to shape. Lat night I went back and soaked them for several minutes (30), molded them into place and glued them with thin CA. When I checked them this morning it seems to have worked pretty well.
 

Red Raider

70cc twin V2
My DLE 85 is on the big brown airplane truck for delivery today!! Sometime tonight, I'll unbox it and share that with all of you. Also, I'm going to replace the stock ring with a Bowman. I'll take a couple of pics while I'm doing that just in case anybody is interested.
Sub'd
I do love those warbirds. And you'll find this place much friendlier than others. There are a lot of great builders and great advice.

You can make some pretty curvy shapes with planking. Check out my build thread, the fuse is all planked and full of curves. The pictures start on page 4 since the original pics were lost during an update.
http://giantscalenews.com/threads/50cc-scratch-build-from-my-own-design-revisited.1089/
View attachment 9401
That is some beautiful work! I wish mine would look that good. I have to plank the nose, the chin cowl, and the top of the fuselage behind the canopy. My problem is that the side of my brain that regulates artistic ability is dormant. My grandfather was a carpenter and one of the many occasions that he was trying to teach me some of his trade secrets he remarked that I was the only guy he knew that could cut a half moon with a circular saw. That just about tells the tale.
 

Red Raider

70cc twin V2
Oh stink!! I came home and instead of a DLE 85 on the porch there was only a door tag saying I had to be there to sign for it. Signed the tag and hung it back out. Better luck tomorrow.
 

Red Raider

70cc twin V2
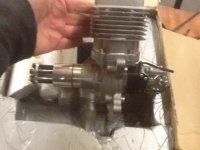
I'm excited now! My engine arrived today and I'm impressed. Monster of an engine. Not many bigger single cylinder power plants like this even made. Like I said in one of the earlier posts, the first thing I do with a new gas engine is to order a Bowman ring for it. This one is no different. The ring came in earlier this week and I just finished installing it. I'm going to post 2-3 pictures and explain a little about what I did just in case anyone is interested.
 

Red Raider

70cc twin V2
image.jpg image.jpg image.jpg
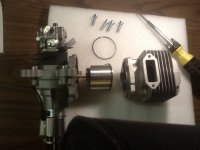
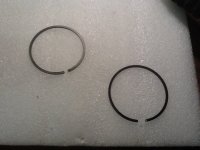
The first pic is me pulling the engine out of the box for the first time. I've been told that I have huge hands (I can palm a basketball) if that gives you a perspective on the size. The second picture shows the insides after I removed the 4 cylinder head bolts. That was no easy trick as the bolts were really snug. Picture #3 is a comparison of the Bowman ring and the stock ring from DLE. The one in the bottom of the picture is the stock ring. The first thing I noticed was the diameter of the rings. The Bowman is smaller. You can see that the gap is significantly smaller. If you look closely at pic #2 you can see the ring protruding out of the piston groove. It was quite easy to remove it. It took very little pressure to get it slip right off.
 
Last edited:

Red Raider

70cc twin V2
Here's what I do. The caveat to this is just that, it's the way I do it. If any of you have input or suggestions or want to correct my procedure, please do so. We're all in this to learn and to enjoy this great sport.
After removing the spark plug and the cylinder head bolts, the cylinder should slide off easily. As the ring groove gets close the bottom edge of the cylinder wall, be careful and keep it straight. Wiggling it back and forth could scar the piston or cylinder wall, twisting it is ok if necessary. If it's an engine with quite a bit of run time, or has been sitting for awhile, reinsert the piston and use a good quantity of light machine oil to ease the process. I've got a can of Singer Sewing Machine oil that I use just for this purpose.

After you have it apart, take the ring out of the piston groove. Unless I want to keep the ring (I'm keeping this one just in case I need it in the future and because it's brand new), I don't care if it breaks, so I'm not particularly careful about taking it out. In this case, it was so much bigger than the piston diameter, it was easy to save.

Putting the new ring in is a matter of patience and paying attention. I've never broken one putting it in, but others I know have not been so lucky. The first thing I do is take my oil and fill the ring groove, making sure to get lots on the edge of the piston between the ring groove and the top. Then I pour oil all over the ring. You can clean up your mess later. I always check for the pin location and make sure I have ring right side up. You can tell by looking at the position of the pin and the relief points cut in the ring. The surest way to break a ring is to put it in upside down then have to take it off to turn it around. I start at the pin an insert one end into the groove. I apply a little pressure to the opposite end to force the ring open ever so slightly as I work it around. Keep the ring as parallel to the ring groove as you can while working it into the groove. When you get about half way around, it should just kinda snap into place. DONE, well not quite. You have to put engine back together.

Here's another opportunity to break the ring; inserting the piston back into the cylinder. Take your oil put a generous amount on the cylinder wall (all the way around), do the same for the piston. Squeezing the ring with 2 fingers, slide the piston in and the ring should follow. I never used anything harder than my fingernail to compress the ring and have always had good success with very little effort. The last thing is to use high temp thread locker on the cylinder bolts. Reinstall them like you would lug nuts on a car wheel. I usually use about 5 different steps in tightening the bolts. The first is barely seated, then go to the opposite bolt and again just barely touching the flange. Each time around the head is a little tighter until the last time when I really give it what for! A torque wrench is probably a good idea, but I don't have one of the appropriate size. And there you have it - my way of changing a piston ring.
 
Last edited:

ChickenBalls

"Cool Guy"
Red are you going to bench run the engine or just using for mock up right now? I need 85cc - 100cc engine, and this DLE is on the short list.
 
Top