• If you are new to GiantScaleNews.com, please register, introduce yourself, and make yourself at home.

    We're 1st in Giant Scale RC because we've got the best membership on the internet! Take a look around and don't forget to register to get all of the benefits of GSN membership!

    Welcome!

3D Fibertech Hyperlite Slick 540 Build Thread

Bipenut

70cc twin V2
Not a lot to show right now, I'm still waiting on the rest of my balsa which will be here tomorrow then I can get the fuse done. I got the wing and stab tubes in the mail and just started to do some measuring to get them ready to install.
 

Attachments

  • image.jpg
    image.jpg
    44.9 KB · Views: 330
  • image.jpg
    image.jpg
    38.1 KB · Views: 317
The fuselage looks great. I know you are waiting on balsa and it will be great when it comes in tomorrow. I am working on the Branline Laser 200 and as you know the fuselage was already framed up and all I did today was undo about all that was built by someone else. I am pleased with what I got accomplished today. The firewall was installed with no right side thrust and the plans call for 2.5 degrees of right thrust so I need to measure the DLE 120 and cut the firewall apart and get the correct right thrust installed another do over. I thought when I purchased the fuse all framed up it would save me a lot of work but I may as well have built the Strickland Laser 200 they are almost identical and both utilize the same cowl and landing gear. The Strickland Laser fuselage is built similar to your Fibertech Hyperlite with stick construction.

Keep filling us in about the build and we all love the pictures she is looking great. I would love to have one or the Viper either one would be great but I have three more planes to build in house besides this Branline Laser. I guess it is wonderful to be blessed with three more giant planes to build!
 

Bipenut

70cc twin V2
Made some progress today. This morning I went a picked up my Viper kit. :woohoo!: 
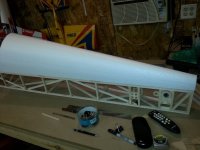
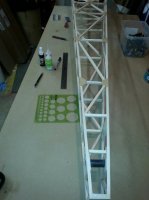
It is next after this one.

I have the wing and stab tubes epoxied in place and then I cut them flush with a razor saw. Then I started finishing up installing the 3/8" triangle stock, the other diagonals and the W-bracing that goes on the inside of the fuse. Then I started gluing on the 1/64" plywood gussets. I should have the fuse done tomorrow the. I can get started on sheeting the foam.
 

Attachments

  • image.jpg
    image.jpg
    45.7 KB · Views: 299
  • image.jpg
    image.jpg
    51.9 KB · Views: 294
  • image.jpg
    image.jpg
    41.9 KB · Views: 288
  • image.jpg
    image.jpg
    45.8 KB · Views: 334
  • image.jpg
    image.jpg
    93.2 KB · Views: 356
  • image.jpg
    image.jpg
    50.9 KB · Views: 286
  • image.jpg
    image.jpg
    41.4 KB · Views: 322

Terryscustom

640cc Uber Pimp
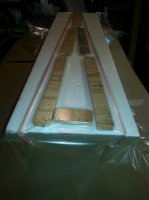
Very nice! Where did you buy' your wing tubes / phenolics? I've not been able to locate carbon phenolics before.
 
The build is moving right along and the fuse looks great, keep up the great work. I hope the wood shows up tomorrow, I got the Holman rings today for the DLE 120 and I have them installed and the engine mounted. The engine fits nicely inside the cowl but a snug fit.

I am working on my 38 % Laser 200 did a lot of thinking and measuring today with the cowl and I believe I have a method now to mount it that suits me. You and discussed the cowl mounting yesterday when you were at my home, in the plane cave, LOL.
 

Bipenut

70cc twin V2
The fuse is almost done, I just have a few little things to finish up on it. I put the front hatch on it today and and pulled out the turtle deck, starting to look like a plane now. I will say that the turtle deck is huge!

The turtle deck had a high spot on it from when it was cut so I just took some 220 sand paper to it and knocked it down. Then I rolled out the turtle deck on some cardboard to figure out how much balsa I needed along with the shape. I have some 1/16" X 6" sheeting that I used to eliminate as many joints as I can.

I cut out the shape that I needed and then I put a little bit of ammonia and water on it and put it in the shucks to help with the sharp radius so it wouldn't split. After the wood dried I sprayed it with hair spray and let it dry, then I mixed up my resin and applied it to the the balsa with a roller. Then I put the turtle deck in the shucks and got everything taped up and in the vacuum bag. You can see towards the back end where I added some shop towels because the wire eats away more foam in that area since it has to sit in there longer. I decided to use my shop vac to help evacuate some of the air before I turned the vacuum pump on and it worked pretty good. You can see in the pictures that the EZ-Vac is working great. I really like this vacuum bagging, I might only be able to bag one piece at a time but their is no way I will go back to cement blocks.
 

Attachments

  • image.jpg
    image.jpg
    61.2 KB · Views: 302
  • image.jpg
    image.jpg
    39.4 KB · Views: 310
  • image.jpg
    image.jpg
    72.5 KB · Views: 340
  • image.jpg
    image.jpg
    78.6 KB · Views: 292
  • image.jpg
    image.jpg
    42 KB · Views: 320
  • image.jpg
    image.jpg
    47.7 KB · Views: 330
  • image.jpg
    image.jpg
    47.5 KB · Views: 305
  • image.jpg
    image.jpg
    52.8 KB · Views: 308
  • image.jpg
    image.jpg
    30.7 KB · Views: 292
  • image.jpg
    image.jpg
    36 KB · Views: 279
  • image.jpg
    image.jpg
    45.1 KB · Views: 305
  • image.jpg
    image.jpg
    58.8 KB · Views: 315
  • image.jpg
    image.jpg
    35.4 KB · Views: 315
The fuselage, hatch and turtle deck looks great. The bagging is the way to go it really does the job and way better than using concrete blocks or what ever else to weight the shucks down to form the balsa to the foam. You are doing a great job.
 
Top