• If you are new to GiantScaleNews.com, please register, introduce yourself, and make yourself at home.

    We're 1st in Giant Scale RC because we've got the best membership on the internet! Take a look around and don't forget to register to get all of the benefits of GSN membership!

    Welcome!

3D EMHW 2.15 Ultimate

Thanks guys!

Ran into the first bit of frustration so far..against my better judgement I attempted to secure the blind nuts for the gear with the included bolts and discovered the bolts are way too soft for the challenge. Even with fresh allen drivers they strip really easily and it takes a bit of force to push a blind nut into this birch. Also, two of the blind nuts are located in a corner with zero possibility to get any leverage on the blind nut to get it started into the wood. They just spin and tear up the wood.

I redrilled the gear to place the holes in an area I can get leverage and I'm off to buy some 12.9 bolts and some new blind nuts. The blind nuts are pretty soft as well and the teeth keep bending and breaking off. I might call Fastenel and see is they carry a strong blind nut, but we'll start with steel bolts.
 
Thanks poprlite, the steel bolts did it. After redrilling the outer holes in the gear to put the blind nuts in an area I could grab them with a wrench the new steel bolts went it easy. Took about 3 minutes to install them.


Lesson learned. No stainless bolts when when force needs to be applied and blind nuts need to be held in place to catch:D
 

Terryscustom

640cc Uber Pimp
Yup, McMasters or my choice is to buy a bunch of stuff and stock up from https://rtlfasteners.com/

RTL has very high quality without the inflated prices. They also have freaky fast delivery. Fastenal will leave your wallet screaming "you go screwed!!". Never again.....

I think we've all learned the hard way with blind nuts in hard plywood. Install them first but using a hammer or a vise. Lite ply and sometimes birch ply are fine but I usually use a good quality bolt to pull them all in and then toss that bolt so it does not get used.
 
Bookmarked: https://rtlfasteners.com/ I'll use them for the RC truck, always shearing bolts on that thing..

This actually was really easy once I had steel bolts. The bolts in the kit are uncharacteristically poor quality compared to everything else. The hexes aren't even close to centered on a few of them and the metal has the consistency of a fresh chocolate chip cookie:laughing:
 

Terryscustom

640cc Uber Pimp
Actually many times I replace hardware in ARF's as well, typical china blind nuts have very loose threads on them and there are certain metric ones that are just junk as well. I've had several on wings where if you thread in a metal 1/4-20 bolt you can actually flop it around in there because the threads are so loose.

Choco cookie bolts......sounds good, but not good!!!!
 
Looks like nice stuff. I compared the kit bolts to some confirmed stainless bolts I have and they aren't the same. Not sure what the kit bolts are, but they're soft. Only think it will make a difference on those blind nuts for the gear, the rest of the hardware looks really nice.

Anyone have any input on sheeting around curves? I'm undecided on trying Windex or a hot water soak --> position/dry -->then glue....

They show the sheeting going on one sheet at a time..
 
Built a tank mount. Changed my mind about running two tanks side by side, so going with one.

Glued the mount together with wood glue and epoxied it to the carbon tubes. I'll add some sticky back velcro and secure it with zip ties. It would have been better to plan it from the beginning and installed on the tubes (through intact drilled holes) when they originally went in, but I think it will hold fine.
 

Attachments

  • IMG_0565.JPG
    IMG_0565.JPG
    69.6 KB · Views: 405
  • IMG_0563.JPG
    IMG_0563.JPG
    67.7 KB · Views: 390
  • IMG_0562.JPG
    IMG_0562.JPG
    64.4 KB · Views: 421
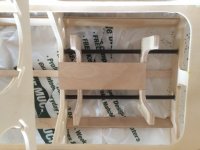
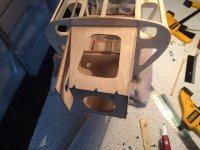
The motorbox was a challenge. They supply a really cool design where the sides start with a wide base on the first bulk head and taper into a small firewall just barely big enough for the DA 100 mounting holes which come pre-drilled. The angles in the motorbox sides give both the right thrust/up thrust and the offset for the 166mm DA 100. Cool design because a smaller firewall is stronger and of course lighter than a larger square firewall built into a square motor box with the mounting holes offset. The box is made of 3 ply 3mm poplar and meant to be glassed after installation for additional strength. The firewall is about 2mm oversized in either direction to allow an angle to be sanded into the edges to match the angles of the motorbox.

Unfortunately the ZDZ 112 has too large a mounting pattern to fit on the DA 100 firewall. They supply a second firewall with a Z routered into it that happens to fit the 112 perfectly. It is also predrilled with the holes in the exact center of the firewall, not offset, so the stock motorbox can't be shortened and position it in the right place.

It might be a translation error but I think the manual says "you're a ZDZ owner, you should have no trouble with this" so I decided to try to replicate their motorbox design for the larger supplied firewall. ;)

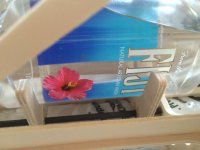
Measured the thrust angles and offset by measuring the the supplied motorbox and using an iphone App IHandy Level to measure the cowl to the tenth degree. The app allows you to set a flat surface as zero for a reference and then measure the cowl sitting on the table. I got 3.8 right and 1 up measuring the motobox and 4 right and 1 up measuring the cowl, so I went with 4 right 1 up.

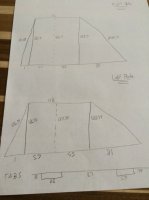
Calculated offset using the DA 100 length of 166mm and started drawing up each side of the box.

http://www.calculator.net/triangle-calculator.html

I used this site extensively. It basically does trig without having to actually do any trig.

First I drew up the top and bottom plate and then the right and left plates as their length follows the outer edge of the top and bottom plates.

This needs to take into account a few things. The offset. The effect the angles have on length from the bulkhead to firewall. The right thrust/up thrust.

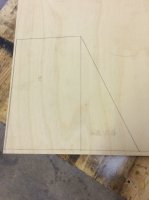
Once I had everything draw up (not remotely to scale) I transferred the plans (to exact scale) to some ultra strong 6 ply 3mm birch.

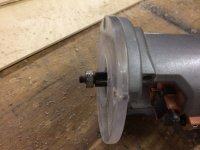
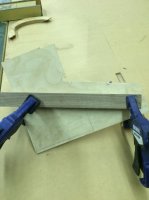
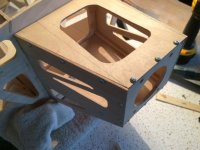
To make all the cuts I clamped various flat/jointed boards along the lines I drew and used a router to cut them with the bearing running along the board. While time consuming this is a really accurate way to make angled cuts because you have all the time in the world to get it clamped up right and once it's clamped it's almost impossible to mess up the actual cut.

I only did the tabs that connect the box to the bulkhead. I used the router to cut 6mm into the end and left tabs in place. I squared up the corners with a scroll saw and file. The main thing was to keep the edge perfectly straight on each side of the tab, I didn't worry about getting the corners perfect. The lightning holes were done on the scroll saw.

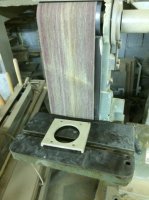
Sanded the angles into the edges of the firewall. Also sanded angles into the tab holes in the bulk head to allow the box sides to leave the bulk head at angles without snapping the tabs.

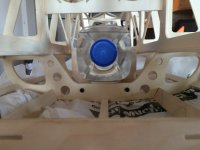
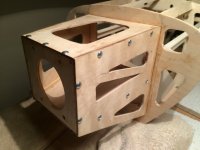
To install I first screwed the firewall to the top and bottom plate and then glued spruce rails on the edges of the top and bottom plates between the firewall and bulkhead. Then positioned the right and left plates and screwed them to the rails. Once I had everything positioned right I took it apart, applied epoxy and just put it back together. The screws aligned everything exactly how it was for the dry fit.

I may pull the screws from the sides which are not directly holding the firewall on. They look cool, but they're not providing any strength...they were just needed for alignment/assembly.

It probably ended up a little heavier than stock even without glassing, but it's extremely strong. The birch ply is much stronger and the spruce rails will really hold it all together.
 

Attachments

  • IMG_0541.JPG
    IMG_0541.JPG
    77.1 KB · Views: 408
  • IMG_0544.JPG
    IMG_0544.JPG
    36 KB · Views: 414
  • IMG_0546.JPG
    IMG_0546.JPG
    61.7 KB · Views: 409
  • IMG_0554.JPG
    IMG_0554.JPG
    31.6 KB · Views: 406
  • IMG_0559.JPG
    IMG_0559.JPG
    34.2 KB · Views: 401
  • IMG_0561.JPG
    IMG_0561.JPG
    59.7 KB · Views: 409
  • IMG_0566.JPG
    IMG_0566.JPG
    90.6 KB · Views: 377
  • IMG_0567.JPG
    IMG_0567.JPG
    80.5 KB · Views: 398
  • IMG_0569.JPG
    IMG_0569.JPG
    68.9 KB · Views: 435
  • IMG_0570.JPG
    IMG_0570.JPG
    74.2 KB · Views: 406
Top