• If you are new to GiantScaleNews.com, please register, introduce yourself, and make yourself at home.

    We're 1st in Giant Scale RC because we've got the best membership on the internet! Take a look around and don't forget to register to get all of the benefits of GSN membership!

    Welcome!
  • Unless you are a paid advertiser NO more posting advertisement in the individual vendor forums. You may post in the Manufacturer's Announcements section only but only ONCE a month unless your a paid advertiser.

65" Vyper Discussion Thread

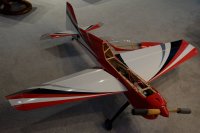
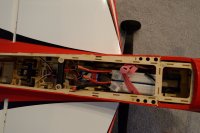
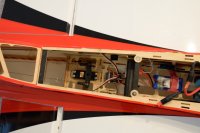
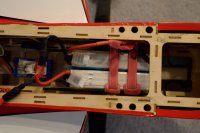
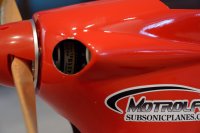
It took a lot of patience but waiting another week paid off. I flew the airplane for the first time on Saturday. It was pretty windy but I found the airplane to fly straight right off the board, maybe a click of aileron trim and a couple of clicks of elevator. I had the battery fairly forward for a more nose heavy condition on the first flight. Flew about 9 minutes and landed. Checked motor and ESC which were not hot at all. Tightened bolts and flew two more flights. Very nice airplane! Winds continued to build so I called it a day. Sunday afternoon was very nice, a little warmer and no wind at all. Flew two more flights with the battery moved aft some. It was a lot of fun. Thanks to 3DHS for making a great airplane and to everyone the forum who offered tips and encouragement. I am really looking forward to flying the tail off this airplane!
 

SnowDog

Moderator
alright! great news...glad you enjoyed the flights...this plane is really not bothered by wind very much at all!
 

SnowDog

Moderator
[MENTION=2581]hopper[/MENTION], this is the 65" Vyper thread I mentioned to you!

Regarding power systems for the 65" Vyper, I've got the Motrolfly 4320-400kv motor from Ken at Subsonicplanes.com.
I'm using the ZTW 85A ESC and a 6S5000 30C lipo for juice. This system runs very cool and is very powerful...prop (IIRC) is an 18x8 or perhaps a 17x10.

Let me know what other questions you have!

-SnowDog
 

nsg

30cc
Let's update the thread...

My 8s Vyper setup in pictures. MotrolFly DM4315-300, Castle ICE50, Xoar 17x8, 2x4s3300 mah Glacier. About 7.5 pounds, 1200 wt at settled voltage, 1400 max. Not a rocket, but plenty fast for me. I get 12 minute flights, too. If I were to do it again, I would perhaps ask Ken for a 310-320 kV wind to get 200 wt/lb or so. I had a 2kwt setup in it for a while, and that was a monster, but I didn't like teh extra weight. The original setup was the 5s combo recommended by 3DHS at the time (yes, they did recommend 5s setups for both Vyper and 68 Velox at some point).

Of interest (hopefully):
- High voltage setups do save weight on motor and ESC. This could be used to increase flight times.
- opening up the cowl holes has worked surprisingly well. I was afraid I'd mess up the looks.
- an 8s setup does fit into a Vyper. That was a concern given how narrow the fuse is. I use an adapter plate to velcro the batteries.
 

Attachments

  • DSC_0654.JPG
    DSC_0654.JPG
    1.5 MB · Views: 268
  • DSC_0655.JPG
    DSC_0655.JPG
    1.4 MB · Views: 296
  • DSC_0656.JPG
    DSC_0656.JPG
    1.4 MB · Views: 271
  • DSC_0657.JPG
    DSC_0657.JPG
    1.5 MB · Views: 215
  • DSC_0658.JPG
    DSC_0658.JPG
    1.5 MB · Views: 275
  • DSC_0663.JPG
    DSC_0663.JPG
    1.6 MB · Views: 198
  • DSC_0665.JPG
    DSC_0665.JPG
    1.3 MB · Views: 250
Last edited by a moderator:

Bushwacker

3DRCF Moderator
Hi ya guys,

Was hoping someone could give me some advice. I just purchased the 65" Vyper and it's my first larger plane. I chose to go with the MotrolFly 4320-450Kv motor and as you or most of you know I will have to drill the firewall because the X-Plate doesn't line up with the factory holes. Well thats my problem, I've never modified a plane before so I hoping someone could maybe share some tips or direct me to a place that will show/explain how to do this. From what I've read here you have to remove the blind nuts and should epoxy the holes then drill new holes for the new plate.

Can you recommend a good way to remove the blind nuts in a fashion that will reduce the risk of tearing up the firewall, and how do you center the motor for the new holes so it lines up with the cowl? Any info you can part with will be much appreciated. By the way all the other building tips here are really great thanks for those.

Not sure if this matters, but the parts list for this plane are:

MotrolFly 4320-450Kv - Xoar 17x10 prop.
ZTW Gecko Series 125A Brushless ESC w/ 8A Adjustable SBEC.
4 Hitec HS-7954SH servos.
Spektrum AR7610

Thanks much for any info you can part with.

Bush
 

gyro

GSN Contributor
Hi ya guys,

Was hoping someone could give me some advice. I just purchased the 65" Vyper and it's my first larger plane. I chose to go with the MotrolFly 4320-450Kv motor and as you or most of you know I will have to drill the firewall because the X-Plate doesn't line up with the factory holes. Well thats my problem, I've never modified a plane before so I hoping someone could maybe share some tips or direct me to a place that will show/explain how to do this. From what I've read here you have to remove the blind nuts and should epoxy the holes then drill new holes for the new plate.

Can you recommend a good way to remove the blind nuts in a fashion that will reduce the risk of tearing up the firewall, and how do you center the motor for the new holes so it lines up with the cowl? Any info you can part with will be much appreciated. By the way all the other building tips here are really great thanks for those.

Not sure if this matters, but the parts list for this plane are:

MotrolFly 4320-450Kv - Xoar 17x10 prop.
ZTW Gecko Series 125A Brushless ESC w/ 8A Adjustable SBEC.
4 Hitec HS-7954SH servos.
Spektrum AR7610

Thanks much for any info you can part with.

Bush

Should be an awesome setup. To remove the exiting nuts, stick a screwdriver or hex driver that will fit into the holes, and lightly tap on the end until they pop out.
Then insert some epoxy covered wooden dowels (or a square piece of balsa that's been shaved or sanded round) into the holes.

To align the new holes, all you need to do is print the mounting template from subsonicplanes, and use it to mark the firewall.

Since the cowl isn't screwed on yet, you should be able to easily align once the motor is mounted.

Good luck!
 

3dNater

3DRCF Regional Ambassador
Hi [MENTION=3728]Bushwacker[/MENTION]. I will comment on the firewall work. It sounds like you know basically what to do but just want a couple tips.

For getting the blind nuts out find a socket from your socket set that just fits over the blind nut flange on the back of the firewall. Find a washer that fits over the back of the socket that has a hole small enough to not let the motor mounting bolt and washer pass through the center. With your bolt that matches the blind nut you now have a blind nut puller. Just run the bolt through the washers and socket into the flange side of the blind nut. Tighten it until the blind nut comes out.

If you are less patient and can bear a little more risk just run the mounting bolt part way into the blind nut on the motor mounting side of the firewall. Put the socket around the blind nut flange. Tap the bolt with a hammer while holding the socket as tight as you can. Your risk of breaking the back of the firewall a little is higher but it is a lot faster.

For filling the holes I would use a dowel with regular wood glue. I don't like epoxy for that job. Get your favorite dowel that fits tightly in the hole or is just a bit bigger. If the dowel is bigger you will have to drill the holes to the right size. Dowels often aren't perfect so some sanding my be required... no big deal... you just want a tight fit. A small amount of wood glue is sufficient. Push the dowel in until it is flush with the back of the firewall with glue applied. Cut the dowel flush to the front of the firewall and sand it smooth. Done.

Mark your new holes and drill. I recommend holding a small block of wood tight to the back of the firewall when drilling the new holes to keep the back side of the ply from blowing out.
 
Last edited by a moderator:
Top