You are using an out of date browser. It may not display this or other websites correctly.
You should upgrade or use an alternative browser.
You should upgrade or use an alternative browser.
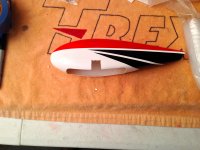
Extreme Flight Extra 300 91"
- Thread starter Scooterpilot
- Start date
Scooterpilot
50cc
I used Epoxy mixed with Denatured Alcohol. I mix it to a consistency that is just bit thicker than water and brush it on. I'm watching the build videos from the EF website and using their techniques used for fuel proofing.
Tonight I'm going to buy a tapered reamer. It's used to open up the pre-drilled hing holes in the control surfaces allowing the knuckle on the robart hinge to have a full range of motion with minimum hinge gap separation on the control surface. Hopefully, I'll get to this on Sat or Sun. WHen I do I'll post pic's.
Tonight I'm going to buy a tapered reamer. It's used to open up the pre-drilled hing holes in the control surfaces allowing the knuckle on the robart hinge to have a full range of motion with minimum hinge gap separation on the control surface. Hopefully, I'll get to this on Sat or Sun. WHen I do I'll post pic's.
Last edited by a moderator:
dth7
3DRCF Regional Ambassador
I used Epoxy mixed with Denatured Alcohol. I mix it to a consistency that is just bit thicker than water and brush it on. I'm watching the build videos from the EF website and using their techniques used for fuel proofing.
Tonight I'm going to buy a tapered reamer. It's used to open up the pre-drilled hing holes in the control surfaces allowing the knuckle on the robart hinge to have a full range of motion with minimum hinge gap separation on the control surface. Hopefully, I'll get to this on Sat or Sun. WHen I do I'll post pic's.
I figured that was the "fuel proof" but didn't know if a new product came out. A friend here used white Krylon, looks pretty nice all white washed inside. Good luck with the rest.
Scooterpilot
50cc
thanks
Scooterpilot
50cc
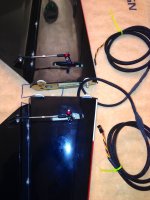
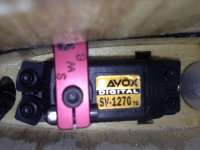
Finally, I worked on the build today. I installed the Savox 1270 servos, SWB arms, tapped them to 3 mm, wrapped the servo wire, used shrink tube and installed the control horns, and installed the linkage. I used a mic to measure the lenght of the linkage to ensure the length is spot on. Also, set up the servo's before installing them in the elevators. Hope this comes out OK, it's my first build with a plane this size.
I used Blendrem tape to seal control surface gaps.
When I installed the servo horns I used Zpoxy mixed with Milled Fiberglass, did the same when I installed the hindges on the Elevators and ailerons.
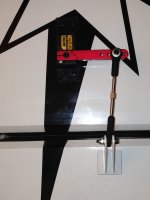
I bulit the tail wheel assembly and.....
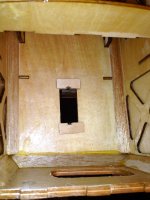
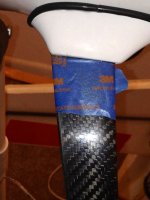
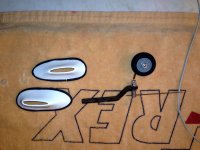
For the wing, I painted the sevo bays, sealed them and installed the Savox servo. Before I intall the servos I run the servo screws into the wood, back them out, apply thin CA; then, I install the servos. All servo wires are wrapped to prevent chaffing. I installed the landing gear and installed the skirts. I used expoxy mixed with milled fiberglass. First, I cut the skirt to fit; then rough sand the landing gear, mark the bottom of the skirt and wrap the gear with tape so no expoy dries below the landing gear below the skirt.
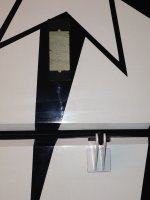
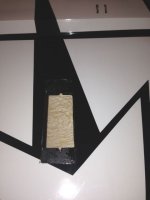
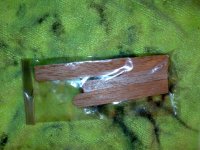
Lastly, I've included a pic of wood( pic with green background) that come with the kit. It's tri stock. What is this used for? I don't have clue
I used Blendrem tape to seal control surface gaps.
When I installed the servo horns I used Zpoxy mixed with Milled Fiberglass, did the same when I installed the hindges on the Elevators and ailerons.
I bulit the tail wheel assembly and.....
For the wing, I painted the sevo bays, sealed them and installed the Savox servo. Before I intall the servos I run the servo screws into the wood, back them out, apply thin CA; then, I install the servos. All servo wires are wrapped to prevent chaffing. I installed the landing gear and installed the skirts. I used expoxy mixed with milled fiberglass. First, I cut the skirt to fit; then rough sand the landing gear, mark the bottom of the skirt and wrap the gear with tape so no expoy dries below the landing gear below the skirt.
Lastly, I've included a pic of wood( pic with green background) that come with the kit. It's tri stock. What is this used for? I don't have clue
Attachments
-
 TAIL GEAR AND MISC.jpg915.8 KB · Views: 315
 -
 ELE RIGHT LEFT 2.jpg488.5 KB · Views: 281
 -
 ELE RIGHT LEFT 1.jpg754.7 KB · Views: 320
 -
 ELE RIGHT LEFT SERVO 3.jpg604.4 KB · Views: 331
 -
 white control horn installee.jpg517 KB · Views: 282
 -
 Wing servo area sealed and painted.jpg26.8 KB · Views: 287
 -
 Wing servos installed.jpg521.3 KB · Views: 286
 -
 Wood for what.jpg1.1 MB · Views: 295
Last edited by a moderator:
Scooterpilot
50cc
Bogroger
Thanks
Thanks
Scooterpilot
50cc
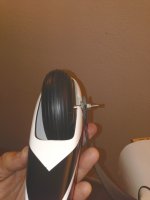
Tonight I removed the masking tape from the landing gear just below where I glued the skirts onto the landing gear with epoxy and fiber mill. Resultes are good. I installed the Main landing gear axle's; then I worked on the wheel pants. Cut them so they will fit flush against the landing gear. Once that was done I check fit the wheel pants against the landing gear and make sure the wheels were centered in the wheel pants. I ground four flat spots on the axle, used blue locktite on the set screws in the wheel collars and mounted the main gear. After that I insatalled the ball link 3.5" back from the rudder hinge line and glued it in place. Lastly I added some additional wood in the motor box where the throttle servo mounts.