• If you are new to GiantScaleNews.com, please register, introduce yourself, and make yourself at home.

    We're 1st in Giant Scale RC because we've got the best membership on the internet! Take a look around and don't forget to register to get all of the benefits of GSN membership!

    Welcome!

Scale 50cc Scratch Build From My Own Design Revisited

Jetpainter

640cc Uber Pimp
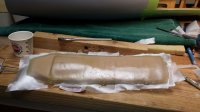
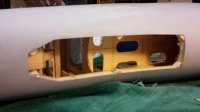
I finished sanding the second wing last night so it was time to move on to a project I've been putting off for a while. I need to make a hatch to cover the tuned pipe exit. The hole in the fuse needed to be big enough to allow the pipe stinger to turn. The pipe installs from the front, but it takes a lot of carefully turning a twisting to get it to come out the back.

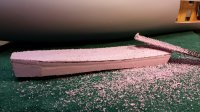
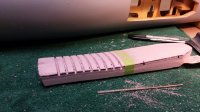
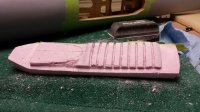
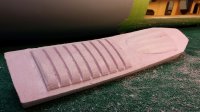
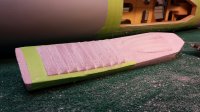
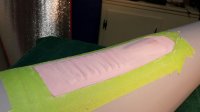
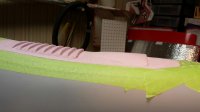
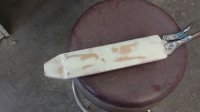
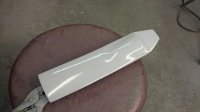
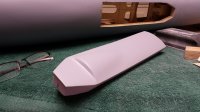
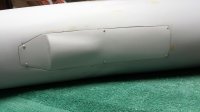
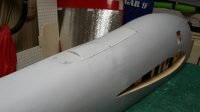
I decided the hatch need to be fiberglass, so I needed to make a plug. So far I made a pattern with tape, then rough cut a piece of foam and shaped it until it fit the hole nicely. Next up is to carve and sand the outside to fit the shape of the fuse.

20160701_210051_resized.jpg
20160701_214003_resized.jpg
20160701_222229_resized.jpg
20160701_222240_resized.jpg
 

Snoopy1

640cc Uber Pimp
That looks like work - plug,Mold, part and then make it fit and hold it down and then the easy part paint it ok we are all watching.
You have to put some very cool shaped louvres in the hatch to look coooool.
 

Terryscustom

640cc Uber Pimp
I imagine that would work well, especially with flex additive in the mix.
Terry, I'm missing your build threads. Anything in the works?

Nothing at the moment. 43% MXS scratch is pretty badass so we're looking at doing a 125"'ish Extra of some sort next Winter. I do have a 126" PAU Edge ARF in transit to me but that's not a "build". Keep up the good work man! Still looking forward to re-covering my GeeBee this Winter with your methods.
 

Jetpainter

640cc Uber Pimp
I worked on my pipe hatch a lot this weekend. I've pretty much got it finished, but it's not exactly what I had planned.

The original plan was to incorporate louvers into the hatch so I carved and sanded them into my foam block along with a raised section to cover the end of the pipe that stuck out a little. The foam turned out really well, but that's about as far as the louvers went.

The plan was to just put several layers of glass over the foam and use it to make the finished part. The problem was I could not get the cloth to lay down into the louvers with the cloth and resin I had here.:(
 

Attachments

  • 20160702_164853_resized.jpg
    20160702_164853_resized.jpg
    899.4 KB · Views: 254
  • 20160702_171540_resized.jpg
    20160702_171540_resized.jpg
    695.8 KB · Views: 237
  • 20160702_201716_resized.jpg
    20160702_201716_resized.jpg
    805.4 KB · Views: 301
  • 20160702_203914_resized.jpg
    20160702_203914_resized.jpg
    791.6 KB · Views: 251
  • 20160702_205208_resized.jpg
    20160702_205208_resized.jpg
    845.3 KB · Views: 315
  • 20160702_212701_resized.jpg
    20160702_212701_resized.jpg
    510.3 KB · Views: 246
  • 20160702_212748_resized.jpg
    20160702_212748_resized.jpg
    437.8 KB · Views: 242

Jetpainter

640cc Uber Pimp
After my failure with the louvers, I decided to cut them off and make the hatch smooth other than the raised area for the pipe. It worked out pretty well. After I removed the louvers I laid down several layers of glass and resin and let it sit overnight. This morning I trimmed the edges then sanded it smooth. After that I used Dolphin Glaze a 2 part polyester glaze to smooth it out and primed it. When the primer dried I cleaned the foam off the back then made some blocks to screw it to and test mounted it.
 

Jetpainter

640cc Uber Pimp
I guess some pictures would help. I have no idea why the forth picture made the primer look pink.
 

Attachments

  • 20160703_191716_resized.jpg
    20160703_191716_resized.jpg
    689.6 KB · Views: 258
  • 20160704_160837_resized.jpg
    20160704_160837_resized.jpg
    655.2 KB · Views: 219
  • 20160704_162316_resized.jpg
    20160704_162316_resized.jpg
    588 KB · Views: 286
  • 20160704_165623_resized.jpg
    20160704_165623_resized.jpg
    721.3 KB · Views: 305
  • 20160704_170511_resized.jpg
    20160704_170511_resized.jpg
    733.3 KB · Views: 305
  • 20160704_195926_resized.jpg
    20160704_195926_resized.jpg
    440.8 KB · Views: 217
  • 20160704_212454_resized.jpg
    20160704_212454_resized.jpg
    603.7 KB · Views: 260
  • 20160704_212933_resized.jpg
    20160704_212933_resized.jpg
    466.5 KB · Views: 233
Top