• If you are new to GiantScaleNews.com, please register, introduce yourself, and make yourself at home.

    We're 1st in Giant Scale RC because we've got the best membership on the internet! Take a look around and don't forget to register to get all of the benefits of GSN membership!

    Welcome!

New ZDZ112 B2RV / Installation into PAU Edge 540

Terryscustom

640cc Uber Pimp
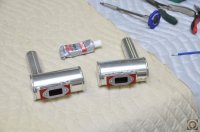
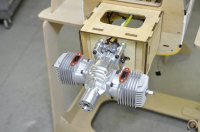
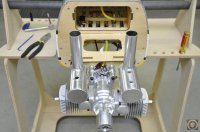
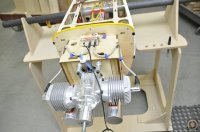
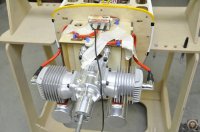
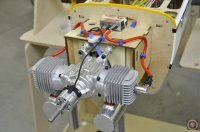
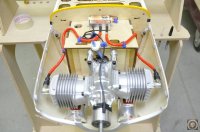
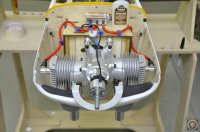
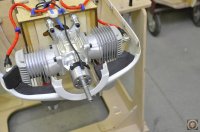
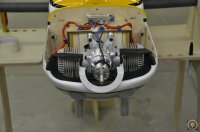
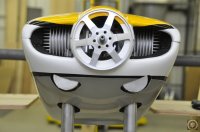
Need to get some real work done today but wanted to bolt the mufflers on quick since I was set up for that when I quit last night.

I used some 600 degree silicone from McMaster Carr and also used the stock DLE gaskets. Why did I use both? The flange on the heads of the engine are not overly wide and I did not want silicone alone to blow out eventually. Also the gaskets are re-usable then because they don't stick to anything and peal apart. Never had one leak, so I guess it works.

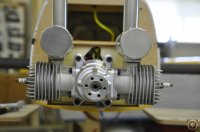
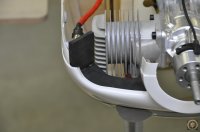
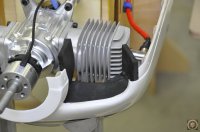
Also a note USE THE MUFFLER BOLTS THAT COME WITH THE ENGINE (or exact replacements)!! They are high grade and also the correct length since the threads in the heads are blind tapped if you use bolts that are too long you will strip the heads!

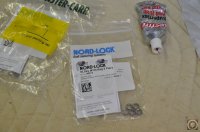
OK, last tip. I use Nord Locks on all my muffler bolts and prop bolts. Again, never have a loose muffler since then. I get the stainless ones that have a little smaller O.D. from mcmaster carr and they fit inside most muffler bolt holes.
 

Attachments

  • image001.jpg
    image001.jpg
    77.4 KB · Views: 305
  • image002.jpg
    image002.jpg
    72.9 KB · Views: 352
  • image003.jpg
    image003.jpg
    86.6 KB · Views: 340
  • image004.jpg
    image004.jpg
    71.2 KB · Views: 349
  • image005.jpg
    image005.jpg
    82.6 KB · Views: 371
Forgive me. I was a little shocked. Plus I like the icons and I need to increase my post count... :laughing:

Looks good! I like the Yellow too!! I am working on my edge this week. Hope to debut it Labor day weekend down in MS> :woohoo!:
 

Terryscustom

640cc Uber Pimp
Found a few more hours tonight and knocked out some final details. Seems odd, but all that is left is the landing gear, tail wheel and canopy shell!! I kinda worked bass-ackwards from my normal build. The build stand has been amazing so far to assemble without actually handling the fuse or plane at all other than to flip upside down now and again.

So tonight I......
- Rudder push rod and setup.
- Ignition mounted.
- Cut the cowl - when the mufflers that are in prototype stage come out I'll probably order a new cowl, so for now I picked the best performance option out of what I had on hand with the Jtec DA100 mufflers.
- Baffles = I LOVE CREATIVE FOAM!!!! For goodness sake baffle your engines if you don't already!!! They will thank you!! This took me less than half hour and every bit of air that comes in is passing though the fins, should run very cool.
- Set up choke servo, set max travel limits and set end points with an amp meter. I have it on a momentary switch and slowed the servo to .8 seconds to full travel to basically widen the dead band width so that there is no chance of binding.
- Set up throttle servo
- Re-bind to reset the fail-safe so I don't inadvertently burn up a choke or throttle servo

This thing will most likely run tomorrow night, we'll see about maiden this weekend. I have a fun fly on Saturday and it's not the place for a maiden flight. Perhaps on Sunday......fingers crossed.
 

Attachments

  • image001.jpg
    image001.jpg
    73.6 KB · Views: 387
  • image002.jpg
    image002.jpg
    55.1 KB · Views: 334
  • image003.jpg
    image003.jpg
    89.5 KB · Views: 347
  • image004.jpg
    image004.jpg
    85.7 KB · Views: 515
  • image005.jpg
    image005.jpg
    63.5 KB · Views: 402
  • image006.jpg
    image006.jpg
    84.9 KB · Views: 387
  • image007.jpg
    image007.jpg
    113.9 KB · Views: 327
  • image008.jpg
    image008.jpg
    102.6 KB · Views: 357
  • image009.jpg
    image009.jpg
    71.3 KB · Views: 385
  • image010.jpg
    image010.jpg
    91.2 KB · Views: 335
  • image011.jpg
    image011.jpg
    85.2 KB · Views: 343
  • image012.jpg
    image012.jpg
    66.3 KB · Views: 345
  • image013.jpg
    image013.jpg
    85 KB · Views: 373
  • image014.jpg
    image014.jpg
    77.7 KB · Views: 391
  • image015.jpg
    image015.jpg
    73 KB · Views: 379
  • image016.jpg
    image016.jpg
    83.4 KB · Views: 371
  • image017.jpg
    image017.jpg
    71.1 KB · Views: 365
  • image018.jpg
    image018.jpg
    64.2 KB · Views: 359
  • image019.jpg
    image019.jpg
    71.4 KB · Views: 335
  • image020.jpg
    image020.jpg
    99.3 KB · Views: 372
  • image021.jpg
    image021.jpg
    55.6 KB · Views: 361
  • image022.jpg
    image022.jpg
    78.5 KB · Views: 347

aerocowboy82

Holy Sh!t!!!
Found a few more hours tonight and knocked out some final details. Seems odd, but all that is left is the landing gear, tail wheel and canopy shell!! I kinda worked bass-ackwards from my normal build. The build stand has been amazing so far to assemble without actually handling the fuse or plane at all other than to flip upside down now and again.

So tonight I......
- Rudder push rod and setup.
- Ignition mounted.
- Cut the cowl - when the mufflers that are in prototype stage come out I'll probably order a new cowl, so for now I picked the best performance option out of what I had on hand with the Jtec DA100 mufflers.
- Baffles = I LOVE CREATIVE FOAM!!!! For goodness sake baffle your engines if you don't already!!! They will thank you!! This took me less than half hour and every bit of air that comes in is passing though the fins, should run very cool.
- Set up choke servo, set max travel limits and set end points with an amp meter. I have it on a momentary switch and slowed the servo to .8 seconds to full travel to basically widen the dead band width so that there is no chance of binding.
- Set up throttle servo
- Re-bind to reset the fail-safe so I don't inadvertently burn up a choke or throttle servo

This thing will most likely run tomorrow night, we'll see about maiden this weekend. I have a fun fly on Saturday and it's not the place for a maiden flight. Perhaps on Sunday......fingers crossed.

You never cease to amaze me, Terry!
 
Top