Yes, good idea! TO make sure that it there 2nd felt cluck is not increasing the resistance to flow. I also need to change the fitting on the top of the main tank, as the fuel line is getting kinked, with the canopy on. I am glad I caught this! Now to find those 90 degree fittings.
You are using an out of date browser. It may not display this or other websites correctly.
You should upgrade or use an alternative browser.
You should upgrade or use an alternative browser.
IMAC The new Dalton 300 SP / 330
- Thread starter orthobird
- Start date
Wayne, I have an idea. I will run a test. I will fill both tanks all the way, and then time it to see how long it takes to empty 1700 ml with my fuel station pump. I can then calculate at what speed the fuel was being emptied, which should be way greater than 100 ml per minute.
I know that the motor will draw an estimate of 100 ml per minute.
Then, i can refill the tank, and take note to see if it collapses as I draw the fuel out with the gas station pump.
But 1st, I need to change out those two fittings.
I know that the motor will draw an estimate of 100 ml per minute.
Then, i can refill the tank, and take note to see if it collapses as I draw the fuel out with the gas station pump.
But 1st, I need to change out those two fittings.
Silver Fox
50cc
The reason why I mentioned that, is because I used such a system when I was flying my Extreme Flight. I had one of the 3W round tanks (51 oz) and had to supplement it with a small 8 oz tank to run the 200. I got the idea from Matt Balazs who was running it the other way around.... The larger tank was filling the smaller tank...so that there was no air in the system until the larger tank was empty.
Using a system similar to what you are using, I found that the vacuum in the larger tank when the engine was running collapsed the sides of the round tank when it was sucking fuel from the small tank. You may get a little better result if you changed the pick up in the small tank to a brass one so that there will be less resistance.
Wayne
UPDATE:
Just got home from work, and went to the shop.
I have fixed the tank situation. All I did was move the location of the fittings, and now, they do not touch the canopy "ceiling".
Ok, I cranked the motor on! WOW< sounds beautiful. Very quiet.
I put the choke on, flipped 10 times, then choke off, and on 1st flip, she came to life. I adjusted the low idle, and now she idles at 1100 rpm.
Sounds rich on the bottom, but I will leave it as is for now, then adjust later.
I did the test whereby I filled the tanks, and then drained them. The pump from the fuel station drains at a rate of 500 ml per minute.
With doing so, the main tank, I could see, was caving in all so slightly. (Just as Wayne mentioned).
I doubt it will do so with the motor running at WOT, since the draw rate at WOT would not be greater than 150 cc per minute.
So I will do this again, to look at it, with the canopy off, and see if anything happens to the tank with WOT.
(thanks Wayne for the advice, good to look at these things,. Nothing beats experience!)
thurmma
150cc
Cam,
I noticed the vent line from the smaller tank is going straight down. When you are in a downline, any fuel in the small tank will drain through the vent line. If you can loop it around the back of the small tank or run the vent line behind the tanks, it will alleviate this situation")
Just my 2 cents
I noticed the vent line from the smaller tank is going straight down. When you are in a downline, any fuel in the small tank will drain through the vent line. If you can loop it around the back of the small tank or run the vent line behind the tanks, it will alleviate this situation
Just my 2 cents
Cam,
I noticed the vent line from the smaller tank is going straight down. When you are in a downline, any fuel in the small tank will drain through the vent line. If you can loop it around the back of the small tank or run the vent line behind the tanks, it will alleviate this situation
Just my 2 cents
Thank you so much Mark for pointing that out. I can definitely fix that. I have always done that in the past. But i forgot to do so on this one. I appreciate you reminding me. I will do it now.
some more pictures. Just as an update, I have started to cover the wings. It is so so hot right now, I was only able to do one wings hing line for now. I will wait til evening, then I can go back into the shop and turn on the AC. Right now, at 98 F, the AC will do nothing. Once it gets to 80 or so outside, then the AC unit will function better.
this is to demonstrate another spinner I purchased, this is a Dave Brown Ultimate Spinner. It is 6" diameter. It weighs several ounces more than the Bill Hempel carbon fiber spinner.

this demonstrates the RPM optical sensor.

this is the top of the front cowl, this is the McFeuler fuel dot.

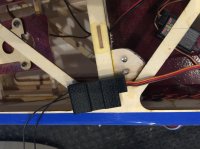
One of my GSN friends, Wayne, @wfield0455 made these for me. Well not specifically for me, but he made them and offered some to me. HE made these with his 3D printer

they capture the Jeti R3 receivers, so that they cannot come unplugged. Very ingenious of him to do!
this is to demonstrate another spinner I purchased, this is a Dave Brown Ultimate Spinner. It is 6" diameter. It weighs several ounces more than the Bill Hempel carbon fiber spinner.
this demonstrates the RPM optical sensor.
this is the top of the front cowl, this is the McFeuler fuel dot.
One of my GSN friends, Wayne, @wfield0455 made these for me. Well not specifically for me, but he made them and offered some to me. HE made these with his 3D printer
they capture the Jeti R3 receivers, so that they cannot come unplugged. Very ingenious of him to do!
Attachments
I put mine in the bottom, in the event, that I have to remove the top cowl only, then I do not have to unplug the sensor. Also, when I install the bottom cowl, I can then feed the lead thru easily.
This is my technique for covering wings...
I like to cover the hinge line, and the tips and roots of the aileron, as well as the wing joint with the aileron root, and the aileron tips.
Then, I glue in the aileron with the RObart point hinges.

tomorrow, I can then start covering the surface of the wings and the aileron, and this will assure that all my lines are smooth.
I received some more covering today from Tower Hobbies, but now, I can see, I may not have enough white!
;(
This is my technique for covering wings...
I like to cover the hinge line, and the tips and roots of the aileron, as well as the wing joint with the aileron root, and the aileron tips.
Then, I glue in the aileron with the RObart point hinges.
tomorrow, I can then start covering the surface of the wings and the aileron, and this will assure that all my lines are smooth.
I received some more covering today from Tower Hobbies, but now, I can see, I may not have enough white!
;(
I found the white covering in the shop early this morning, a brand new long roll! I am good to cover when I get home from work.
I also forgot to mention, as you see above, both wings weigh 2 pounds and 14 ounces each.
It still needs the covering and the horns and servos. Probably will weigh 3 pounds and 8 ounces each. this bird is starting to look more and more like a 46 pounder.
I also forgot to mention, as you see above, both wings weigh 2 pounds and 14 ounces each.
It still needs the covering and the horns and servos. Probably will weigh 3 pounds and 8 ounces each. this bird is starting to look more and more like a 46 pounder.