• If you are new to GiantScaleNews.com, please register, introduce yourself, and make yourself at home.

    We're 1st in Giant Scale RC because we've got the best membership on the internet! Take a look around and don't forget to register to get all of the benefits of GSN membership!

    Welcome!
  • Unless you are a paid advertiser NO more posting advertisement in the individual vendor forums. You may post in the Manufacturer's Announcements section only but only ONCE a month unless your a paid advertiser.

Extreme Flight 60" Laser Build Thread

Ohio AV8TOR

Just Do It
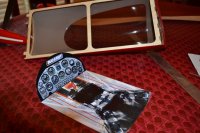
I have difficulty putting the wings on! it seems that the wing CF tube is a very tight fit. What should I do?

Avoid the urge to sand. My Laser fit pretty good, in fact better than some plane I have had before. Try using talcum power on the tube and slide it in. If you can get it in you are good to go because the vibrations will lap the two together.

I should add that if you feel you have to sand try using super fine 0000 steel wool.
 
Last edited by a moderator:

Fast3D

50cc
ok thanks. Will try some powder and see how it goes. Unfortunately , the build has taken some of my time and I have to put it on hold for few weeks due to heavy work schedule. Fortunately, I will have an MXS soon so I can fly soon until the laser is finished; so I don't have to rush this build! These are the pictures of what I've done so far. I tried to put the BEC as far back as possible. The cowl and spinner gap seem to be ok. At the bottom of the cowl though there is gap if you can see; I am not sure if this is designed that way for air to flow? Please let me know if you see something you don't like. IMG_0433[1].jpgIMG_0434[1].jpgIMG_0435[1].jpgIMG_0436[1].jpgIMG_0437[1].jpg This is my first build probably after 10 years or so!IMG_0429[1].jpgIMG_0430[1].jpgIMG_0431[1].jpgIMG_0432[1].jpg
 

Ohio AV8TOR

Just Do It
Glad you are back in the saddle after 10 years Fast3D. I took a longer break from RC some 5-years back and wow did the industry change.
 

Fast3D

50cc
Thanks Avi8tor. I've been following the industry change to some extent and actually flying over the past 10 years but very infrequently. I did stop building though upuntil now, mostly because of the fact that I didn't have the time for it. It was a real joy building the laser and I hope I can finish it soon.
 

Ohio AV8TOR

Just Do It
Well I got to maiden my Laser this morning and it did not disappoint. Hard to say at this point if I like it more than my 60" Edge but for sure it's not worse. I find it hard to believe but the slow flight on the Laser might be a tad better. Today was one of the rare low wind days here in Texas and elevators had no wing rock what so ever and came down with just a little forward speed.

I started my CG out balancing to the wing tube and found it a little nose heavy but not bad. I moved the pack back 1/4" the next flight and it was better. Another 1/2" on the third flight. I may split the difference the next time out as I only had time for 3 flights before work today.

Rolling circles required more elevator when I started but with the CG move rear it was much better. Entering Crankshafts was not as easy at first but then really nailed it. It flips right on it's own axis. Roll rate is very fast and very axial. Knife Edge was much better after I moved the CG and had no coupling issues. I was flying lower Expo than the manual suggested with my Edge but set this up per the manual. I need to back off the Expo on my next flights.

I am so happy with the plane and visibility is great with nice contrast from the upper and lower surfaces.
 

Attachments

  • DSC_0007.JPG
    DSC_0007.JPG
    286.9 KB · Views: 250
  • DSC_0029.JPG
    DSC_0029.JPG
    354.8 KB · Views: 258
  • DSC_0047.JPG
    DSC_0047.JPG
    356 KB · Views: 271
  • DSC_0059.jpg
    DSC_0059.jpg
    100 KB · Views: 271

Nalby

50cc
Nice flight report. My maiden was very similar. great flying plane. Seeing yours makes me wish I had gotten the red one.
 

Ohio AV8TOR

Just Do It
So back on post #46 I showed some cockpit graphics that Tim H put together and I fit to the 60" Laser. If you have not seen the thread on the 60" E-Flight Beast Tim H has put together a really nice cockpit for it which I downloaded and found pretty darn close fitting our Laser 60". He was kind enough to get rid of the tapered fuselage using the raw image he had and along with my fitting we found a pretty nice combination that fits pretty well. This weekend I will finish off mine. All you need is to print these out on 8x10 photo paper. Your choice if you want to fold it at the dash transition or add as a separate piece. I am going to try and fit a dashboard top from 1/32" balsa to the canopy transition to paint flat black or just leave it as is. Tim says he will be checking on on this thread and if you want some custom colors he can do that too. Have fun with it.
 

Attachments

  • Laser-final-1-v1.pdf
    497.9 KB · Views: 398
  • Laser-final-2-v1.pdf
    121.3 KB · Views: 307
  • Laser-final-3-v1.pdf
    120 KB · Views: 320
Last edited by a moderator:

wedoitall

Member
wonder if he could do something for the yellow and blue one also? im sure I could just edit his but he would do a better job
 

Ohio AV8TOR

Just Do It
Tonight I started to add the cockpit in the high quality print to photo paper. I think this might be a couple of night job with drying. After dry fitting several draft pieces and looking at the real plane pictures I wanted the seat back to be closer to the clear visual windshield of the canopy. To do so I had some foam that I cut out to the opening and then I used spray contact cement to the foam for the picture to adhere too. This in my opinion not only looks better it fits better because the wood by the latch is not flush. I just but a small bead of Welders to the two slanted wood ribs and letting it dry over night. The other advantage of this foam piece is that it moves everything forward minimizing the clear part in front of the dash. My plan here is after it is in place airbrushing this clear part in black like doing a car body from the inside. The tilted dash forms a perfect mask so no paint gets on the clear that you want clear. Don't however spray in the direction back to the clear, spray away to the front of the canopy.

I had success placing my draft prints in with the dash part just folder back and I am going to try to mount it this way so there won't be a seam to come undone. Just place a straight edge across this to get a nice aligned and tight bend seam.
 

Attachments

  • DSC_01.JPG
    DSC_01.JPG
    205.1 KB · Views: 275
  • DSC_02.JPG
    DSC_02.JPG
    268.4 KB · Views: 279
  • DSC_03.JPG
    DSC_03.JPG
    143.6 KB · Views: 269
  • DSC_04.JPG
    DSC_04.JPG
    146.7 KB · Views: 276
Top