• If you are new to GiantScaleNews.com, please register, introduce yourself, and make yourself at home.

    We're 1st in Giant Scale RC because we've got the best membership on the internet! Take a look around and don't forget to register to get all of the benefits of GSN membership!

    Welcome!
  • Unless you are a paid advertiser NO more posting advertisement in the individual vendor forums. You may post in the Manufacturer's Announcements section only but only ONCE a month unless your a paid advertiser.

Extreme Flight 60" Laser Build Thread

Ohio AV8TOR

Just Do It
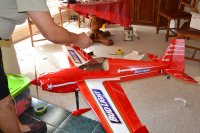
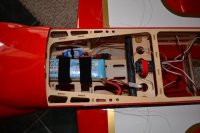
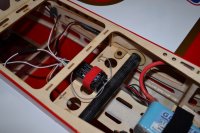
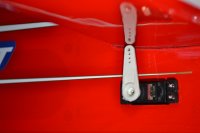
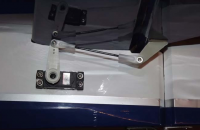
A little under the weather today but trying to get servos running and came across something I need to change. This is the same servo and control arm I used in my 60" Edge and the control arm actually hit the stab. I filed it back some but this is concerning so I think I will find a smaller arm. Anyone else run into this?
 

Attachments

  • DSC_1.JPG
    DSC_1.JPG
    96.2 KB · Views: 263

Ohio AV8TOR

Just Do It
After downloading the manual, to use that zoom feature and not to mention the color photos I see that on picture 31 their elevator control arm is very close too. I guess I will proceed. and after installing the ball link check to see if I can shave it back some.

If I were doing this over again I would sand back some the bottom servo cutout on the fuselage a little so the servo sits just a tad lower. Look into this on yours before you drill your servo mounting screws.

Below is the picture from the manual.
 

Attachments

  • Region capture 2.png
    Region capture 2.png
    146.4 KB · Views: 269
Being somewhat paranoid after a composite arm came off an aileron servo at flight #17, I refitted the elevator servo with a Hanger-9 1.5" double spline lock aluminum arm cut down to use the first hole at 1.25" out from center, with DuBro 2-56 ball-link and hardware on the servo end of the kit supplied metal push-rod. The ball-link has about 1/16" clearance to the stab. The remainder of servos are fitted with giant scale Hitec composite arms commonly supplied with their larger servos, and with Loctite on their mounting screws:)
 

Ohio AV8TOR

Just Do It
Everything is connected now and went on to balance the plane. I have been using Glacier 6S 3300's with my 4315-480 and will in this. On this balance I used two pieces of 15lb fishing line as it is super thin and made a loop and passed it around the wing tube between the fuse and the wing root. This proved to be very easy with this plane. Two quick little battery re-positions and this is where the battery will start at for my maiden. Then balance will be dynamic tested.
 

Attachments

  • DSC_0002.JPG
    DSC_0002.JPG
    257.5 KB · Views: 325
  • DSC_0003.JPG
    DSC_0003.JPG
    155.3 KB · Views: 311

Ohio AV8TOR

Just Do It
If you have not seem a 60" MXS it has an nice improved wing attachment method that now the Laser employs. I find it real easy to use plus if a screw becomes loose the wing is still held in the same locked position because the screw is still held in shear to the wing. I plan on using bonded washers to prevent the screw from coming loose.
 

Attachments

  • DSC_1001.JPG
    DSC_1001.JPG
    175.3 KB · Views: 282

Ohio AV8TOR

Just Do It
In keeping with the Stand Off Scale presentation of my plane to Leo's original he had the same star design on his wheel pants so I made a temporary decal for that and as Leo did not fly with SFG's I am guessing if he did he would have had the star design there so again this is a temp decal to see how I like it.
 

Attachments

  • DSC_1002.JPG
    DSC_1002.JPG
    171.5 KB · Views: 231

Ohio AV8TOR

Just Do It
One thing I would add and suggest you do this when installing your cowl. Place 2-3 layers of 1" painters "green" tape to the leading edge of your canopy to provide some clearance gap. I found my canopy install and removal tight after I first installed it. For me to correct it I had a small round file and slotted my cowl screw hole just a touch so I could push up the cowl a little. This helped a lot.
 

wedoitall

Member
One thing I would add and suggest you do this when installing your cowl. Place 2-3 layers of 1" painters "green" tape to the leading edge of your canopy to provide some clearance gap. I found my canopy install and removal tight after I first installed it. For me to correct it I had a small round file and slotted my cowl screw hole just a touch so I could push up the cowl a little. This helped a lot.

glad you reminded me to do this. I didn't do it on my MXS and I ended up chip'n my canopy and cowl because of a tight gap
 

Fast3D

50cc
I have difficulty putting the wings on! it seems that the wing CF tube is a very tight fit. What should I do?
 
Top