• If you are new to GiantScaleNews.com, please register, introduce yourself, and make yourself at home.

    We're 1st in Giant Scale RC because we've got the best membership on the internet! Take a look around and don't forget to register to get all of the benefits of GSN membership!

    Welcome!

The 'What did you do in your workshop tonight?' thread

stangflyer

I like 'em "BIG"!
Rob is Baby going flying?
I considered it for tomorrow. But I would be going out alone. My son is feverishly burning the midnight oil and daytime sunlight rebuilding the front section of the fuse on his PAU Edge. Crazy how that structure would remind you of egg shells or non tempered glass. It never should have shattered the way it did. Anyway, I will probably stay home in the morning and work on the new Yak. I spoke to the "G" man on Friday. His parts order was delayed in customs until Thursday. So they were not able to get the 212 rebuilt. That was the plan for Friday. He mentioned Monday will probably be test run day and back into a shipping box to come home to its...new home. I want to get as much done on the new Yak as possible. Hopefully a maiden in a week or two.
 

Luchnia

70cc twin V2
Photos k?
That was the plan, but I was trying to powerwash the back of my shop and do about 15 different things all at the same time, so did not get any pics. Hopefully I can get some pics of unwrapping and seeing if it fits in the fuse and how the wing tube fits etc.

These things are easy enough to make that even if it doesn't work, I will just slap another one together. I think it may have taken me 20 minutes to cut the fiberglass, wrap the wing tube with wax paper, and coat the fiberglass. I really thought it was much more to it. I bet it will take longer to sand and fit that sucker!
 

Luchnia

70cc twin V2
Since I was not able to do pics, here are the steps I used
  1. Cut the old wing tube sleeve out of the fuselage
  2. Sand and clean where the old wing tube was mounted in the fuselage
  3. Cut a piece of fiberglass cloth about two inches wider than the actual size of the fuse and enough to make two complete wraps on the wing tube. I used 6 oz cloth, but I don't see any reason you could not use finer weave as the 6 oz can be difficult to work with at times because it is constantly trying to come unwound.
  4. Make sure you have a solid work surface (a glass could be used)
  5. Put down wax paper on a work surface to protect the work surface from any wasted epoxy resin
  6. Clean the wing tube and wrap it with two layers of wax paper. One set of instructions showing using a thin film of Vaseline to hold the wax paper down to itself and not to get it on the wing tube. I did use that method although I also used some small pieces of scotch tape to help.
  7. You can use latex or vinyl gloves if you want. It does help to keep from getting stuff everywhere. Mix up the epoxy resin and take a small brush and put one length on the wing tube on the wax paper to hold the cloth to the tube. This worked really well and allowed me to get a good start on rolling the cloth.
  8. Now gradually start to roll the tube on the cloth and at the same time brush in the resin on the cloth as you proceed. Use only enough to saturate. Keep doing this until you have it completey wrapped and covered. There is no need to get crazy with the epoxy. I see some just pour it on, not needed at all.
  9. At this point if your sleeve is done well and tight you can hang it up to dry and put something under it to catch any access that should come off the tube or you can proceed to step 10 to try to make it tighter fit.
  10. Put two layers of wax paper over the freshly epoxied fiberglass just like you did on the wing tube before you put the fiberglass on
  11. You can put a couple of pieces of tape around it to hold it temporary. Try to make sure it is fairly snug all the way around
  12. Take duct tape and start taping. While taping put as much pressure as you can on it and wrap it at an angle so when you are done you are at the end of the sleeve. (I could have left this process out of my build as I did not have any waste epoxy at all, but maybe it helped to keep it compressed. Some guys also use heat shrink or vacuum in this process and I could see why.
  13. Let everything cure overnight
  14. Remove the duct tape and the wax paper while still on the wing tube. This can be a bit difficult when you get to the wax paper, but remove as much as possible then you can sand the rest off
  15. Remove the sleeve from the wing tube. (mine was really tight, but I got it off after some tough work)
  16. Cut one end of the sleeve square
  17. Remove the wax paper from the inside of the tube. Just take some long needle nose pliers and pinch the paper then rotate and it will wrap the wax paper and it will come out easy.
  18. Now take the tube to your belt sander (you could hand sand but that would be timely) and smooth the outer surface some and then hand sand to keep it smooth. Every so often attempt to fit the sleeve in the fuse. Once you get it close then hand sand to finish and fit it in the tube.
  19. Now you can mark it and cut the other end a fraction longer than needs to be for the fuse. You can finish sand this as needed for a nice fit.
  20. Now take the sleeve out of the fuse practice fit the wing tube in the sleeve. You will probably need to sand this some. I took an Oak dowel and wrapped sticky backed sandpaper on it and it worked perfectly.
  21. Once everything is fitted, then take your wings and put them on to make sure you have a good fit of your wings to the fuse. If not you may need to slightly adjust your fuse mount holes by some slight sanding. Once everything is fitting then you can epoxy the sleeve into the fuse.
  22. If everything looks good now, you are ready to epoxy in the sleeve. Depending on how the sleeve mounts in the plane and how much room you have, you can mix up your epoxy and then start the sleeve almost all the way in and put your epoxy brush against the tube just before each wood mount area and turn the sleeve while putting epoxy on with a brush. This is not nearly as messy as epoxying the whole sleeve and sliding it in or trying to get epoxy in the fuse with a brush.
  23. Once all is dried do you final fitting and any final sanding that is need.
  24. Now GO fly the plane :D
If there is a proper place for this, can a moderator move it?
 

49dimes

Damn I'm hungry
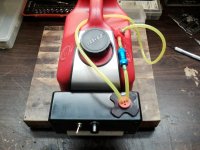
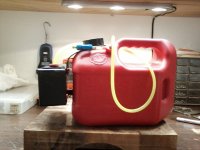
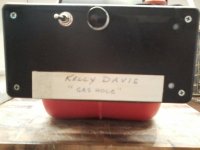
Found myself needing a new pump to fill the Extra with petrol 'O' plenty :cautious: (When I sold my 104 some how the gas can I made had to go with it!?!?:face-palm: lol). Any who.....I found this cool little gear pump on Amazon for under 30 bucks and got to work making me a gallon sized fueler :). The pump is 12 volts but I am running a 2S Lipo and getting 12oz a minute. Perfect for my 16oz tank in my Extra since I have downsized the cc's.......CUZ I CHEAP!
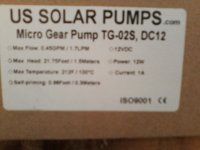
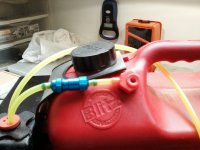
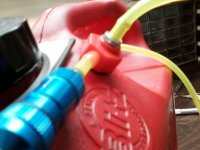
I also modified the Dubro can fitting with a nylon bushing insert to replace the O ring that kept coming out. Nice tight leak free fit now.

0716170807-00.jpg 0716170807-01.jpg 0716170813-00.jpg 0716170813-01.jpg 0716170814-00.jpg 0716170815-00.jpg 0716170815-01.jpg
 

stangflyer

I like 'em "BIG"!
Found myself needing a new pump to fill the Extra with petrol 'O' plenty :cautious: (When I sold my 104 some how the gas can I made had to go with it!?!?:face-palm: lol). Any who.....I found this cool little gear pump on Amazon for under 30 bucks and got to work making me a gallon sized fueler :). The pump is 12 volts but I am running a 2S Lipo and getting 12oz a minute. Perfect for my 16oz tank in my Extra since I have downsized the cc's.......CUZ I CHEAP!
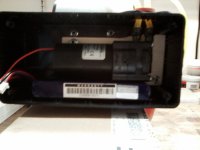
I also modified the Dubro can fitting with a nylon bushing insert to replace the O ring that kept coming out. Nice tight leak free fit now.

View attachment 97556 View attachment 97557 View attachment 97558 View attachment 97559 View attachment 97560 View attachment 97561 View attachment 97562
Nice Kelly, Would you post the link to where you got that pump? The pump I purchased for my gas can setup works. But when it comes to filling those Behemoth Fuel tanks, it takes a while. Heck, my unshaven stubble becomes a six inch beard before my tanks are filled. LOL.
shocked-smiley-emoticon.gif
 

49dimes

Damn I'm hungry
Top