You are using an out of date browser. It may not display this or other websites correctly.
You should upgrade or use an alternative browser.
You should upgrade or use an alternative browser.
Top Flight P-47 build
- Thread starter wfahey415
- Start date
Tom Hintz
50cc
Just a quick update.
I am well into assembling the fuse, motor is on, servos and radio in, tail feathers on and those linkages made. I am adding 1/4" to the motor standoffs as the EME60 carb is right at the firewall with the included standoffs which incidentally produce the exact firewall to prop washer distance listed in the instructions. I am hoping to "cheat" the cowl just a tick out from the standard position.
I have not been flying for a couple weeks now due to weather here in Concord, NC and this weekend is looking great so I will take a day or so away from the P47 to prevent a total meltdown of my thought generator. I expect by Sunday evening I will be urgently getting back to the warbird!
Bipenut53
150cc
Just a quick update.
I am well into assembling the fuse, motor is on, servos and radio in, tail feathers on and those linkages made. I am adding 1/4" to the motor standoffs as the EME60 carb is right at the firewall with the included standoffs which incidentally produce the exact firewall to prop washer distance listed in the instructions. I am hoping to "cheat" the cowl just a tick out from the standard position.
I have not been flying for a couple weeks now due to weather here in Concord, NC and this weekend is looking great so I will take a day or so away from the P47 to prevent a total meltdown of my thought generator. I expect by Sunday evening I will be urgently getting back to the warbird!
That is great!! Enjoy your flying time!! The only flying I will do this weekend is indoors on Sunday morning, not quite the same as what you will be doing but it gets me out and flying again. I cant wait until spring so I can fly "Big Air" and stretch my legs out ha ha!!
wfahey415
3DRCF Moderator
Just a quick update.
I am well into assembling the fuse, motor is on, servos and radio in, tail feathers on and those linkages made. I am adding 1/4" to the motor standoffs as the EME60 carb is right at the firewall with the included standoffs which incidentally produce the exact firewall to prop washer distance listed in the instructions. I am hoping to "cheat" the cowl just a tick out from the standard position.
I have not been flying for a couple weeks now due to weather here in Concord, NC and this weekend is looking great so I will take a day or so away from the P47 to prevent a total meltdown of my thought generator. I expect by Sunday evening I will be urgently getting back to the warbird!
Enjoy the down time from the build Tom. You've more than earned it!
I think you are way ahead of schedule anyway! :thumbup:
wfahey415
3DRCF Moderator
Tom Hintz
50cc
Top-Flite P-47 Razorback Build - Segment 3
Top-Flite Giant Scale P47 Razorback – Segment 3
Filling up the fuselage
Text, photos and video by Tom Hintz
Posted – 2-14-2016
The Top-Flite Giant Scale P47 Razorback fuselage looked immense to me when I first pulled it from the packaging. But by the time the servos, receiver, batteries, retracts, flap and fuel systems are installed much of that “extra space†disappears. But Top Flite® provides plenty of space and options to let me do installations of which I am confident.
Tail Feathers
The elevators come already hinged to the horizontal stabilizers. Those are supported by a pair of aluminum spars that have a very tight fit in the stabs and through the fuselage. Once I applied epoxy to all of the parts they went together somewhat easier but still required some effort. The instructions say to hold these pieces steady with masking tape which I did even though once seated I could not get either stab to move outwards.
The vertical stab is factory installed but to keep the box a reasonable size hinging the rudder is left to us. Good-sized “Robart style†pin hinges are supplied and the necessary holes were drilled at the factory. I had no issues getting the rudder mounted with virtually no hinge gap because everything fit as it should with no “coaxing†or “fitting†needed. Top Flite® keeps impressing me with quality of the components and the preparation of the kit itself.
While the epoxy at the tail feathers cured I installed the servos for the elevators, rudder, throttle and tail wheel. The instructions include good photos of the servo layout as well as the servo arm lengths needed to get the control deflections specified by Top Flite® for the Giant Scale P47 Razorback. This layout along with the tubes that carry the control rods to the tail make installing the servos correctly the first time a snap. The servos all mount in an elevated tray that offers lots of room to store/hide the excess servo cable lengths beneath the servos and out of the way. The elevators and rudder are controlled using long steel rods supported by factory installed tubes within the fuselage. The rods are threaded on one end and plain on the other end so we can trim their length to fit and solder clevises on that end. Having the guiding tubes pre-installed simplifies this process and before long I had my rear control surfaces working. I made sure I had a good amount of initial throw on these surfaces. Later once the Top-Flite Giant Scale P47 Razorback is fully assembled I will go through all of the control surfaces a final time to set their travels per the instructions.
Retractable Tail Wheel
This was also a good time to install the Robart retractable tail wheel. Here again the quality of the Top-Flite Giant Scale P47 Razorback kit showed through. Despite the tail wheel looking like it would never squeeze into its cavity it did and it fit nicely. The only issue came when I installed the pull-pull cable system that steers the tail wheel. Incidentally, the pre-installed tubes for the cables made this one of the easiest cable-stringing jobs I have done.
Unfortunately, in the glee of the moment it never occurred to me to put the tail wheel down before I made the pull-pull cables. Later when I did try to lower the tail wheel it moved just a little and the automatic amp-out system in the Robart retract shut the motor off. The tail wheel needs to be down when you size the pull-pull cables so this was my bad all the way. I was able to turn the servo around and shorten the cables enough that they snugged up with the ail wheel down. Getting up to start working on the plane at 2:30am occasionally has some liabilities.
The instructions say to use a Y-cord connecting the rudder servo and the tail wheel servo but I decided to separate the steering servo to an open AUX channel and then set up a mix of the tail wheel steering servo to the rudder servo. People who are experienced with the Top-Flite Giant Scale P47 Razorback have been telling me that the tail wheel steering is sensitive so with this mix I can adjust the steering without changing rudder deflection.
EME60 Engine
The EME 60 was mounted using the stand offs that came with it. The Top-Flite Giant Scale P47 Razorback instructions call for a 171mm firewall to prop washer distance and these standoffs produce exactly that dimension. However, the carb is pointed back as on many single cylinder engines and there was precious little space between the carb and firewall. I considered adding 1/4â€-thick spacers to move the EME 60 forward but that creates issues with fitting the cowl and setting the CG. I opted for boring a 1-7/8†diameter hole in the firewall aligned with the carb to let the motor breathe. A depression was also carved in the firewall to allow full motion of the choker lever. Then with the motor placement set I could install the throttle servo, throttle linkage and my hand-made choke rod.
The stock muffler that came with the EME 60 was too wide and would protrude through the side of the cowl. I had a Bisson wrap-around Pitts style muffler and that fit much better. Another plus for this muffler is that it has baffles in it that reduce the decibel level of the engine noticeably.
Fuel System
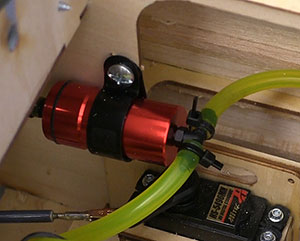
I am a huge fan of the RotoFlow fuel tanks so am installing a 24-ounce capacity RotoFlow tank along with their trick Quick Fire Fuel Balancer and Filter system. This filter is designed to hold ¼-ounce of fuel at the carb for quicker starts.
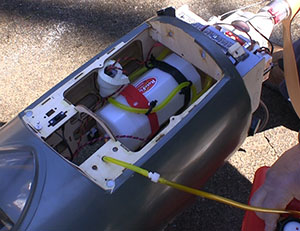
The Top-Flite Giant Scale P47 Razorback it offers a removable hatch that provides access to the fuel dot and On/Off switch. I also like being able to see the fuel tank so that during the initial flights I can better determine safe flight times with this combination.
I mounted the Quick Fire filter first because it was easier with the tank out. One end of the filter has two nipples and gets a line from the fuel dot and another to the fuel tank. The single nipple end has a line going to the carb. Nothing fancy in terms of the plumbing but I am hopeful the fuel this filter retains will make starting easier on those days when nothing seems to want to run.
I mounted the RotoFlow tank with a strip of foam secured to its bottom with double-sided tape. I also added two hook and loop straps to secure it. On these tanks I run the vent line around the top of the tank, secured to the hook and loop straps and then down to a vent dot on the bottom of the plane. Nothing fancy, just as clean and secure as I can make the installation. Plumb it decently and the RotoFlow tank will keep the plane flying reliably in virtually any attitude.
Cowl
The Top-Flite Giant Scale P47 Razorback cowl is very well made from what appears to be quality fiberglass. It certainly not flimsy or cheap. The paint job is very good and the cowl arrived without damage. I recognized my inability to cut a cowl for exhaust with any degree of finesse so I have secured the help of Dennis Shaver, one of the finest builders/fliers in the RCWingers club I fly with.
The dummy engine needed to be mounted in the cowl before the cowl was mounted and cut to clear the exhaust so I put that part of it together. The dummy engine for the Top-Flite Giant Scale P47 Razorback seems to be made of the same thin plastic used to make many other f aux engines and interiors. I am certain that this plastic can see me coming and morphs itself into an exceptionally brittle state that splits, cracks and pretty much blows up when I try to work with it. That bit of paranoia probably insures disastrous results but I pushed ahead nonetheless. I was gratified to see that if you stand well back, the dummy engine looks sort of normal. I suspect that done by someone with skills this material can worked into a good looking f aux engine. If my faux engine looks funny to you it is all my bad.
Here endeth this part of the Top-Flite Giant Scale P47 Razorback build. I am getting down to the small stuff now but some that can still kill a plane if forgotten. That’s why I always stop at this point and go back at it the next day. I need to set the CG, set the throws, make sure I have everything in theDX9 the way I want it, confirm that my ignition kill works and then fire the motor up to be sure the fuel system is working without leaking. Always a good point.
Top-Flite Giant Scale P47 Razorback – Segment 3
Filling up the fuselage
Text, photos and video by Tom Hintz
Posted – 2-14-2016
The Top-Flite Giant Scale P47 Razorback fuselage looked immense to me when I first pulled it from the packaging. But by the time the servos, receiver, batteries, retracts, flap and fuel systems are installed much of that “extra space†disappears. But Top Flite® provides plenty of space and options to let me do installations of which I am confident.
Tail Feathers
The elevators come already hinged to the horizontal stabilizers. Those are supported by a pair of aluminum spars that have a very tight fit in the stabs and through the fuselage. Once I applied epoxy to all of the parts they went together somewhat easier but still required some effort. The instructions say to hold these pieces steady with masking tape which I did even though once seated I could not get either stab to move outwards.
The vertical stab is factory installed but to keep the box a reasonable size hinging the rudder is left to us. Good-sized “Robart style†pin hinges are supplied and the necessary holes were drilled at the factory. I had no issues getting the rudder mounted with virtually no hinge gap because everything fit as it should with no “coaxing†or “fitting†needed. Top Flite® keeps impressing me with quality of the components and the preparation of the kit itself.
|
|
| The elevators come already hinged (left) but I had to glue the horizontal stabilizers to the fuse with two aluminum tubes for strength. The Robart retractable tail wheel (right) went in easy but I tensioned the pull-pull cable with the wheel retracted. Wrong! I was able to turn the servo around and adjust the cables and all was fine. Click images to enlarge | � |
Retractable Tail Wheel
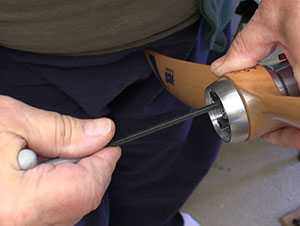
This was also a good time to install the Robart retractable tail wheel. Here again the quality of the Top-Flite Giant Scale P47 Razorback kit showed through. Despite the tail wheel looking like it would never squeeze into its cavity it did and it fit nicely. The only issue came when I installed the pull-pull cable system that steers the tail wheel. Incidentally, the pre-installed tubes for the cables made this one of the easiest cable-stringing jobs I have done.
Unfortunately, in the glee of the moment it never occurred to me to put the tail wheel down before I made the pull-pull cables. Later when I did try to lower the tail wheel it moved just a little and the automatic amp-out system in the Robart retract shut the motor off. The tail wheel needs to be down when you size the pull-pull cables so this was my bad all the way. I was able to turn the servo around and shorten the cables enough that they snugged up with the ail wheel down. Getting up to start working on the plane at 2:30am occasionally has some liabilities.
|
|
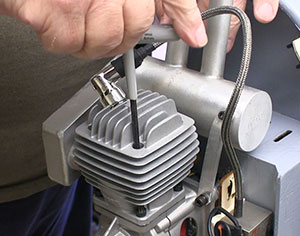
| The included stand offs put the EME60 (left) in perfect position to match the instructions 171mm firewall to prop washer dimension. I had to bore a large hole in the firewall (right) to let the carb breathe, not an uncommon thing with gas engines. Click images to enlarge | � |
EME60 Engine
The EME 60 was mounted using the stand offs that came with it. The Top-Flite Giant Scale P47 Razorback instructions call for a 171mm firewall to prop washer distance and these standoffs produce exactly that dimension. However, the carb is pointed back as on many single cylinder engines and there was precious little space between the carb and firewall. I considered adding 1/4â€-thick spacers to move the EME 60 forward but that creates issues with fitting the cowl and setting the CG. I opted for boring a 1-7/8†diameter hole in the firewall aligned with the carb to let the motor breathe. A depression was also carved in the firewall to allow full motion of the choker lever. Then with the motor placement set I could install the throttle servo, throttle linkage and my hand-made choke rod.
The stock muffler that came with the EME 60 was too wide and would protrude through the side of the cowl. I had a Bisson wrap-around Pitts style muffler and that fit much better. Another plus for this muffler is that it has baffles in it that reduce the decibel level of the engine noticeably.
Fuel System
I am a huge fan of the RotoFlow fuel tanks so am installing a 24-ounce capacity RotoFlow tank along with their trick Quick Fire Fuel Balancer and Filter system. This filter is designed to hold ¼-ounce of fuel at the carb for quicker starts.
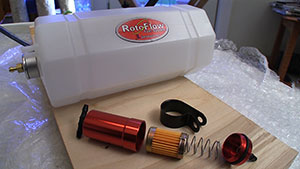
|
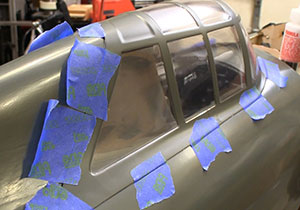
|
| I am a big fan of RotoFlow gas tanks (left) and this time I am adding their Quick Fire fuel filter. The canopy (right) came out of the box ready for installation. I didn't know that was legal! Click images to enlarge | � |
I mounted the Quick Fire filter first because it was easier with the tank out. One end of the filter has two nipples and gets a line from the fuel dot and another to the fuel tank. The single nipple end has a line going to the carb. Nothing fancy in terms of the plumbing but I am hopeful the fuel this filter retains will make starting easier on those days when nothing seems to want to run.
I mounted the RotoFlow tank with a strip of foam secured to its bottom with double-sided tape. I also added two hook and loop straps to secure it. On these tanks I run the vent line around the top of the tank, secured to the hook and loop straps and then down to a vent dot on the bottom of the plane. Nothing fancy, just as clean and secure as I can make the installation. Plumb it decently and the RotoFlow tank will keep the plane flying reliably in virtually any attitude.
Cowl
The Top-Flite Giant Scale P47 Razorback cowl is very well made from what appears to be quality fiberglass. It certainly not flimsy or cheap. The paint job is very good and the cowl arrived without damage. I recognized my inability to cut a cowl for exhaust with any degree of finesse so I have secured the help of Dennis Shaver, one of the finest builders/fliers in the RCWingers club I fly with.
The dummy engine needed to be mounted in the cowl before the cowl was mounted and cut to clear the exhaust so I put that part of it together. The dummy engine for the Top-Flite Giant Scale P47 Razorback seems to be made of the same thin plastic used to make many other f aux engines and interiors. I am certain that this plastic can see me coming and morphs itself into an exceptionally brittle state that splits, cracks and pretty much blows up when I try to work with it. That bit of paranoia probably insures disastrous results but I pushed ahead nonetheless. I was gratified to see that if you stand well back, the dummy engine looks sort of normal. I suspect that done by someone with skills this material can worked into a good looking f aux engine. If my faux engine looks funny to you it is all my bad.
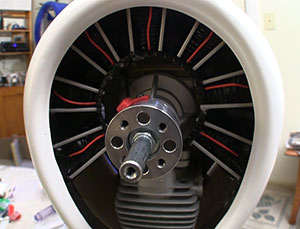
| |
| The faux engine turned out pretty well (left) even though I did the install. I had a friend do the cutting of the cowl for the exhaust because I am more confident that I would screw that up. Click image to enlarge | � |
Tom Hintz
50cc
Top-Flite Giant Scale P47 Razorback – Segment 4
Top-Flite Giant Scale P47 Razorback – Segment 4
The (failed) search for stupid
Text, photos and video by Tom Hintz
Posted – 2-23-2016
As the Top-Flite Giant Scale P47 Razorback nears maiden day we also venture into one of the most dangerous periods for any new RC aircraft. It is easy to think that the plane is completely done and ready for flight. However, history proves beyond a shadow of a doubt that it is likely that one or more things have been overlooked. The next segment of this build, Top-Flite Giant Scale P47 Razorback – Maiden Flight 1 will make that painfully clear.
Nuts and Bolts
I generally have the cowl off of a plane during the initial running of the engine so this is a good time to check all of the nuts and bolts holding the engine to the airframe and the engine itself together. Checking the muffler bolts is a good thing but there are many more that need to be checked. This is not a time to veer off into your macho mode to start snapping off fasteners but rather to make sure everything is good and tight. I include the bolts holding the engine cylinders to the crankcase along with the nuts and bolts holding the engine to the airframe.
Prop and spinner bolts need to be checked often, especially with a new engine and/or a new prop. All of these bolts need thread locking material but they also hold better after you apply that thread locker a couple times. A loose prop bolt can cause a vibration and even encourage the prop to blow up at speed. All of the prop bolts must be tight and better yet, they should all be applying roughly the same amount of clamping force to the prop center section.
Remember that wooden props will compress some and allow the prop washer to sink into the hub of the prop, loosening the clamping load on the bolts. I always leave the spinner off (if I even use one) during the initial flights to make it easier to check the prop bolts between flights. I usually can put another 1/8th turn or so on each of the prop bolts after each of the first 4 to 8 flights. After that applying roughly the same amount of force does not turn the prop bolts much if at all.
I use special wood screws (#3 X 5/8â€) with a hex head that makes securing the servos into an airframe far easier than with the typical cross head (Phillips) screws. These screws also have a very sharp point that usually allows me to drive them without drilling a pilot hole. But if they are going to be driven near the edge of a piece of wood I still drill the pilot hole to help reduce splitting. After installing these screws initially, I will put a drop of thin CA on the screw itself or on the holes they screw into.
I also replace the cross head screws that hold the servo arm on with hex head bolts (2.5 X 8mm) for many of the same reasons. They are much easier to drive and remove without stripping the Phillips style screw head and let you apply more tightening force. I still use a small drop of thread locking material on these screws and usually apply that on the final check of the plane before the maiden flight.
Other nuts and bolts like those holding the landing gear on must be checked one final time. Screws holding ballast weight certainly need to be checked because we do not need chunks of lead flopping around inside an airframe.
Setting Throws – Checking Linkage
Now that the lane has been balanced and all of the equipment is in place we need to set the control throws. On my sport/3D planes I just set everything at “all I can get†and maybe program in a dual rate setting or two that let me be smoother or more aggressive yet remain able to tone the plane down for landing. A warbird is a different animal so following the kit manufacturers recommendations is a good idea, at least initially. Later, after the plane has been maidened and dialed in for normal flight we can adjust the throws to best suit your style of flying but still within the performance envelope of that particular plane.
While we are working on the control system the ends of the linkages at the control surfaces and at the servos need to be checked to be sure they are tight and move freely. I also move all of the controls through their full range of motion to be sure there are no conflicts where a control surface can get stuck or is limited.
Wing Bolts
Easily the most glaring problem with the Top-Flite Giant Scale P47 Razorback kit is the ¼-20 by 2â€-long nylon wing bolts. They are simply too short by at least ¼-inch. I could only get one side to engage the threads of the factory installed blind nut (1/4 X 20) and then it only engaged what feels like a few threads. Nothing about this gives me the warm fuzzies and I certainly am not going to fly it this way. While searching for longer wing bolts I found that lots of outlets that sell wing bolts also think that 2†is all you need. I recognize that I am not an engineer and can’t spout the actual strength that few threads of engagement actually creates. I can tell you this Top-Flite Giant Scale P47 Razorback won’t fly until the 3â€-long nylon wing bolts I eventually found at RTL Fasteners arrives. I am confident that too short is dangerous and too long is just fine in this case.
The other important thing about the too-short wing bolts is that it represents the only thing I do not like about the Top-Flite Giant Scale P47 Razorback kit. To improve this kit substantially Top Flite® would have to send a couple techs (with longer wing bolts) to come to my shop and assemble the kit for me.
Assembly Rack and Wing Bag
A very common issue with warbirds sporting a one-piece wing is that they have to be assembled in an inverted position. That means building a simple rack to hold the Top-Flite Giant Scale P47 Razorback while I attach the wing and plug in the flaps, retracts and aileron servos. All that is best done with someone or something holding the wing rocked up on the leading edge so I can make all those connections.
If you don’t already recognize the utility of PVC pipe there is a good chance you don’t have a warbird. Suffice it to say that in the scheme of building a Top-Flite Giant Scale P47 Razorback several feet of PVC pipe and the necessary connections is a negligible expense.
Hauling that one-piece wing to and from the field, even in a trailer is going to be tough, especially if you don’t want a bunch of trailer/hangar rash when you pull it out. I have a story on my site regarding making your own wing bags using a nifty insulating material called Reflectix. It’s not perfect but it does work and you can design the wing bag the way you want it.
Starting the EME 60
I like to do the initial running of a new motor at home because it can get frustrating very quick, but it is seldom the fault of the motor. The problem is likely the idle end of the throttle setting which never seems to be right before the motor is actually running. I should also note that running a gas engine is never totally safe so you need to be paying attention. I have a safety start fixture that I take everywhere I go because as long as I have grass to drive its stake into I can start my engines without getting run over by them.
No matter how much time I spend setting the throttle servo up, just getting the motor to start can mean increasing the idle end of the throw a bunch. The EME 60 used in the Top-Flite Giant Scale P47 Razorback is no different. The mixture settings appear to be dead on right out of the box but to get the motor to start I had to increase the sub trim for the throttle servo so that the idle was low enough. This bit of radio programming has nothing to do with the Top-Flite Giant Scale P47 Razorback but rather is a normal setting on a new motor/airframe.
For breaking the EME 60 in I am using gas mixed at 30:1 with petroleum based oil per the manufacturers suggestions. I carry a second gas can to the field with this “break in†fuel so I can comply with the manufacturer’s instructions with a new motor and run my normal 50:1 mix with Redline Synthetic 2-cycle oil. Aside from using the correct gas/oil mixture I frequently change the rpm during break in and never run it at wide open throttle for more than a few seconds and then only after I have half a gallon of the break in mix through the new motor.
The final work on the Top-Flite Giant Scale P47 Razorback before the maiden was to check nuts and bolts as I assembled it. The motor has nearly an hour of run time so I went over that and all of the bolt-in parts one more time to be sure all is secure. I finished all of these tasks on Friday so I loaded the Top-Flite Giant Scale P47 Razorback into the trailer and put my Spektrum DX9 Black Edition transmitter on charge to be sure everything was ready for maiden day.
However, my search for stupid mistakes failed to catch one and that would end the second day of test flying the Top-Flite Giant Scale P47 Razorback before it really got started.
Top-Flite Giant Scale P47 Razorback – Segment 4
The (failed) search for stupid
Text, photos and video by Tom Hintz
Posted – 2-23-2016
As the Top-Flite Giant Scale P47 Razorback nears maiden day we also venture into one of the most dangerous periods for any new RC aircraft. It is easy to think that the plane is completely done and ready for flight. However, history proves beyond a shadow of a doubt that it is likely that one or more things have been overlooked. The next segment of this build, Top-Flite Giant Scale P47 Razorback – Maiden Flight 1 will make that painfully clear.
Nuts and Bolts
I generally have the cowl off of a plane during the initial running of the engine so this is a good time to check all of the nuts and bolts holding the engine to the airframe and the engine itself together. Checking the muffler bolts is a good thing but there are many more that need to be checked. This is not a time to veer off into your macho mode to start snapping off fasteners but rather to make sure everything is good and tight. I include the bolts holding the engine cylinders to the crankcase along with the nuts and bolts holding the engine to the airframe.
Prop and spinner bolts need to be checked often, especially with a new engine and/or a new prop. All of these bolts need thread locking material but they also hold better after you apply that thread locker a couple times. A loose prop bolt can cause a vibration and even encourage the prop to blow up at speed. All of the prop bolts must be tight and better yet, they should all be applying roughly the same amount of clamping force to the prop center section.
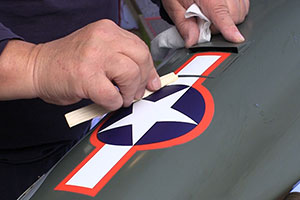
|

|
| While these are not water-slide decals Top Flite says to peel the backing off and then dip the sticky back decal in water with a little dish soap in it. That makes it easier to position the graphics. Then use a paper towel to get most of the water out from under the decal followed by a piece of soft balsa to squeegee the rest of the water out and set the decal. Click images to enlarge | � |
I use special wood screws (#3 X 5/8â€) with a hex head that makes securing the servos into an airframe far easier than with the typical cross head (Phillips) screws. These screws also have a very sharp point that usually allows me to drive them without drilling a pilot hole. But if they are going to be driven near the edge of a piece of wood I still drill the pilot hole to help reduce splitting. After installing these screws initially, I will put a drop of thin CA on the screw itself or on the holes they screw into.
I also replace the cross head screws that hold the servo arm on with hex head bolts (2.5 X 8mm) for many of the same reasons. They are much easier to drive and remove without stripping the Phillips style screw head and let you apply more tightening force. I still use a small drop of thread locking material on these screws and usually apply that on the final check of the plane before the maiden flight.
Other nuts and bolts like those holding the landing gear on must be checked one final time. Screws holding ballast weight certainly need to be checked because we do not need chunks of lead flopping around inside an airframe.
Setting Throws – Checking Linkage
|
|
| As I put the Top-Flite Giant Scale P47 Razorback together for the maiden flight I tighten everything I can find once more. I always tighten props down (right) with a good hex wrench to be sure I get the bolts equally tight. Click images to enlarge | � |
While we are working on the control system the ends of the linkages at the control surfaces and at the servos need to be checked to be sure they are tight and move freely. I also move all of the controls through their full range of motion to be sure there are no conflicts where a control surface can get stuck or is limited.
Wing Bolts
Easily the most glaring problem with the Top-Flite Giant Scale P47 Razorback kit is the ¼-20 by 2â€-long nylon wing bolts. They are simply too short by at least ¼-inch. I could only get one side to engage the threads of the factory installed blind nut (1/4 X 20) and then it only engaged what feels like a few threads. Nothing about this gives me the warm fuzzies and I certainly am not going to fly it this way. While searching for longer wing bolts I found that lots of outlets that sell wing bolts also think that 2†is all you need. I recognize that I am not an engineer and can’t spout the actual strength that few threads of engagement actually creates. I can tell you this Top-Flite Giant Scale P47 Razorback won’t fly until the 3â€-long nylon wing bolts I eventually found at RTL Fasteners arrives. I am confident that too short is dangerous and too long is just fine in this case.
The other important thing about the too-short wing bolts is that it represents the only thing I do not like about the Top-Flite Giant Scale P47 Razorback kit. To improve this kit substantially Top Flite® would have to send a couple techs (with longer wing bolts) to come to my shop and assemble the kit for me.
Assembly Rack and Wing Bag
|
|
| I am glad I chose to open the hatch (left) to give me access to the fuel tank and filter. I can keep the On/Off switch and fueling tube inside the fuse and off of the sides of the plane. his is my first use of the Quick Fire from the RotoFlow folks and it seems to be working great. Click images to enlarge | � |
If you don’t already recognize the utility of PVC pipe there is a good chance you don’t have a warbird. Suffice it to say that in the scheme of building a Top-Flite Giant Scale P47 Razorback several feet of PVC pipe and the necessary connections is a negligible expense.
Hauling that one-piece wing to and from the field, even in a trailer is going to be tough, especially if you don’t want a bunch of trailer/hangar rash when you pull it out. I have a story on my site regarding making your own wing bags using a nifty insulating material called Reflectix. It’s not perfect but it does work and you can design the wing bag the way you want it.
Starting the EME 60
I like to do the initial running of a new motor at home because it can get frustrating very quick, but it is seldom the fault of the motor. The problem is likely the idle end of the throttle setting which never seems to be right before the motor is actually running. I should also note that running a gas engine is never totally safe so you need to be paying attention. I have a safety start fixture that I take everywhere I go because as long as I have grass to drive its stake into I can start my engines without getting run over by them.
No matter how much time I spend setting the throttle servo up, just getting the motor to start can mean increasing the idle end of the throw a bunch. The EME 60 used in the Top-Flite Giant Scale P47 Razorback is no different. The mixture settings appear to be dead on right out of the box but to get the motor to start I had to increase the sub trim for the throttle servo so that the idle was low enough. This bit of radio programming has nothing to do with the Top-Flite Giant Scale P47 Razorback but rather is a normal setting on a new motor/airframe.
| Video Tour |
The final work on the Top-Flite Giant Scale P47 Razorback before the maiden was to check nuts and bolts as I assembled it. The motor has nearly an hour of run time so I went over that and all of the bolt-in parts one more time to be sure all is secure. I finished all of these tasks on Friday so I loaded the Top-Flite Giant Scale P47 Razorback into the trailer and put my Spektrum DX9 Black Edition transmitter on charge to be sure everything was ready for maiden day.
However, my search for stupid mistakes failed to catch one and that would end the second day of test flying the Top-Flite Giant Scale P47 Razorback before it really got started.