• If you are new to GiantScaleNews.com, please register, introduce yourself, and make yourself at home.

    We're 1st in Giant Scale RC because we've got the best membership on the internet! Take a look around and don't forget to register to get all of the benefits of GSN membership!

    Welcome!

Top Flight P-47 build

wfahey415

3DRCF Moderator
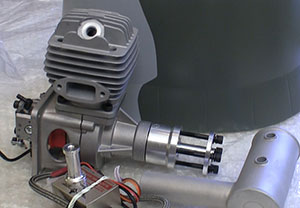
This is a special build by a very special person. Tom is a very close friend of mine and is battling Alzheimer's. One of his dreams is to build the Top Flight P-47 and fly it at Joe Nall this year. Unfortunately, he just didn't have the resources to pull it all together. So I formulated a game plan, I would purchase the plane, retracts, motor and electronics and have them all sent to Tom in North Carolina. He could do the build for his website and then fly the plane at Joe Nall. The folks at Nall got wind of the build and were nice enough to register Tom for the event as their guest. I will join Tom at Joe Nall in May and take possession of the aircraft there. The support for this build has been great. MilehighRC provided a great price on the EME 60 for this build. Rotoflow is providing a tank and Quickfire filter. Anderson RC was very helpful in acquiring all of the electronics for this build. And there is more great news to come with this build. Stay tuned.:thumbup:

Here is the first segment. :popcorn:

http://www.flyingrc.net/tfp471.html
 

Bipenut53

150cc
Wow, nice! You can just read his excitement in his description of everything. I wish I could write that well! Well done [MENTION=3978]wfahey415[/MENTION]! I will be watching for more links to his story.
 

Bushwacker

3DRCF Moderator
Very cool indeed. Man I love stuff like this. Awesome job by both of you and the folks who pitched in. :thumbup:
 

wfahey415

3DRCF Moderator
You will also notice on the majority of his articles that there is a video posted. These are always well done and interesting. Same for his woodworking videos.
 

3dmike

640cc Uber Pimp
Looks great Bill! Feel free to cut and paste the build here if you would like. I know we are a 3d hub but many of us started in and still fly warbirds! :)
 
Top-Flite Giant Scale P47 Razorback – Segment 2

I keep finding good stuff while assembling the wing

Text, photos and video by Tom Hintz
Posted – 1-25-2016
Because retracts and flaps have been added to my normal aileron only wings this segment will focus only on assembling the wing. Though the hinging on the wing has been done for us the addition of retracts and a laminated wing spar adds a little bit of complexity to this build. I say “a little†complexity because if you have built any of the cheaper ARF’s the Top-Flite Giant Scale P47 Razorback is a walk in the park by comparison. Top-Flite provides good instructions combined with user-friendly engineering that makes putting this plane together easier and faster than the lower-priced excuses for kits.
I did go over the aileron and flap hinges as the instructions say to be sure the hinges were glued solidly. I have pulled on all of the hinges in this plane and have yet to find one that even hints at being loose. All of the hinge gaps run from small to nearly non-existent.
Installing the servo mounting blocks on the underside of the panels is a snap because Top-Flite® lays out the location of the blocks. I used the Epo-Grip paste epoxy to install the blocks then put a little chunk of iron on each pair to be sure they “settled in†to get the best bond I can. The next day I removed the weight and added a screw into each block that further secures them, as all installations like this should be.
To avoid confusion, I labeled each servo door with a number then added a piece of making tape to the wing just above the servo door with the same number. This is just a simple way to avoid small errors caused by small differences in the doors.
servoblocks300.jpg
goodsrvoinst300.jpg
The blocks for mounting servos (let) go in etched, no mistake layout lines and are doubly secured with a screw in each. Top Flite suggests putting a 1/16" spacer under the servos (right) to reduce vibration. You should be doing that on every plane with servo mounting like this.
Click images to enlarge
Top Flite® gives us plenty of string for pulling the servo cables to the root of the wing. I discovered that the “strings†are actually one piece of string that runs from the aileron servo out of the root rib then back up to the retract cable. The flap servo is close enough to the root to just drop its cable to where you can reach it, and then pull it up through the pre-cut hole on top of the wing.
After doing the basic setup on the servos I began making the control linkages. Top Flite® includes quality clevises both threaded and solder on along with metal rods that are threaded on one end. With the control surface clamped in its neutral position I marked the cutting point so the rod end protrudes through the clevis a little. Then I used silver solder to permanently attach that clevis. This is a very quick but efficient way to make tough linkages sized perfectly for the plane. Once again, Top Flite® puts the good stuff in the kit so another trip to the hobby shop is eliminated. Because it is silver solder you need a good soldering iron/gun.
Joining Wing Halves

The Top-Flite Giant Scale P47 Razorback comes with a three-part wing spar. It has plywood outer surfaces and a tough aluminum center bar that has holes in it to keep the weight down. I used the long setup Epo-Grip paste epoxy to assemble the spar pieces. Then I used several clamps to hold the pieces in place, paying attention to the alignment before setting is aside to cure overnight. After curing the spar needs to be free from squeeze-out epoxy, particularly along its edges. I used the “fine†side of a woodworking rasp to clean up the edges of the spar, make them square and gently round the edges to reduce “snagging†as it is pushed into the cavities in the wing.
Because we need the spar to fit snugly getting it into its cavity is going to take a bunch of trial and error fitting. I used an electric sander with fine paper to slowly reduce the spar until it could be pushed fully into each half of the wing. I even fit one side to the right wing, labeled that and then fit the other side to the left wing. I don’t want to find out later that there is a difference internally when the epoxy is curing before I can get the spar in.
The peanut butter-like consistency of the Epo-Grip Paste with its 3 to 4 hour working time made coating out the root ribs, spar and spar cavity easier because I was not rushed. Also, I could apply a decent thickness film of the epoxy without it running which is a huge benefit for this kind of assembly.

pntystring300.jpg
shrintube300.jpg
The strings for pulling wires through the structure (left) are plenty long to be easy to use. Top-Flite also includes shrink tubing (right) for securing extensions! You will find lots of quality parts and pieces in this kit that you would probably replace with a "bargain" kit.
Click images to enlarge
When I was assembling the wing it was around 16-degrees in the shop so I was doing all this in a smaller space in the house. I have to say that joining the Top-Flite Giant Scale P47 Razorback wing halves was more of a test of coordination than I anticipated. The covering job Top Flite® does actually makes the wing feel slick to the hand because it really is smooth. But after a little push-me pull-you the wing halves were joined and I used the included rubber bands to apply clamping pressure to the wing halves while the epoxy cured. Alcohol and paper towels were used to clean up any excess epoxy that squeezed out of the seam between the wing halves.
After joining the wing halves I installed the control horns on the ailerons and flaps. The holes are not drilled for the control horns but there are plywood plates under the covering in line with the servo control arms. I put the screw-on clevis on the control rod, attached that to the servo arm and then used the rod laid over the control surface to mark where the control horns are installed. The plate under the covering has plenty of surface but you do have to be careful not to drill all the way through the flap or aileron.
The receiver and batteries were used to put the servos at their neutral point so the control linkages could be made using the hardware included in the Top-Flite Giant Scale P47 Razorback kit. I’m not a big fan of solder-type clevises but when those pieces are of the quality Top Flite® includes that process went faster than I anticipated. Doing it this way also produces the perfect length linkages which makes dialing the control surfaces in very easy.
The Top-Flite Giant Scale P47 Razorback comes with aluminum tubing that represents the eight machine-guns located in the wings. The manual provides exposure lengths for each so I marked them, mixed up some of the Epo-Grip long set paste epoxy and installed those pieces of tubing.
lamspar300.jpg
joinwing300.jpg
The heavy aluminum center piece to the laminated spar (left) means you sill not be bending or breaking this unless you try flying through a building or something. I used the Epo-Grip epoxy for joining the wing halves (right) also.
Click images to enlarge
A strengthening plywood doubler gets epoxied to the underside of the wing at the 1/4-20 bolt holes. After carefully tracing the doubler and cutting the covering away we have to epoxy that piece in place. The only way to really align this correctly is to use the bolts. I sprayed the bolts with WD-40 and then coated the bottom of the doubler with 6-minute epoxy. I used the oiled wing bolts to locate the plate and clamped it in place so it conforms to the dihedral in the wing. After the epoxy cured I removed the clamps and then unscrewed the bolts from the epoxy. A day or so later when the epoxy was fully cured I cleaned the bolts holes out with a drill.
The final steps to finish the building of the wing is to install the retract control box onto the center of the wing where it will be inside of the fuselage. The control box is super light so double-sided foam tape will work fine. Since both the ailerons and flaps are on Y-cords I can group the wires coming out of the wing and using the cavity within the wing at that point to hide the excess cable that is not needed to make the connections to the receiver in the fuselage.
There is a center section that gets epoxied to the bottom of the wing that continues the bottom contour of the fuselage. I have prepped that piece and will epoxy it in place at the end of one of the coming days. Trying to locate this center section with the wing off of the plane is just not the way to do it.
Aside from the final setup of the control surfaces the wing is done. Once I get the fuse nearly completed I can go in and set up all of the control surfaces, according to the specs in the instruction manual so some of my friends at the field don’t hyperventilate over my “excessive†throws. Actually they are probably excessive for a warbird but I have to keep poking at everybody or they will think something is wrong with me.

Tom Hintz, owner
FlyingRC.net
 
Top Flite® Giant Scale P-47 Razorback - Segment 1

ARF Segment #1 – Unboxing, prep and component selection

Text, photos and video by Tom Hintz
Posted – 1-18-2016
Giant scale warbirds can be a touchy subject with modelers that have been through the compromise-heavy and physically heavy ARF’s (almost ready to fly, a lie to be sure but the accepted terminology) on the market today. When I saw the first press releases showing the new Top-Flite Giant Scale P47 Razorback the “gotta have it†center in my brain kicked into overdrive. Now with the Top-Flite Giant Scale P47 Razorback in my shop it is clear that my “gotta have it†sensors are working just fine.
The Basics

One of the big attractions of the Top-Flite Giant Scale P47 Razorback is the built-up balsa and light plywood fuselage in place of the fiberglass versions of many other warbirds. I am not a fan of fiberglass in fuselages because they tend to be either heavy or scary thin, neither of which give me the warm fuzzy feelings that a well-designed and constructed wood structure does.
The Top-Flite Giant Scale P47 Razorback was designed to accommodate gas or electric power. To make battery changes easier they added a large magnet-secured hatch on top ahead of the cockpit. It is covered over but you can remove a four screws, cut it out and iron the included strips of covering over the edges. This hatch can also be used with gas engines to increase access to the tank system as well conceal fuel filling and On/Off switches.
The Top-Flite Giant Scale P47 Razorback has an 85 in wingspan, 75 in-long and a wing area of 1,329sq in. Part of what many pilots who currently fly this model describe as great handling characteristics come from that big of a wing supporting an all up weight of 19-1/2 to 21-1/2 lbs that gives this model a wing loading of 34-37 oz per sq ft, not high at all for a warbird.
swtchdot300.jpg
tbestorear300.jpg
Everywhere you look the Top-Flite Giant Scale P47 Razorback is very well built. they even include places for a fuel dot and switches (left) under the hatch. The tubes (right) take the included pushrods directly to the surface they are to control.
Click images to enlarge
This plane was designed around the DLE61 gas engine and purpose designed Robart® air or electric retracts. You also get a detailed cockpit kit, replica radial engine, fiberglass wheel doors, fiberglass cowl, metal gun barrels and a removable antenna. To complete the warbird look a detailed decal sheet is included.
Un Boxing

The Top-Flite Giant Scale P47 Razorback survived its cross-country truck rides with no visible damage to the double boxing. All of the major components were covered in bubble wrap. All of the pieces inside the box were still taped in place which goes a long way to preventing banging-together damage during shipping. It is important to be sure all of the square-shaped boxes and what look like fillers are opened as some contain parts bags and other pieces.
In addition to finding a real instruction manual it was nice to find undamaged parts bags still holding all of their contents. Another unexpected find was the real aluminum prop hub type spinner that I paid $80 for on my last warbird. The stepped base/prop washer is drilled for the DLE61 bolt pattern which includes a bunch of other engines in this size range including my new EME60 that will go into the Top-Flite Giant Scale P47 Razorback.
The fuselage is straight, solid and surprisingly well built. They have nicely sized stringers that are placed closer together than I am used to seeing in an ARF. The structure inside of the fuse is also well done and spacious. Putting the radio gear in the Top-Flite Giant Scale P47 Razorback is not going to be a problem.
seervimnt300.jpg
firewall300.jpg
Top-Flite etches the position of the servo mounting blocks (left) and then puts the hole all installations like this should have for the screw that toughens the mount a bunch. The firewall is coated out (right) to be fuel proof and has the hole locations for many popular motors already laid out!
Click images to enlarge.
The covered-over hatch meant primarily for changing batteries when an electric motor is used can also be used for access to hidden switches and a re-fueling port. I am going to open this hatch to put the switches in but this may also make plumbing the gas fuel tank easier.
The wings feature pre-installed pin hinges in the ailerons and flaps with virtually no gaps. The covers for the aileron and flap servos have embossed layout marks indicating where the hardwood blocks are to be epoxied in place AND they have a screw hole already drilled for adding a screw that further secures the servo mounting. Even the strings (actually one long string that loops out to the root of each wing, very nice) for pulling servo cables are actually long enough to use easily. Where does Top Flite get off being logical?
The cavity for the retracts has the liner already installed (I’ll kiss someone from Top Flite for that one) so the builders of the Top-Flite Giant Scale P47 Razorback can skip the harsh language throughout the trimming and supposed easy installation of junk other manufacturers call wheel wells. (I have a set of EMS wheel wells in the woods next to my house where I throw excessively stupid things) A big thumbs up to Top Flite for the wheel wells and lots of other things on this one.
The elevators are hinged and again, nicely done with tight seams and no loose pin hinges. The instructions include a reminder to check the factory hinging which is always a good idea but Top Flite is having a better hinging job done at the factory than most of the ARF’s I have seen.
The mounting rails for the Robart Electric Retracts are substantial and glued well. I like that Top Flite puts a cover over the base of the retract. This and the included (and well made) retract “doors†promise a decent retract installation that again lacks the usual harsh language and frustration. Adding 5†wheels is another nice touch that will tame not-so-short grass runways.

Other unexpected finds in the Top-Flite Giant Scale P47 Razorback box are rubber bands to be used as the instructions show during the joining of the wing halves. They also include shrink wrap for securing servo extensions. The dummy engine plate that goes inside the cowl has aluminum tubes you glue in place to simulate rocker pushrod covers and lengths of red wire to simulate spark plug wires. Both are nice touches and both unexpected.
canopy300.jpg
whlwells300.jpg
My ESM Zero had a special section of the instructions warning how fragile their canopy was. The Top-Flite version (left) is made from quality material and is cut and ready to glue in place! Top-Flite also installs the wheel wells (right) and adds very well made gear covers.
Click images to enlarge
Preparation

I have learned to go over all of the glue joints I can reach before starting assembly. This is a simple way to prevent future disasters. I also went over the covering with my iron (medium heat) to be sure the seams are sealed (they were). And then my hot air gun to generally tighten the covering. There were a few wrinkles that came out easily.
I decided to cut the top hatch open even though a EME60 gas engine is powering the plane. A RotoFlow 24-ounce tank will be used and it looks like installing the tank as well as checking fuel level to determine the safe flying time for this combination will be very easy. Another point is that there are cutouts under the hatch for the fuel fill line and the radio On/Off switch so those are not visible from the outside.
Components

Our Top-Flite Giant Scale P47 Razorback will be powered by an EME60 gas engine with the stock muffler, I think. You never really know about the muffler until the motor and cowl are mounted. The EME60 comes with a Walbro carburetor so no upgrades are needed there. I will be adding a trick fuel filter from the folks that make the RotoFlow tank.
Radio equipment starts with a Spektrum AR9110 PowerSafe receiver. This receiver comes with dual battery inputs and three satellite receivers as well as a “soft switch†that fails to the On position for another level of security. HiTec HS-5565MH high voltage servos will be used on everything but the throttle where a HS-5496MH high voltage servo will go. The HS-5565MH servos are a bit of over kill for this plane but that means they will not be working hard all of the time and can be used in a much wider range of planes later if the Top-Flite Giant Scale P47 Razorback gets retired at some point. Servo extension cables are from MAXX Products. A Tech-Aero Ultra IBEC will power the ignition right out of the receiver as well as provide remote engine killing from the transmitter. Flight batteries are a pair of Glacier 7.4V, 5000mAh 2S Lipos plugged directly into the PowerSafe receiver. In this installation no separate battery switch is needed so we lose that potential point of failure.
Conclusions

eme300.jpg
We are using an EME60 engine (left) in part because of the success I had with my EME70 Twin.
Click image to enlarge
I normally do not include a “Conclusions†section in multi-part reviews/builds but theTop-Flite Giant Scale P47 Razorback is not a normal kit. I really had gotten so frustrated with my earlier ESM Zero that I swore off warbirds. Once I got the Zero as right as I could it flew OK but between stupid instructions, over 2lbs of lead crammed in the nose to hit the CG and having to replace a bunch of the included “hardware†the money savings of the ESM kit isn’t even close to justifying thinking of the Top-Flite Giant Scale P47 Razorback as expensive. Better costs more and the Top-Flite Giant Scale P47 Razorback is far better than the higher price suggests. This is a well thought out model that is manufactured on a level with AeroWorks who I still consider to the gold standard in ARF’s.
Stay tuned, next up is building the Top-Flite Giant Scale P47 Razorback wing. At this writing I am well into that portion of the build and the high-end quality Top-Flite put in this kit continues.
Street price for the Top-Flite Giant Scale P47 Razorback is $749.98 (1-8-2016) and if any ARF is worth it, it is this one! I will not "save money" with cheap kits that produce head-ache planes. Keep watching this build, it is going to be a fun one!
 
Top