• If you are new to GiantScaleNews.com, please register, introduce yourself, and make yourself at home.

    We're 1st in Giant Scale RC because we've got the best membership on the internet! Take a look around and don't forget to register to get all of the benefits of GSN membership!

    Welcome!

Scale Pitts S1-T, S1-S, and a Challenger.

acerc

640cc Uber Pimp
This post and the following two I have on another thread, thought I would put it here for a better understanding of where I am.
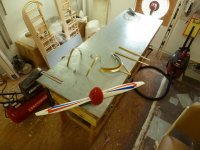
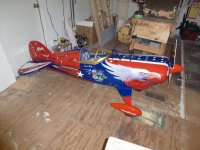
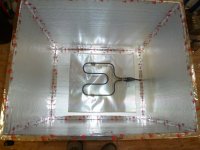
I need to make, a plug, to vacuum form a canopy. I have tried PETG, Acrylic, and Plexiglas. The first two sagged to much for my abilities, kept getting wrinkles in it. The plexi worked real well but I fear it may be to brittle in the long run. I am currently using a Plaster of Paris plug I poured from the original cracked canopy. I have been told that I need a lighter plug that I can affix to the vac table and place the table/mold over the glass on the oven to eliminate the wrinkles. I have read, researched, and had a few fellas try to tell me how. What I have read is mostly commercial, my set up is far short of that. And the few guys that told me a thing or two, well, I'll just say none of them worked out. I watched a tutorial on a plastic companies website which showed the inverted method and it seems that may be my best bet. But to be quite frank, I have no clue as to what I am actually doing.
 

acerc

640cc Uber Pimp
What I need, and many others that try to learn how to vacuum form, is a down to earth basic tutorial. My oven is made of 1" insulated board 24"x30"and 24" deep with a heating element at the bottom, it seems to do well for heating the plastic quickly. My table is 24"x30" and 4" deep and I use a big shop vac for suction.
The first time I tried a pull the vac pulled the top in so bad I had to add a bunch of 1" dowels inside for support. The table works real well and the oven is sufficient. I need a good plug and to be shown or told how to use PETG would be great.
 

acerc

640cc Uber Pimp
Here is the Plexi canopy and windscreen I pulled. Turned out great, especially after I bought the special drill bits. But it is brittle in a manner, had one corner crack during assembly, so I don't think it will last long.
 

Attachments

  • 678.JPG
    678.JPG
    96.5 KB · Views: 439
  • 682.JPG
    682.JPG
    100.3 KB · Views: 415

Fibertech

70cc twin V2
Sorry getting back a day late. Getting ready for Nall.
Going to condens this a little. For one pull plugs they can be made from blue or pink foam carved to shape then glasses with twu layers of 4oz cloth and good finishing epoxy. Then a min of 3/8" layer of bondo and sanded and shaped. You can use a orbital sander with 80grit for fast sand to start shape. Your going to add bondo sever times. OK why the thickness. If you don't give enough thickness the cloth will resinate through and show on petg.

If you have canopy shell you can make a female mold from this. Add a positive relief on front and back of this shell. This shell will be used to poor plaster into for making a plug. I would say 90% of my plugs are produce from plaster. The other 10% is produce from eurathane type material but this is $$$. I have have plaster type plugs that I have pulled over 100 canopy's from. Dalton's 42% Extra is one of them. On large plaster plugs the can be lightened in weight by using foam in mid but the plaster shell should be a min of 1-1/2 thick all around. Once the plug is drie ( about two weeks) it can be be sanded if needed and the primed with a good automotive primer. I do two or three coats let drie and fill any pin holes sand the plug with 320 grit then primer again the sand in one direction with 320grit. This allows air to be pulled out between plug and petg during the vacuum process.

The canopy shell should have a good several layers of glassing done to make it strong. Also make a wood frame for this shell fit in as you poor the plaster you don't want it moving around.

This was short so feel free to ask what wasn't clear and I'll post as I can't
 

acerc

640cc Uber Pimp
It may be short but very helpful. I have a plaster plug done the way you described and it works great. I guess that part I am getting right so maybe I need to look at how I am heating. I am using a smoker element and thought it works maybe it is not enough to heat the plastic quickly enough. My problem with PTEG is the amount of droop generated by the time it reaches full temp. My oven, pictured below, is 26"x30" and uses a smoker element. Maybe I need two of them.
 

Attachments

  • 002.JPG
    002.JPG
    80.7 KB · Views: 559
Last edited:

Fibertech

70cc twin V2
The way my vac machines work's is the the heat eliments are at the top. The frame that clamps the petg his pulled to the top for heating with the plug sitting on bottom base suction table. I let the petg sag to about what the height of plug is. Then lower petg over plug. Then slowly open the ball valve to allow the air to be pulled out and around plug. This process needs to be controled.
Pulling canopy's is a bit of art. It looks real easy but even with the right equipment takes several pulls the get it.
 

acerc

640cc Uber Pimp
Today I took it to a friends place to do the balancing and weighing.
The aircrafts total weight is 49lbs 12.8oz dry. Balance came in at 6oz light on the tail of which I will leave be, better to be a tad nose heavy and at this size 6oz is minimal. And it was perfectly balanced laterally without any additional weight.


Schwing!!! :fist_pump:
 

acerc

640cc Uber Pimp
I just calculate the wing loading, .29oz per sq. in. and/or 43oz per sq. ft. Not to bad for a bird of this size with as many custom scale addition's, not in my opinion anyway.
 
Top