• If you are new to GiantScaleNews.com, please register, introduce yourself, and make yourself at home.

    We're 1st in Giant Scale RC because we've got the best membership on the internet! Take a look around and don't forget to register to get all of the benefits of GSN membership!

    Welcome!

Scale Pitts S1-T, S1-S, and a Challenger.

Snoopy1

640cc Uber Pimp
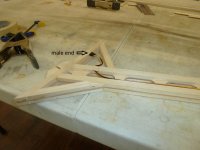
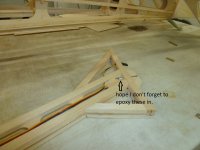
But this Challenger is being built to take the wings off quick and easily, one bolt top wing, one bolt each bottom wing half, flying wires disconnect at fuselage. It will have a piece made (I'll call it the joint strut) to hold each half of the top and bottom wings together so as to not have to remove the strut and the rest of the flying wires. To install the wings I pull the joint strut, slide wings on, install three bolts, and hook up two flying wires. I have done this method before and assembly at the field is less than five minutes.

I have looked at a couple of larger planes. But the plane needs to fit into my mini-van. But looking at your big bi planes. One idea I have been thinking about is to split the fuselage just behind the canopy. Then all that needs to be done at the field is to make the wire connection slide the two fuselage halves together and a couple bolts. Have you ever given this method any thought. That will leave all the flying wires in place and the two wings.
 

acerc

640cc Uber Pimp
I have looked at a couple of larger planes. But the plane needs to fit into my mini-van. But looking at your big bi planes. One idea I have been thinking about is to split the fuselage just behind the canopy. Then all that needs to be done at the field is to make the wire connection slide the two fuselage halves together and a couple bolts. Have you ever given this method any thought. That will leave all the flying wires in place and the two wings.
I have seen that done both on forums and in person, I don't care for it.
 

acerc

640cc Uber Pimp
A little more done today, is it just me or what, but it feels like I just keep getting slower and slower.
Pic 1 is brass inserts to reinforce the tail wire bolts. Pic 2 is just a shot of the metal brackets for the wing wire's. Pic 3 is the 1/4" spacer so the brackets are not recessed, I guess the covering could have just been slit for these but not in my shop. Pic 4 is how I like to run the top wing extensions through the strut. I simply carve a slot for it all, the male end gets epoxied in place, same for the male end in the wing. pic 5 is just a shot of the other end of the strut.
 

Attachments

  • P1080733.JPG
    P1080733.JPG
    318.3 KB · Views: 274
  • P1080734.JPG
    P1080734.JPG
    307 KB · Views: 269
  • P1080735.JPG
    P1080735.JPG
    290.6 KB · Views: 260
  • P1080736.JPG
    P1080736.JPG
    287.6 KB · Views: 217
  • P1080737.JPG
    P1080737.JPG
    299.4 KB · Views: 234

acerc

640cc Uber Pimp
The fuse was designed for 1/8" sheeting as seen in pic 1, but I decided for ease of access to G10 the nose instead. In order to use the G10 I am applying 1/8" x 1/4" light ply strips, pic 2, to fill the space of the balsa on the framework.
 

Attachments

  • 29.JPG
    29.JPG
    378 KB · Views: 270
  • 56.JPG
    56.JPG
    370.3 KB · Views: 248

Snoopy1

640cc Uber Pimp
Man that is one good looking plane and you are really taking your time to do right with no short cuts. It is all laid out and pre thought out. Like the work clean and everything fits nicely. Please keep the pictures coming really enjoy looking at them.
Is this the plane the 170 four stroke was purchased for.
 

acerc

640cc Uber Pimp
I only have one 170 4s, it is in the Eagle. The 140 4s I bought is for the Bulldog II which is a custom designed and cut kit me and Blazing wings worked on for the last year, it is at the cutters now. This is the Bulldog I, a purpose build purely for flying enjoyment. It is powered by a DLE 111 and with it being built as light as possible it should prove to be a fantastic airframe. Once I get to fitting the cowl I will take some measurements to see if the 140 4s will fit, it did not appear to using my hand and eyeballing it. I would like to use the 140 4s if possible but it will not bother me if not, might find out sometime this weekend. Also note worthy, the 140 4s may be to heavy for the purpose of this build. When I get closer to covering we'll see what the balance is and whether it could use the weight up front, and if the 140 fits, and it needs the weight, then most definitely it will go in.
 

acerc

640cc Uber Pimp
Here are the models. A pic of my Eagle, pics of what the Bulldog I (current build) and II (upcoming build) looks like.
 

Attachments

  • 700.JPG
    700.JPG
    534.6 KB · Views: 304
  • 0839644.jpg
    0839644.jpg
    248.8 KB · Views: 257
  • 531k1uiw1nM6IngA8gN8FHLA3Xt76ADf.jpg
    531k1uiw1nM6IngA8gN8FHLA3Xt76ADf.jpg
    71.3 KB · Views: 247

acerc

640cc Uber Pimp
Being Snoop inquired about the engine I looked up the specs for comparison.
DLE weighs 5.5lbs can turn a 27/28x10 prop and is 10.04" wide.
Valach 140 weighs 9.35lbs can turn a 32x12/14 prop and is 13" wide.
Quite a difference between the two in both weight and size. So unless I need a few pounds on the nose it will be the DLE.
 

acerc

640cc Uber Pimp
I have also compared the weight of the G10 to the aluminum I use, the G10 is 1.19 grams psi versus the aluminum at .41 psi, I think I'll use the aluminum instead.
I am waiting on glue to dry and these are the things I think about and do while sitting on my hands.
 

Snoopy1

640cc Uber Pimp
Being Snoop inquired about the engine I looked up the specs for comparison.
DLE weighs 5.5lbs can turn a 27/28x10 prop and is 10.04" wide.
Valach 140 weighs 9.35lbs can turn a 32x12/14 prop and is 13" wide.
Quite a difference between the two in both weight and size. So unless I need a few pounds on the nose it will be the DLE.
That is quia bit of weight difference. But how does the power compare. It would be interesting to see the Pound per horsepower comparison.
 
Top