• If you are new to GiantScaleNews.com, please register, introduce yourself, and make yourself at home.

    We're 1st in Giant Scale RC because we've got the best membership on the internet! Take a look around and don't forget to register to get all of the benefits of GSN membership!

    Welcome!

IMAC Dalton 300 ml build thread.

getting closer
 

Attachments

  • IMG_6697.JPG
    IMG_6697.JPG
    106.2 KB · Views: 204
  • IMG_6698.JPG
    IMG_6698.JPG
    99.4 KB · Views: 214
just finished installing the stab tabs/mounts with 1" long #4 button head hex screw. these are getting purchase into the hardwood i glued into foam area, before installing the root cap made of plywood. these screws got a monster bite, and i also used some glue on the screw threads. The stab servo has also been installed. all i need to do next is hinge it!!
 

Attachments

  • IMG_6700.JPG
    IMG_6700.JPG
    27.5 KB · Views: 194
the control horns are painted! the rudder are yellow, and the elevators and ailerons are black!!
 

Attachments

  • IMG_6705.JPG
    IMG_6705.JPG
    57.5 KB · Views: 216
left to do list:
1. sand and cover the wings and ailerons. then glue in hinges and control horns, then install servos.
2. finish the cowl area/baffles
3. prime then paint the wheel pants, canopy/hatch area, and cowl...
 
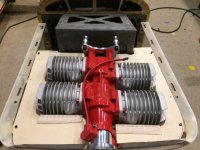
I am interested in optimizing the cooling of the motor, and am concerned with regards to overheating of the rear two cylinders. this being my first 4 cylinder RC airplane. the last time i worked on a flat 4, it was in 1986. It was an air-cooled 1.6 liter air cooled flat 4 (boxer) type engine. I did a complete rebuild on it. That is a different story. My research or should i say, my reading, has led me to believe that cooling of the rear cylinders is critical to prevent problems and prolong the longevity of my motor. I have come across multiple different baffling set ups for a 4 cylinder, this includes different strategies, such as a closed off rear cowl area, that directs air down thru the fins into the bottom of the cowl, using a split baffling type system.http://www.google.com/url…
another technique is to use a NACA duct.
http://en.wikipedia.org/wiki/NACA_duct
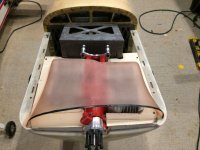
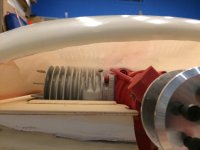
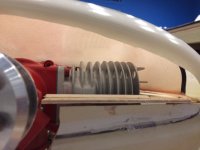
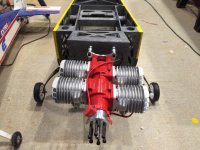
in reading the trumpet man's Dalton build, he came across something built byHenry Piorun for Cardens, that is a Shroud type of baffling. Still using the concept of the split cowl baffles, the shroud helps to direct air back then down thru the plate and the fins of the cylinders, then down and out of the air dams on the bottom of the cowl. I am not done yet, but these are some pics so far!!
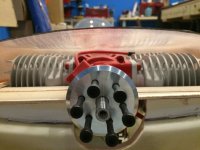
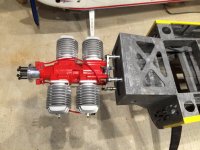
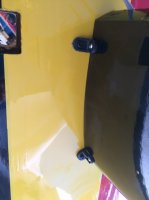
With the split cowl baffle plates. trying to keep at least 1/8" gap between the fins and the plywood.
the superimposed shroud, which is for a Carden. It required modifications in order to fit.
I will be using 4 temp sensors, one on each cylinder. This will be important for me during the first few flights to assure that the temps are not getting high in the rear. From what i have read, using the shroud, the rear cylinder temps are lower than the front ones. I do not know if this is true, but we will see. Traditionally, the rear cylinders would run hotter since they are in the shadow of the prop wash (in a situation where no baffling was performed).

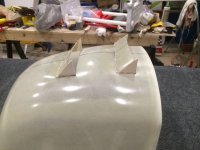
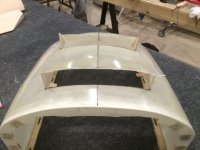
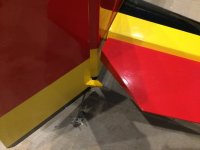
keeping in mind the rule of 3 to 1, i have built 4 air dams, two under the cowl using the epoxy material from the cowl itself, instead of cutting it out, i just made 3 cuts and pushed it down, opening to rear. then in bottom of fuselage, there will be 2 more air dams.
 

Attachments

  • IMG_6701.JPG
    IMG_6701.JPG
    95.2 KB · Views: 256
  • IMG_6702.JPG
    IMG_6702.JPG
    90 KB · Views: 216
  • IMG_6703.JPG
    IMG_6703.JPG
    79.1 KB · Views: 183
  • IMG_6706.JPG
    IMG_6706.JPG
    63 KB · Views: 236
  • IMG_6707.JPG
    IMG_6707.JPG
    69.3 KB · Views: 226
  • IMG_6679.JPG
    IMG_6679.JPG
    72.5 KB · Views: 196
  • IMG_6680.JPG
    IMG_6680.JPG
    83.2 KB · Views: 217
  • IMG_6681.JPG
    IMG_6681.JPG
    83.2 KB · Views: 192
  • IMG_6684.JPG
    IMG_6684.JPG
    107.8 KB · Views: 198
  • IMG_6685.JPG
    IMG_6685.JPG
    102.3 KB · Views: 243

stangflyer

I like 'em "BIG"!
I personally haven't built but one cooling duct on a larger displacement motor plane. Working on the second on my Sukhoi. However end result was awesome for controlling temps. I realize you have two more pistonies, but the idea is the same. I did pretty much what you are doing. Except I put my hot air escape louver back further. Can't see why yours won't be just as efficient. My temps are running very low. Yours may cool better since your DA does not have painted jugs like my 3Dub. Anxious to hear how it turns out for you.
20140302_202353.jpg
20141014_144138.jpg
 
Stang, that looks awesome!!
Did some work on the instrument panel. once i sand this down, my wife will do the finishing painting on it.

I was not aware, but was then told this is the IP on Patty Wagstaff's extra.
 

Attachments

  • IMG_6708.JPG
    IMG_6708.JPG
    124.8 KB · Views: 209
Top