• If you are new to GiantScaleNews.com, please register, introduce yourself, and make yourself at home.

    We're 1st in Giant Scale RC because we've got the best membership on the internet! Take a look around and don't forget to register to get all of the benefits of GSN membership!

    Welcome!

Brand New PAU........Viper-ST Announced!!!!!!!!

Islandflyer

GSN Sponsor Tier 1
Head Honcho.....Do you know if those 380's are as smooth in the gears as the 777's?


Don't mean to get off point.
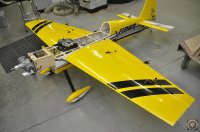
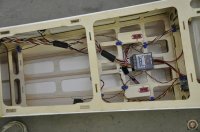
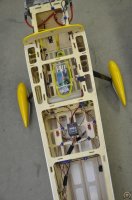
Every bit as smooth, crazy power, and insanely fast.
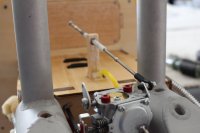
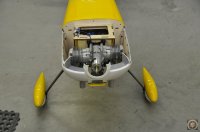
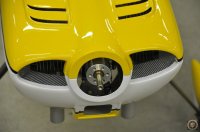
All others have had a hint pf play when new. These have zero play, and are supposed to wear-in (as opposed to wear out...)
 

Islandflyer

GSN Sponsor Tier 1
My choke set up: I reach into the cooling opening under the cowl
 

Attachments

  • IMG_0075.JPG
    IMG_0075.JPG
    62 KB · Views: 351
  • IMG_0076.JPG
    IMG_0076.JPG
    69.6 KB · Views: 297
  • IMG_0083.JPG
    IMG_0083.JPG
    66 KB · Views: 343

Terryscustom

640cc Uber Pimp
My choke set up: I reach into the cooling opening under the cowl

I guess I forgot to mention my choke setup, I went super low tech. I cut out the hole in front of the carb and installed a small G10 horn on the carb so I can just reach in there with my finger. You do sometimes get a little fuel residue on your fingers though so I actually kinda like Herve's setup as well.

I wrapped mine up today except for battery placement. Looks like the factory placed the wing tube center right at 32% MAC which is perfect for maiden flights. This should leave the plane just slightly nose heavy for good precision and 3D:way_to_go:.
 

Terryscustom

640cc Uber Pimp
I installed the aileron servos and control horns. Just a reminder the outer horn will be slightly further out on the control horn. To find the correct position measure from the center of the hinge line out to the center of the clevis. Outside and inside servos need to match.

I don't like crawling around under the wings for adjustment so I install the wings on the "wrong" side and upside down to do the initial setup of the pushrods and links. Once I get close I put them on the correct side and and finish the setup.

After that was set up I tidied up the wiring with foam keepers and organized everything to keep wires from rubbing where they should not. Power safe Rx's also placed.
 

Attachments

  • _DSC0448.JPG
    _DSC0448.JPG
    50.3 KB · Views: 332
  • _DSC0449.JPG
    _DSC0449.JPG
    58 KB · Views: 315
  • _DSC0450.JPG
    _DSC0450.JPG
    94.3 KB · Views: 297
  • _DSC0451.JPG
    _DSC0451.JPG
    94.7 KB · Views: 310
  • _DSC0452.JPG
    _DSC0452.JPG
    53 KB · Views: 323

Terryscustom

640cc Uber Pimp
Next up is Canopy installation. There are several ways to do this, you can simply screw it on with small screws, you can use epoxy if that's your thing (but it's a little less forgiving) but I prefer Goop adhesive or RC56 canopy glue is also a great option. On this one I used Goop.

I like to do this with the canopy on the plane to eliminate any risk of twisting the canopy deck. To keep from gluing the canopy onto the airplane I lay down some wax paper or parchment paper. Cut out the canopy tabs so you can install the canopy, install the canopy screws and trim off the excess parchment paper to leave about 1/4" exposed or so. After a few test fittings I laid down a fine bead of goop and secured the canopy shell with masking tape. After this dries for a few hours I can remove the tape and I use a syringe with Goop to lay a bead around the inside edges just to make sure that it is secure for the long haul.
 

Attachments

  • _DSC0453.JPG
    _DSC0453.JPG
    80 KB · Views: 325
  • _DSC0454.JPG
    _DSC0454.JPG
    53.9 KB · Views: 308
  • _DSC0455.JPG
    _DSC0455.JPG
    78.3 KB · Views: 332
  • _DSC0456.JPG
    _DSC0456.JPG
    64.2 KB · Views: 308
  • _DSC0457.JPG
    _DSC0457.JPG
    88.8 KB · Views: 320

Terryscustom

640cc Uber Pimp
_DSC0465.JPG
Next I installed the lower cowl half. Since the bolts are #8 for installing the cowl I added some lock washers just in case, and the lower cowl bolts are accessible through the vent in the bottom of the cowl.
We had to remove the factory screen from the vents to paint the yellow for a closer match and I had just enough of the aluminum screen that I used to the kit prototypes to fill the holes, looks great!!!! The ARF's will have screen already installed that looked very nice.

After that and a little cleanup I was able to unmask the canopy, there was a little loose on the bottom edge so I pushed some goop in with my finger and taped over for it to dry for a couple more hours.
 

Attachments

  • _DSC0458.JPG
    _DSC0458.JPG
    57.5 KB · Views: 294
  • _DSC0459.JPG
    _DSC0459.JPG
    74.1 KB · Views: 281
  • _DSC0461.JPG
    _DSC0461.JPG
    67.8 KB · Views: 308
  • _DSC0462.JPG
    _DSC0462.JPG
    77.7 KB · Views: 283
  • _DSC0463.JPG
    _DSC0463.JPG
    103.5 KB · Views: 296
  • _DSC0464.JPG
    _DSC0464.JPG
    63.4 KB · Views: 293

Terryscustom

640cc Uber Pimp
Drum roll please.......all up final weight (with my setup) came out at 25lb. 8oz. less batteries. Adding batteries brings it to 26lb. 2oz.:mario-banana:.

Anyone who has flown a 25-27lb. plane with 120cc's on the nose will understand that this is going to be just plain stupid fun power!!!!


I shot a quick one handed video of my surfaces setup. I have discovered that "crow" (ailerons up and flaps down) is pretty useless on a mid-wing airplane so I left that out. What is cool is the following:

- Standard full length ailerons
- Flaps with outside ailerons
- Outside ailerons only (for precision flight only)
- Spoilerons / Flaperons (for super tight waterfalls and straight down elevators). Very useful to loose elevation quickly, just make sure you have these on a switch that is easily accessible to use and turn off quickly.


pawnshopmike

Staff member
Awesome job as always @Terryscustom.:way_to_go::way_to_go::way_to_go:

Blows my mind that you can not only build so fast, but also find the time to take hundreds of pics along the way. AND, if that isn't enough, Write the worlds best assembly manual along the way!!! My hat is off to you my friend. You either have a team of elves in your shop, or you are super human. I'm leaning towards the later.
 
Top