You are using an out of date browser. It may not display this or other websites correctly.
You should upgrade or use an alternative browser.
You should upgrade or use an alternative browser.
The 'What did you do in your workshop tonight?' thread
- Thread starter Xpress
- Start date

Jetpainter
640cc Uber Pimp
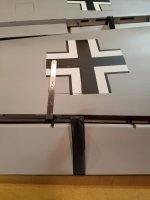
Since we're able to post pictures again, here are some pics of my canister and header repair job from yesterday.
For the canisters I taped them down to a parts rack at work, and used a rod that fit nicely in the stinger and applied a little upward pressure while heating the inner and sides of the kink. That got the major part of the kinks out, but I needed to use a small hammer and tap very carefully on the high spots, while resting the high spots on the other side on a block of wood. When I was happy with the results I sanded off all the tool marks and then went over it with a red ScotchBrite pad.


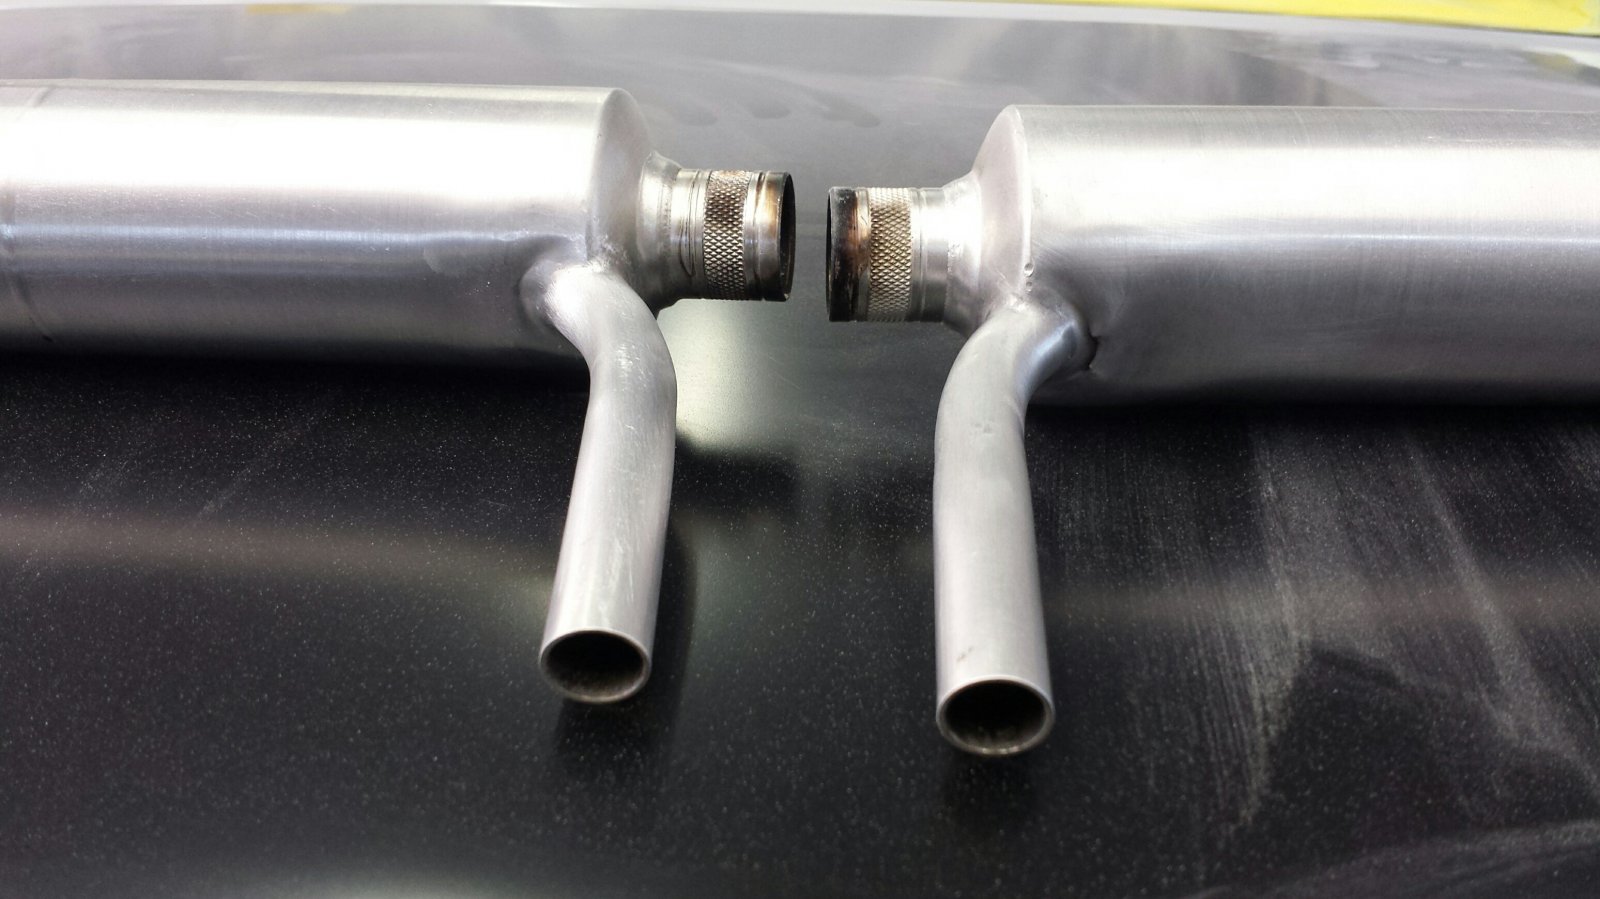
The header was a little more difficult. I really couldn't figure out a way to pry up on it while applying heat that wouldn't damage the flex section, so I did it all with a hammer, while resting the opposite side on a block of wood. I still want to do more finishing work on the header, but it would function just fine the way it is.


For the canisters I taped them down to a parts rack at work, and used a rod that fit nicely in the stinger and applied a little upward pressure while heating the inner and sides of the kink. That got the major part of the kinks out, but I needed to use a small hammer and tap very carefully on the high spots, while resting the high spots on the other side on a block of wood. When I was happy with the results I sanded off all the tool marks and then went over it with a red ScotchBrite pad.
The header was a little more difficult. I really couldn't figure out a way to pry up on it while applying heat that wouldn't damage the flex section, so I did it all with a hammer, while resting the opposite side on a block of wood. I still want to do more finishing work on the header, but it would function just fine the way it is.

")
Snoopy1
640cc Uber Pimp
Since we're able to post pictures again, here are some pics of my canister and header repair job from yesterday.
For the canisters I taped them down to a parts rack at work, and used a rod that fit nicely in the stinger and applied a little upward pressure while heating the inner and sides of the kink. That got the major part of the kinks out, but I needed to use a small hammer and tap very carefully on the high spots, while resting the high spots on the other side on a block of wood. When I was happy with the results I sanded off all the tool marks and then went over it with a red ScotchBrite pad.
View attachment 91456 View attachment 91457 View attachment 91458 View attachment 91459 View attachment 91460 View attachment 91461
The header was a little more difficult. I really couldn't figure out a way to pry up on it while applying heat that wouldn't damage the flex section, so I did it all with a hammer, while resting the opposite side on a block of wood. I still want to do more finishing work on the header, but it would function just fine the way it is.
View attachment 91462 View attachment 91463
Very nicely bone I have tryed but it did look like that. The dent on the cannesters did heat around the stinger and pull up on the stinger to get the dent out or how. Good job.
Xpress
GSN Sponsor Tier 1
Very impressive @Jetpainter 
Looks like the right can will need some re-sealing at the joint on the stinger??
Looks like the right can will need some re-sealing at the joint on the stinger??
Jetpainter
640cc Uber Pimp
Most of the dent in the can itself came out when I put a little upward pressure on the stinger. It's still a little dented there, but shouldn't cause any problems.The dent on the cannesters did heat around the stinger and pull up on the stinger to get the dent out or how.
Looks like the right can will need some re-sealing at the joint on the stinger??
Yes, there is a small crack from the crash. I think I'm just going to JB Weld it.
Bunky.F.Knuckle
150cc
Since we're able to post pictures again, here are some pics of my canister and header repair job from yesterday.
For the canisters I taped them down to a parts rack at work, and used a rod that fit nicely in the stinger and applied a little upward pressure while heating the inner and sides of the kink. That got the major part of the kinks out, but I needed to use a small hammer and tap very carefully on the high spots, while resting the high spots on the other side on a block of wood. When I was happy with the results I sanded off all the tool marks and then went over it with a red ScotchBrite pad.
View attachment 91456 View attachment 91457 View attachment 91458 View attachment 91459 View attachment 91460 View attachment 91461
The header was a little more difficult. I really couldn't figure out a way to pry up on it while applying heat that wouldn't damage the flex section, so I did it all with a hammer, while resting the opposite side on a block of wood. I still want to do more finishing work on the header, but it would function just fine the way it is.
View attachment 91462 View attachment 91463
Damn!!!
Bunky.F.Knuckle
150cc
Got a few more hinges glued up on the FW 190. Found out that the hatches were made wrong (almost typical for a Chinese ARF). Servo output shaft was not in the right location for the control horns. If I would have seen that prior to cutting for the control horns, I would have moved the control horns. But never know if there was a wood block under the sheeting for the conteol horns, so I think I made a wise choice in rotating the servo hatches, for the wings.
How you do that..... Arent the servo mounts already glued in? Yep! They sure are. I tested on a flap hatch, that if this theory of mine didnt work, Im only repainting 1 color, not 3. I peeled the UltraCote off, with paint attached and rotated the hatch 180, for a shorter pushrod. Ironing the covering down was almost effortless. But when I moved to the aileron hatches and peeled the covering, I had to lay the covering back down in the right spot. So, I laid the hatch in, and then laid the covering down over and tacked it down.
How you do that..... Arent the servo mounts already glued in? Yep! They sure are. I tested on a flap hatch, that if this theory of mine didnt work, Im only repainting 1 color, not 3. I peeled the UltraCote off, with paint attached and rotated the hatch 180, for a shorter pushrod. Ironing the covering down was almost effortless. But when I moved to the aileron hatches and peeled the covering, I had to lay the covering back down in the right spot. So, I laid the hatch in, and then laid the covering down over and tacked it down.