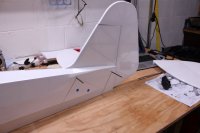
Hey guys, it's been a while and would like to keep the build moving so here's a batch of photos detailing the tail section. All in all, there aren't any surprises. The tail brace wires aren't scale but they worked out fine and went together easily enough. Two servos move the elevator halves and one servo swings the rudder via a direct pushrod connection. Hinges are all pre-installed and are actually metal which is kinda cool.
Construction of the tail pieces is of balsa, built up truss style.
The halves of the horizontal stabilizer are mounted to the fuselage via two steel rods and are held in place by the tail brace wires and a screw on each side....in other words, the horizontal stabilizer is removable
") View attachment 51531
View attachment 51531
There are brass tubes inside the horizontal stab halves for the steel rods to slide into to prevent the rods from wearing the holes out-of-round and loose
The kit is delivered with the rudder separate from the fuselage, fit the rudder and mark the covering so the extra can be removed then epoxy it into place. The fit was tight and the alignment was good so there wasn't any need to rework this area of the fuselage.
The brace wires on a full size Cub are actually steel rods with threaded ends and clevis style rod ends bolted to steel tabs that are through bolted to the trailing edges of the horizontal and vertical stabilizers. On the World Models Super Cub, the brace wires are actually two wires side by side with clevis ends and plastic brackets that bolt to the vertical and horizontal stabilizers. The holes for the brackets are pre-drilled so you only have to cut through the covering material. Because you're bolting a necessary structural element to balsa, it's important to soak the bolt holes with thin CA glue before assembling the tail brace wires.
I used string to brace the horizontal stab to the vertical stab so I could get it square and measure the distance for the top and bottom wires allowing me to make the wires using the supplied materials (plastic coated wires, crimp tubes, eye hooks, clevis ends) on the bench.
The tailwheel assembly is pretty nice and just bolts to the bottom of the fuselage. The bracket to which you attach the fuselage end of the lower brace wires is mounted to the fuselage using the center bolt for the tailwheel and I just put it in there and tightened the tailwheel into place which caused the brace wire bracket to smash its way into the bottom of the fuselage. It was a bit of a leap of faith but it worked out (you can see it in the picture above)

I'll show the servos and connections in the post outlining controls and radio installation. I attempted to reverse an MKS HV1240 servo last night and it worked up until I reassembled the top gearing to the center case section and then it stopped working. When I broke it apart again it worked and then didn't work when assembled. It drove me nuts for like three hours before working and reworking the solder joints causes the pads to separate from the circuit board....toast! Too bad, it was a nice servo! Ordered a couple of Hitec HS7954SH servos since they can be reversed via programming and the tail section will be done once they're installed.
You're saying, just use two channel inputs and you wouldn't have to reverse it at the servo....yes, you're right but I need all nine channels and I'm already using four channels for the flaps and ailerons so I can do an aileron/flap mix for full span flaperons. That leaves five channels for elevator, rudder, throttle, engine kill switch, and the other function that I can't discuss yet!
Engine is mounted and ready to go, just need to get the pictures together and I'll post those up ASAP.
Thanks for looking!
.

 Where???
 .
.