GSNadmin
Staff member
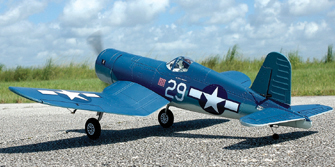
No doubt about it, among warbirds, the Vought F4U Corsair ranks way up near the top as a favorite with modelers. The bent-wing bird, as it’s often called, has a look like no other WW II fighter. From its big, round cowl through its aft cockpit to its unique inverted gull wing, there’s no mistaking a Corsair. For this presentation, I started with the all-foam (EPO) Corsair offered by Tower Hobbies.
Instead of a complete re-paint, I decided to take the alternative route of using the stock version as a basis for a “weathered,” or in-service look, which the real Corsair was likely to have experienced. The techniques employed are relatively easy and inexpensive, and you really can’t make a serious mistake. Equally important is the fact that these techniques can be used even after you’ve repainted your model in order to give it a personalized look. While both the refinishing and weathering techniques improve the overall appearance, the refinish changes the look while weathering, or properly done aging, enhances the realism.
The search
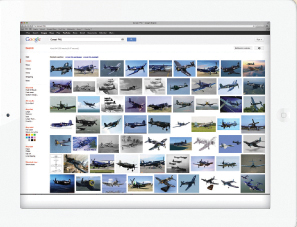
The first—and most important—part of the process involves the “search.” Much like the documentation hunt for that “just right” paint scheme, photos of actual aircraft are essential. This search for a weathered appearance is a little bit easier than the complete documentation phase, as you don’t need a specific airplane; photos of any airplane operating under similar environmental and service conditions will do. Typically, WW II subjects operating in harsh environments like deserts or salt air will tend to look “beat up” in a shorter amount of time. Without the benefit of hangars, covers, shelters, or daily maintenance, they took some serious abuse and it showed.
Panel lines
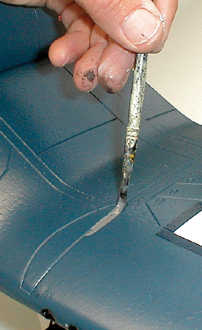
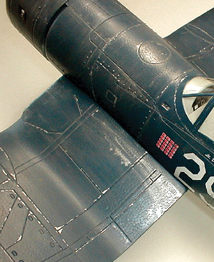
Left: A small artist’s brush is used to flow the gray wash into the molded panel lines. Wipe the excess away with a paper towel and the residual gray will stay in the panel line.
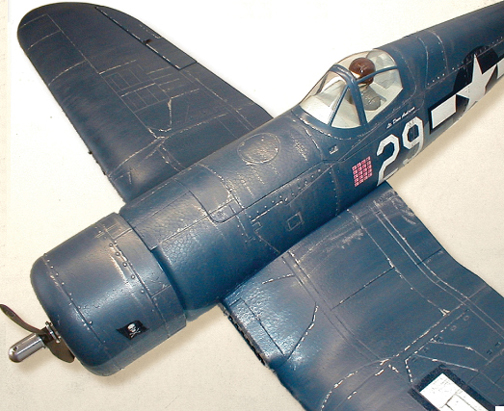
Below: The final appearance of the model is anything but monochromatic and you’ve created a look of realism; don’t be afraid to try it!
Since I had decided not to repaint the model, there was no need to remove any of the manufacturer-applied markings, prepare a new stencil or markings, or even mask for color separation. All that was required was a light spray of glass cleaner to the overall model, a thorough wipe down, and adequate drying time. Since this Corsair has crisply molded-in panel lines and surface detail, the first step was to highlight these details with a medium gray wash applied to the panel line with a fine brush. I use water-based acrylic paint (latex house paint will work) and thin it so that it flows easily into the panel lines. Apply this wash to each panel individually and, with a paper towel, wipe the excess wash off the adjacent surface, leaving some wash in the groove. You should do this fairly quickly after application of the wash but don’t worry, any excess film can be removed later with fresh, clean water. The key is to leave some residual wash in the groove and allow it to dry completely. If you’re really nervous about making mistakes, start on the bottom surfaces first; by the time you reach the top, you’ll be an expert!
As with most weathering techniques, the key here is a light hand. When you reach the point where what you’ve done is obvious, you’ve gone too far.
Sun and sand
OK, the panel lines now all pop out visually and you’re probably quite pleased with the transformation. Well, there’s more to be done. Let’s get out that very same wash that you allowed to accumulate in the panel lines to make them stand out. This time, starting at the leading edge of all flying surfaces, dab some wash onto the surface with a brush and immediately use a paper towel to spread it aft toward the trailing edge, always in the direction of the airflow. The density of the wash will determine the intensity of the streaking. I suggest diluting the wash to the point that it is just visible when first applied with the brush. Once again, when in doubt, go to the underside of the model! As with most weathering techniques, the key here is a light hand. When you reach the point where what you’ve done is obvious, you’ve gone too far. Using water-based paint for weathering, however, removes a lot of fear factor from the process, as most of it can be removed for “re-dos!” You want some very subtle streaking (tone changes) created by airflow over the surfaces. In the case of the fuselage, the direction of the streaking should be vertical, from top to bottom; long periods of being exposed to the sun will do that. Again, subtlety is key.
Wear and tear

Above: Small, spring-loaded panels, like this handhold, lose a lot of their paint through daily use. Silver paint, randomly applied with a fine brush, creates the illusion of chipped edges.
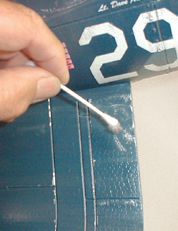
Below: In those areas requiring wear, rather than the chipping replication, I use a craft material called Rub ‘n Buff applied with either a cotton swap, paper towel, or my finger.
Getting even more excited about your efforts, huh? Sure, it’s looking great and luckily there are just a few steps left. The part of the weathering process that seems to get the most attention but is easiest to overdo is the panel wear or paint chipping. I usually start by sizing up the level of wear I’ve already applied and imagining how some of the panel edges would look after frequent opening, closing, or removal. How much of the finish on the leading edges of the airplane would be beat up by sand, stones, and other debris found on operating theaters like that desert we mentioned earlier? You can be sure that any painted surface kept outdoors and exposed to regular dirt, sand, or rocks found on most airports, will suffer the effects of these materials. Naturally, the worst wear usually occurs at the leading edge.
The next step is deciding how to simulate the wear or chipping. For sharp-edged panels or large chipped areas, as on the leading edge of wings, I use a fine, pointed brush to randomly apply silver paint stippled along the edge of the panel. The drier the brush the better; you don’t want a lot of paint, just a suggestion of metal peeking through on the edges.
Chipping uses the same paint, but application is better handled by random dabs of a coarse, mostly dry sponge dipped in the silver paint and blotted before you apply it to the surface. Using a different corner of the sponge for sequential dabs will prevent a “repeat pattern” look. Also, when going from one leading edge to the opposite one, try not to look at the first one to “mirror image” it. Avoid symmetry of chipping ff it never happens that way!
Now, for those areas where the paint was worn through rather than chipped, I use a craft material from Amaco called Rub ‘n Buff. Crafters use it to create a metallic look on candles and other items. It’s wax-based and I apply a small amount to a cotton swab before touching it directly to the model’s surface. Don’t apply it too heavily or you’ll be on your way to a chrome-plated leading edge! Excess can be removed with alcohol but you’d best practice on something other than your model until you feel comfortable with the process and result.
Dirt and grime
Here is an example of both wear and chipping simulation in the same general area of the model. Compare the “before” and “after” images below to see the difference just a little weathering can make on your scale project.
Finally, there’s the exhaust staining and grime accumulation that is best handled with an airbrush but can also be convincingly duplicated with pastel chalks or even ground-up pencil leads. Again, subtle is better! You will notice in your photos that the engine grime starts behind the cowl flaps, as you would expect. No need for masking anything here, just take the cowl off, do your thing, and replace the cowl; the stains will begin exactly where they should.
Before
After
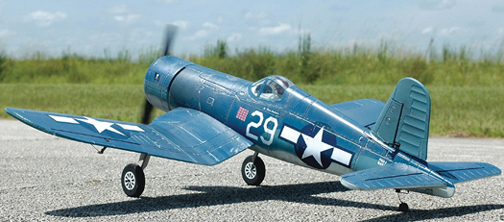
There you have it, breathing life and realism into a great foamie warbird in a small number of easy and inexpensive steps. It is easy, but you’ll never know until you try it. Just think of all the admiring looks your new weathered warbird is going to receive at the field; go ahead, go for it!
TEXT & PHOTOS BY RICH URAVITCH
Model Airplane News - The #1 resource for RC plane and helicopter enthusiasts featuring news, videos, product releases and tech tips.
Continue reading...
Instead of a complete re-paint, I decided to take the alternative route of using the stock version as a basis for a “weathered,” or in-service look, which the real Corsair was likely to have experienced. The techniques employed are relatively easy and inexpensive, and you really can’t make a serious mistake. Equally important is the fact that these techniques can be used even after you’ve repainted your model in order to give it a personalized look. While both the refinishing and weathering techniques improve the overall appearance, the refinish changes the look while weathering, or properly done aging, enhances the realism.
The search
The first—and most important—part of the process involves the “search.” Much like the documentation hunt for that “just right” paint scheme, photos of actual aircraft are essential. This search for a weathered appearance is a little bit easier than the complete documentation phase, as you don’t need a specific airplane; photos of any airplane operating under similar environmental and service conditions will do. Typically, WW II subjects operating in harsh environments like deserts or salt air will tend to look “beat up” in a shorter amount of time. Without the benefit of hangars, covers, shelters, or daily maintenance, they took some serious abuse and it showed.
Panel lines
Left: A small artist’s brush is used to flow the gray wash into the molded panel lines. Wipe the excess away with a paper towel and the residual gray will stay in the panel line.
Below: The final appearance of the model is anything but monochromatic and you’ve created a look of realism; don’t be afraid to try it!
Since I had decided not to repaint the model, there was no need to remove any of the manufacturer-applied markings, prepare a new stencil or markings, or even mask for color separation. All that was required was a light spray of glass cleaner to the overall model, a thorough wipe down, and adequate drying time. Since this Corsair has crisply molded-in panel lines and surface detail, the first step was to highlight these details with a medium gray wash applied to the panel line with a fine brush. I use water-based acrylic paint (latex house paint will work) and thin it so that it flows easily into the panel lines. Apply this wash to each panel individually and, with a paper towel, wipe the excess wash off the adjacent surface, leaving some wash in the groove. You should do this fairly quickly after application of the wash but don’t worry, any excess film can be removed later with fresh, clean water. The key is to leave some residual wash in the groove and allow it to dry completely. If you’re really nervous about making mistakes, start on the bottom surfaces first; by the time you reach the top, you’ll be an expert!
As with most weathering techniques, the key here is a light hand. When you reach the point where what you’ve done is obvious, you’ve gone too far.
Sun and sand
OK, the panel lines now all pop out visually and you’re probably quite pleased with the transformation. Well, there’s more to be done. Let’s get out that very same wash that you allowed to accumulate in the panel lines to make them stand out. This time, starting at the leading edge of all flying surfaces, dab some wash onto the surface with a brush and immediately use a paper towel to spread it aft toward the trailing edge, always in the direction of the airflow. The density of the wash will determine the intensity of the streaking. I suggest diluting the wash to the point that it is just visible when first applied with the brush. Once again, when in doubt, go to the underside of the model! As with most weathering techniques, the key here is a light hand. When you reach the point where what you’ve done is obvious, you’ve gone too far. Using water-based paint for weathering, however, removes a lot of fear factor from the process, as most of it can be removed for “re-dos!” You want some very subtle streaking (tone changes) created by airflow over the surfaces. In the case of the fuselage, the direction of the streaking should be vertical, from top to bottom; long periods of being exposed to the sun will do that. Again, subtlety is key.
Wear and tear
Above: Small, spring-loaded panels, like this handhold, lose a lot of their paint through daily use. Silver paint, randomly applied with a fine brush, creates the illusion of chipped edges.
Below: In those areas requiring wear, rather than the chipping replication, I use a craft material called Rub ‘n Buff applied with either a cotton swap, paper towel, or my finger.
Getting even more excited about your efforts, huh? Sure, it’s looking great and luckily there are just a few steps left. The part of the weathering process that seems to get the most attention but is easiest to overdo is the panel wear or paint chipping. I usually start by sizing up the level of wear I’ve already applied and imagining how some of the panel edges would look after frequent opening, closing, or removal. How much of the finish on the leading edges of the airplane would be beat up by sand, stones, and other debris found on operating theaters like that desert we mentioned earlier? You can be sure that any painted surface kept outdoors and exposed to regular dirt, sand, or rocks found on most airports, will suffer the effects of these materials. Naturally, the worst wear usually occurs at the leading edge.
The next step is deciding how to simulate the wear or chipping. For sharp-edged panels or large chipped areas, as on the leading edge of wings, I use a fine, pointed brush to randomly apply silver paint stippled along the edge of the panel. The drier the brush the better; you don’t want a lot of paint, just a suggestion of metal peeking through on the edges.
Chipping uses the same paint, but application is better handled by random dabs of a coarse, mostly dry sponge dipped in the silver paint and blotted before you apply it to the surface. Using a different corner of the sponge for sequential dabs will prevent a “repeat pattern” look. Also, when going from one leading edge to the opposite one, try not to look at the first one to “mirror image” it. Avoid symmetry of chipping ff it never happens that way!
Now, for those areas where the paint was worn through rather than chipped, I use a craft material from Amaco called Rub ‘n Buff. Crafters use it to create a metallic look on candles and other items. It’s wax-based and I apply a small amount to a cotton swab before touching it directly to the model’s surface. Don’t apply it too heavily or you’ll be on your way to a chrome-plated leading edge! Excess can be removed with alcohol but you’d best practice on something other than your model until you feel comfortable with the process and result.
Dirt and grime
Here is an example of both wear and chipping simulation in the same general area of the model. Compare the “before” and “after” images below to see the difference just a little weathering can make on your scale project.
Finally, there’s the exhaust staining and grime accumulation that is best handled with an airbrush but can also be convincingly duplicated with pastel chalks or even ground-up pencil leads. Again, subtle is better! You will notice in your photos that the engine grime starts behind the cowl flaps, as you would expect. No need for masking anything here, just take the cowl off, do your thing, and replace the cowl; the stains will begin exactly where they should.
Before
After
There you have it, breathing life and realism into a great foamie warbird in a small number of easy and inexpensive steps. It is easy, but you’ll never know until you try it. Just think of all the admiring looks your new weathered warbird is going to receive at the field; go ahead, go for it!
TEXT & PHOTOS BY RICH URAVITCH
Model Airplane News - The #1 resource for RC plane and helicopter enthusiasts featuring news, videos, product releases and tech tips.
Continue reading...