• If you are new to GiantScaleNews.com, please register, introduce yourself, and make yourself at home.

    We're 1st in Giant Scale RC because we've got the best membership on the internet! Take a look around and don't forget to register to get all of the benefits of GSN membership!

    Welcome!

Glassing and Painting techniques

tylerzx9r

100cc
so could a person forego the glassing and just polyurethane the wood for a protective coating and an all 'natural' look?
You could, but I don't believe the strength would be there, plus the weight may be an issue after your finished getting the look your after.
 

Dooinit

70cc twin V2
so could a person forego the glassing and just polyurethane the wood for a protective coating and an all 'natural' look?
The polyurethane doesn't make the balsa very resistant to dents and dings. Resin would be a better experiment for YOU to try.
 

3Dchief

70cc twin V2
Crashflow, you can keep it clear if you use the right epoxy over glass, but not poly resin. You have to use a blush-free epoxy and it is spendy! You also have to coat the epoxy with a layer of UV protection, I use varnish designed for boats from Helmsman. I use Raka epoxy for my boats inside and out. It is every bit as strong as the stuff we use on planes, but gives you a lot more work time, easily 1/2 hour or more for glassing, several hours if you are using it as a glue so I don't recommend it for that. The downside of that is you have to wait at least 24 hours before you can sand/prep for the next coat.

The glass absorbs the epoxy and disappears unless you get right up next to it. The bottom of my kayaks get two layers of 6 oz glass, you can see in the pictures how it becomes transparent when wetted with the epoxy. Bigger heavier boats like a drift boat get at least two layers of 20 oz cloth and it hides just as well. It takes about 6 coats of epoxy to fill all the weave and get a glass-smooth finish.

I wouldn't personally do it for a plane, it's too heavy and shows every little flaw both in the finish and in the wood and joints below.

10377629_764134460304065_514788600454259818_n.jpg

10382828_754708827913295_5769577699748457395_n.jpg


10309207_754756307908547_7581660908919080581_n.jpg
10299072_754756604575184_2786453915374284163_n.jpg
 
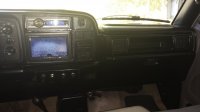
This is perfect timing for this thread to come along For me. I have a friend with a 30 cc P 51 Mustang all fiberglass fuselage that has been stepped on behind the canopy, busting the seams at the top and the bottom all the way back to the Rudder. I am self taught working with fiberglass with all my information coming from the internet. my biggest Project to date is fiberglassing my cracked dash in my old Dodge truck.
all of my experience is with polyester resin. from what I understand polyester resin is way too brittle to make a repair on a model airplane. I want to try West systems epoxy resin with a hardener that gives 30 to 40 minutes working time. he wants to take the cheap route with the Zap finishing resin.
 

Attachments

  • 20141025_113240.jpg
    20141025_113240.jpg
    63.1 KB · Views: 241
idea is to make the repair from the inside after I wrap the back of fuselage with blue painters tape to get the Seams and cracks flush again. I have done this repair before To a Cowl with amazing results. the polyester resin will not stick to the tape I'm not sure how epoxy resin will work any ideas?
 

Fibertech

70cc twin V2
This is perfect timing for this thread to come along For me. I have a friend with a 30 cc P 51 Mustang all fiberglass fuselage that has been stepped on behind the canopy, busting the seams at the top and the bottom all the way back to the Rudder. I am self taught working with fiberglass with all my information coming from the internet. my biggest Project to date is fiberglassing my cracked dash in my old Dodge truck.
all of my experience is with polyester resin. from what I understand polyester resin is way too brittle to make a repair on a model airplane. I want to try West systems epoxy resin with a hardener that gives 30 to 40 minutes working time. he wants to take the cheap route with the Zap finishing resin.

I use West systems only. Resin is 105 and I use slow hardener 206 for all my parts. I have tried some other brands but like the west systems better. Some may like polyester but I have many molds that were made with poly from years back and they all have cracks in them.
For you project if you can get to the inside I would sand with some 80 grit and then some with 180 to remove any residue in a bout a 2”-3” line down the crack. Mix up some glue and mix in 1 to 1 to 2 ratio of micro balloons and cabosil and flocked cotton fiber as a fill brush this along crack then lay in 2 layers of 4oz fiberglass cloth. You can also use the mixed fill on the cracked seam on the outside once the inside was done. This mix will sand fairly easy.
This would of course depend on the damge area.
 

Fibertech

70cc twin V2
Just saw you second post. Yes good to tape up the outside first. Make sure and sand outside of fuse also.
 

Jetpainter

640cc Uber Pimp
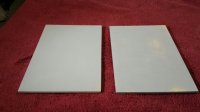
That nasty four letter word "Work" has been getting in the way, but I did manage to prime a few of the test panels I've been working on. Some of them I sprayed with two coats of Nason 421-19 2K urethane primer with Nason 483-87 activator. I reduced the activated primer by about 10% with Nason 441-21 reducer to make it lay a little smoother.

Two others I sprayed with a thin self-etching primer. The self-etch doesn't fill any thing but it will show any pinholes or bad spots and you can spray basecoat right over it if you want. I have two more that I'm going to spray with epoxy primer, but I was out of it the night I sprayed these.

I sanded the best two panels, one with urethane primer and one with self-etch, with 400 dry and weighed them. Before I would paint I would wet sand it with 600, but for testing this is close enough.

Both panels are slick, smooth, pinhole free and would be great painted. Here is a short rundown of the weight gains on these two parts.

Urethane primed part:
Weight after cloth and 1st coat of resin, sanded. 0.30 ounces
Weight after 2nd coat of resin, sanded. 0.30 ounces (no measurable gain of weight for the second coat of resin after sanding)
Weight after priming and sanding. 0.33 ounces

Self-Etch primed part:
Weight after cloth and 1st coat of resin, sanded. 0.32 ounces
Weight after 1 coat of joint compound, sanded. 0.33 ounces (I tried a coat of joint compound between the first and second coat of resin)
Weight after 2nd coat of resin, sanded. 0.33 ounces
Weight after 3 coats of Self Etch primer. 0.34 ounces
20141212_095031_resized.jpg
 
Top