rcbirk21
70cc twin V2
Center of Gravity Setup for first flight and pull-pull vs push-pull decision for EF and 3DHS Airframes
Have you ever thought about how to CG your plane for its maiden voyage? Of course you have, and so have a ton of companies out there selling CG stands and other CG devices. While those are great tools for a lot of airframes, the wonderful minds behind the scenes at 3D Hobby Shop and Extreme Flight have designed their airframes in a much more friendly manor with the flyer rather than the builder in mind. (While I have never built an Extreme flight plane, I have been told they work the exact same way)
I want to start off with a quick disclaimer. This is based on my experiences with 3DHS airframes and while it has not failed me yet, use this at your own risk and please do not take this as a smack in the face if you own a CG stand. My dad and I own multiple, but since I started flying 3DHS planes i have not touched it . The CG stands out on the market are still very viable and helpful products that work great.
All you will need to CG any of these planes is:
-Plane fully loaded (minus rudder servo if you are not sure on push-pull or pull-pull)
-Flight/main pack (if electric do not secure it just yet)
-Bungee cord or some rope/twine/anything that can fit around the wing tube and is strong enough to pick up the airframe.
Measured CG is fairly useless for a few reasons, but the most important is that everyone flys differently, has different setups, and builds slightly differently. The CG for the first flight is NOT intended to be the be all end all to what CG you use. The goal is merely a CG in a safe range in order to get the plane into the air relatively comfortably in order to further tune the plane in the air via inverted roll, vertical stall, and knife edge tests. Because this is not an exact CG, it does not to be perfect, it only needs to be close.
Also, if you are not decided on pull-pull or push-pull, DO NOT cut out the slot for the rudder servo in the tail until you decide.
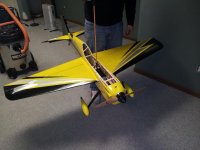
The pictures accompanying this process are for my new 3DHS 65" Vyper. A mini-review is coming soon, as well as a review on the new savox brushless servos in it.
The process I go through is as follows (for an electric plane. Gas is similar, just ignore electric terminology) :
1) Install all electronics except rudder servo. This will allow you to mock up the servo in either location and determine an approximate battery location for either setup while leaving all other electronics in practical locations (esc and bec in the cowl in an easy place to mount that also leaves reach for battery leads, receiver spot that allows all servos to be plugged in relatively easily. can even leave receiver out on larger planes as it will not make a huge difference, but it never hurts to already have it installed)
2) Leave hatch off. I know some people will be upset with this step, saying that it can make a difference. And that is true, but remember we are doing an approximate safe CG, so it really just creates a hassle. Once the hatch is off, attach a bungee cord (or other string/twine/rope/strap) to the wing tube. Slide the rudder servo in the pull pull location. Then install the flight pack. Location is not important, just guess a location.
3) Pick up the plane by the bungee cord attached to the wing tube. Start off by just making the plane light on the wheels. You will immediately know if you are really far off. Adjust the main flight pack as necessary to make the plane fairly level as you pick it up. A slight nose dip is ideal, but not necessary.

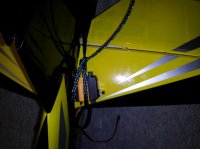
4) Once the battery location is figured out, set the plane down and take out the rudder servo. To avoid having to cut covering to mount the rudder servo in the rear location, simply set it on the elevator (the non moving surface), and tie it down with some spare twine, servo extensions, or anything else laying around. The extra weight does not matter, but if you want to reason it to yourself it replicates part of the servo linkage weight.

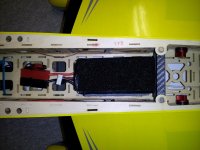
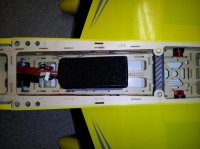
5) In order to compensate for the rudder servo in the rear location, the battery will need to move forward. If your pack was all the way forward for pull pull, then it wont be possible to do push-pull unless you use a heavier motor or rearrange location of items significantly. Also note that if one setup allows adjust-ability while the other does not, the former should be used in order to have room to fine tune after initial flights. For example, with my 65 vyper the pull-pull setup requires my pack to be up against the wing tube. I dont like that as I dont have room to adjust backwards if necessary, while the push-pull allows me that room to adjust. Notice how switching from pull-pull to push-pull only required moving the battery a few inches. The picture on the left shows battery location with the rudder servo in the pull-pull configuration, while the picture on the right is with the servo in the push-pull configuration.


And thats it! Please feel free to let me know if I forgot anything, if you have any questions, or there is any clarification I can give by either explanation or by addition pictures. Hope this is helpful and saves some of you some time and/or a few bucks!
Have you ever thought about how to CG your plane for its maiden voyage? Of course you have, and so have a ton of companies out there selling CG stands and other CG devices. While those are great tools for a lot of airframes, the wonderful minds behind the scenes at 3D Hobby Shop and Extreme Flight have designed their airframes in a much more friendly manor with the flyer rather than the builder in mind. (While I have never built an Extreme flight plane, I have been told they work the exact same way)
I want to start off with a quick disclaimer. This is based on my experiences with 3DHS airframes and while it has not failed me yet, use this at your own risk and please do not take this as a smack in the face if you own a CG stand. My dad and I own multiple, but since I started flying 3DHS planes i have not touched it
All you will need to CG any of these planes is:
-Plane fully loaded (minus rudder servo if you are not sure on push-pull or pull-pull)
-Flight/main pack (if electric do not secure it just yet)
-Bungee cord or some rope/twine/anything that can fit around the wing tube and is strong enough to pick up the airframe.
Measured CG is fairly useless for a few reasons, but the most important is that everyone flys differently, has different setups, and builds slightly differently. The CG for the first flight is NOT intended to be the be all end all to what CG you use. The goal is merely a CG in a safe range in order to get the plane into the air relatively comfortably in order to further tune the plane in the air via inverted roll, vertical stall, and knife edge tests. Because this is not an exact CG, it does not to be perfect, it only needs to be close.
Also, if you are not decided on pull-pull or push-pull, DO NOT cut out the slot for the rudder servo in the tail until you decide.
The pictures accompanying this process are for my new 3DHS 65" Vyper. A mini-review is coming soon, as well as a review on the new savox brushless servos in it.
The process I go through is as follows (for an electric plane. Gas is similar, just ignore electric terminology) :
1) Install all electronics except rudder servo. This will allow you to mock up the servo in either location and determine an approximate battery location for either setup while leaving all other electronics in practical locations (esc and bec in the cowl in an easy place to mount that also leaves reach for battery leads, receiver spot that allows all servos to be plugged in relatively easily. can even leave receiver out on larger planes as it will not make a huge difference, but it never hurts to already have it installed)
2) Leave hatch off. I know some people will be upset with this step, saying that it can make a difference. And that is true, but remember we are doing an approximate safe CG, so it really just creates a hassle. Once the hatch is off, attach a bungee cord (or other string/twine/rope/strap) to the wing tube. Slide the rudder servo in the pull pull location. Then install the flight pack. Location is not important, just guess a location.
3) Pick up the plane by the bungee cord attached to the wing tube. Start off by just making the plane light on the wheels. You will immediately know if you are really far off. Adjust the main flight pack as necessary to make the plane fairly level as you pick it up. A slight nose dip is ideal, but not necessary.

4) Once the battery location is figured out, set the plane down and take out the rudder servo. To avoid having to cut covering to mount the rudder servo in the rear location, simply set it on the elevator (the non moving surface), and tie it down with some spare twine, servo extensions, or anything else laying around. The extra weight does not matter, but if you want to reason it to yourself it replicates part of the servo linkage weight.

5) In order to compensate for the rudder servo in the rear location, the battery will need to move forward. If your pack was all the way forward for pull pull, then it wont be possible to do push-pull unless you use a heavier motor or rearrange location of items significantly. Also note that if one setup allows adjust-ability while the other does not, the former should be used in order to have room to fine tune after initial flights. For example, with my 65 vyper the pull-pull setup requires my pack to be up against the wing tube. I dont like that as I dont have room to adjust backwards if necessary, while the push-pull allows me that room to adjust. Notice how switching from pull-pull to push-pull only required moving the battery a few inches. The picture on the left shows battery location with the rudder servo in the pull-pull configuration, while the picture on the right is with the servo in the push-pull configuration.


And thats it! Please feel free to let me know if I forgot anything, if you have any questions, or there is any clarification I can give by either explanation or by addition pictures. Hope this is helpful and saves some of you some time and/or a few bucks!
