You are using an out of date browser. It may not display this or other websites correctly.
You should upgrade or use an alternative browser.
You should upgrade or use an alternative browser.
3D Viper-ST 100-120cc scratch build......it continues!
- Thread starter Terryscustom
- Start date
stangflyer
I like 'em "BIG"!
I chose to hold off on the PAU as originally planned due to this very reason.Terry's Kit will be available soon! HINT, HINT!
stangflyer
I like 'em "BIG"!
You're evil.... Just gotta figure out how in the world I will build that plane in my....ummm....limited space. LOLThere it is Stang! Pre Order! DO IT, DO IT!
Fibertech
70cc twin V2
You're evil.... Just gotta figure out how in the world I will build that plane in my....ummm....limited space. LOL
Kitchen table…
")
Terryscustom
640cc Uber Pimp
OK, I have a few hours I can work today. I forgot to post these pics last night of the control horn block installation.
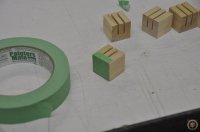
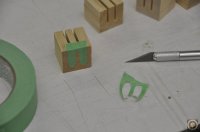
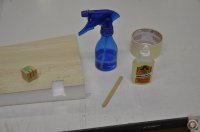
I've played with different methods of this and this is the strongest, lightest and easiest method that I have come up with for the CNC cut control horns (ARF style). This is basically semi-lite balsa blocks. I use this because it grabs the foaming glue the best out of all materials that I tried.
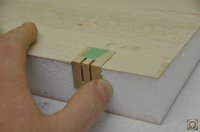
The blocks will be glued on four of the six sides so one side with the slots needs to be taped off. Put some tape and trim off so the slots are covered and most of the wood surface is showing. This keeps the foaming glue from filling up the slot.
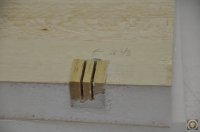
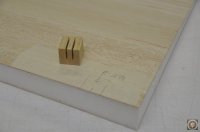
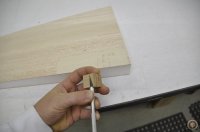
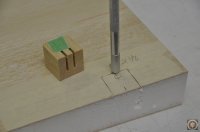
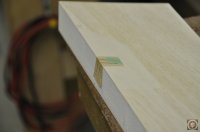
First put tape on the cut-out control surface and trace the block where you want it. Typically I just trace it with my hobby knife so I get an exact fit. Then take several passes to carefully score through the sheeting laser. The depth of the exacto blade is perfect for the block depth, so cut around it carefully and make sure that the back cut is perpendicular to the surface of the balsa. If done correctly the block should fit nicely in the slot, the top should stick up just a hair and the front should angle out slightly as shown.
Install these with Gorilla quick glue. Use a spreader and spread a thin layer of glue on all the inside walls of the hole you just cut. Mist the block with water (don't soak, just mist) and insert it, wipe off any excess glue that comes out. Now securely tape it in place pushing the tape around the block to keep the glue from foaming out.....you want it to foam into the foam core. You also don't want it to push the block out.
I've played with different methods of this and this is the strongest, lightest and easiest method that I have come up with for the CNC cut control horns (ARF style). This is basically semi-lite balsa blocks. I use this because it grabs the foaming glue the best out of all materials that I tried.
The blocks will be glued on four of the six sides so one side with the slots needs to be taped off. Put some tape and trim off so the slots are covered and most of the wood surface is showing. This keeps the foaming glue from filling up the slot.
First put tape on the cut-out control surface and trace the block where you want it. Typically I just trace it with my hobby knife so I get an exact fit. Then take several passes to carefully score through the sheeting laser. The depth of the exacto blade is perfect for the block depth, so cut around it carefully and make sure that the back cut is perpendicular to the surface of the balsa. If done correctly the block should fit nicely in the slot, the top should stick up just a hair and the front should angle out slightly as shown.
Install these with Gorilla quick glue. Use a spreader and spread a thin layer of glue on all the inside walls of the hole you just cut. Mist the block with water (don't soak, just mist) and insert it, wipe off any excess glue that comes out. Now securely tape it in place pushing the tape around the block to keep the glue from foaming out.....you want it to foam into the foam core. You also don't want it to push the block out.
Attachments
-
 _DSC0597.JPG55.6 KB · Views: 587
 -
 _DSC0598.JPG53.6 KB · Views: 591
 -
 _DSC0599.JPG53.3 KB · Views: 556
 -
 _DSC0600.JPG56.4 KB · Views: 580
 -
 _DSC0601.JPG54.1 KB · Views: 540
 -
 _DSC0602.JPG50.8 KB · Views: 566
 -
 _DSC0603.JPG52 KB · Views: 557
 -
 _DSC0604.JPG53.2 KB · Views: 556
 -
 _DSC0605.JPG46.8 KB · Views: 557
 -
 _DSC0607.JPG47.4 KB · Views: 566
 -
 _DSC0606.JPG36.7 KB · Views: 568
Terryscustom
640cc Uber Pimp
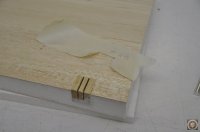
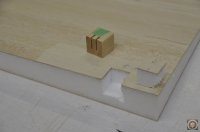
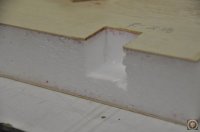
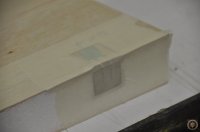
After about a half hour you can remove the tape and sand flush as shown here:
After the hinge stock is installed with wood glue this makes a very strong control mount. However VERY IMPORTANT.....you need to harden these blocks with thin foam safe CA glue before installing the control horns with epoxy. You can also harden the blocks after sanding flush and before gluing on the hinge stock if you like.

After the hinge stock is installed with wood glue this makes a very strong control mount. However VERY IMPORTANT.....you need to harden these blocks with thin foam safe CA glue before installing the control horns with epoxy. You can also harden the blocks after sanding flush and before gluing on the hinge stock if you like.