3DNinja
30cc
View attachment dec_14_wildfredyak.pdf Here are the blueprints if anyone wants to build one.
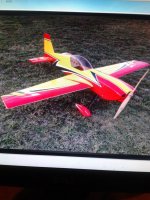
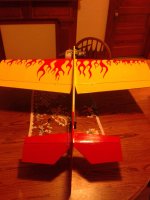
Ok, here is a 3D plane im scratch building for a buddy of mine. I wont mention his name but it starts with Snow and ends with Dog") This is a plane that was designed by Ron Ferrier (AKA Wild Fred). I contacted him and asked if I could post this build on here and he said no problem, I also asked if I could post the blueprints on here and was told that would be fine as well. I have built a few of these thus far and I can tell you that it is one of the most fun 3D planes that you will ever have the privilage to fly, not to mention very durable and affordable. So sit back and enjoy thisopcorn:, as I built this from blueprint (no kit).
This is a plane that was designed by Ron Ferrier (AKA Wild Fred). I contacted him and asked if I could post this build on here and he said no problem, I also asked if I could post the blueprints on here and was told that would be fine as well. I have built a few of these thus far and I can tell you that it is one of the most fun 3D planes that you will ever have the privilage to fly, not to mention very durable and affordable. So sit back and enjoy thisopcorn:, as I built this from blueprint (no kit).
View attachment 6861


The first step is to cut two airplane kits, build one of them and give the other one to your buddy. After about 6 months or so harass your buddy about him not building his yet, then agree to build it for him Ok so lay all your parts out and cover your prints with wax paper over the build table, I used the pink foam from Home Depot on my table so I can pin the parts to. Crack open a beer and study the prints. Remember this is a scratch build so if you want to make any mods to the origional design, this is the time to plan it out.


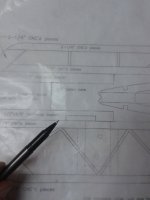
Since i did this months before, I wanted to show you just how I cut the parts out using the blueprints. Fiirst, trace them onto wax paper. Then use some spray adhesive to apply them to the wood to be cut (also apply to multiple peices of wood so as to cut duplicats ie right and left side ribs). This is a temporary glue up and is to be removed after you cut the tracing out and seperate the duplicate parts. I Cut the tracings out with a scroll saw but it can also be cut with a #11 Exacto blade. This is rapidly becoming a lost art due the the ARF planes being more in demand, but is not hard to do. Before long you have a kit.


Glue up nose/engine mount block and dont be afraid to use clamps! A strong airplane depends on a good glue joint. All the glue in the world will not make up for a bad glue joint. I glued up some duplicate parts I cut to make up the thickness i needed since I did not have the correct size wood (so I improvised)


Now here is a unique part of the design of this plane, there is a 1/2 inch hollow tube running through the center of the wing and the length of the fuse. We must build the inboard wing ribs to allow a channel for this tube to fit.


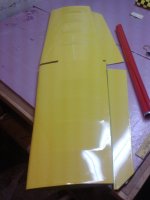
Now comes building the wing. Yay! I love building wings!:bouncy: Basically, you build your main spar and doubler on the plans and place them onto the wing prints with the bottom main spar bending up from the table. This will allow for the wing taper when you start laying down the ribs. Assemble all the ribs upper and lower spar in place and square it all up on the trailing edge so you will have a nice straight hinge line, then glue it all together ensuring that the ribs are all pinned down to the table. Glue the leading edge to both wing halves.


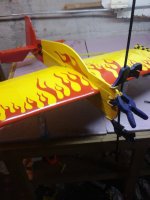
Now I glued the wing sheeting from the leading edge to the main spars although the prints are olny shown sheeted up to the sub spars. Glue the LE of the sheeting to the LE spar with CA, then moisten the sheeting with water and form it around the profile of the ribs. I like to use Tite Bond wood glue for this since it gives me time to work the sheeting. Again clamp it like theres no tomorrow! Remember that the olny good glue joint is a tight one! Remove from the building table and sheet the other side.
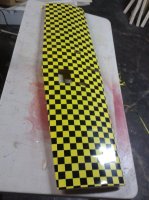
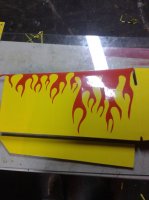
Build the ailerons to the Prints. Notice the "dog eared" tips. This is so you dont rip them off as easily on those low high AOA knife edge circuits, or clipping them on rolling harriers done the right way
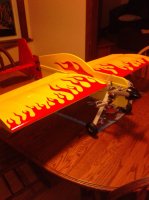
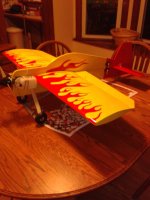
Now we have built the nose block, wing and ailerons!:thumbup: More to come.
Ok, here is a 3D plane im scratch building for a buddy of mine. I wont mention his name but it starts with Snow and ends with Dog
This is a plane that was designed by Ron Ferrier (AKA Wild Fred). I contacted him and asked if I could post this build on here and he said no problem, I also asked if I could post the blueprints on here and was told that would be fine as well. I have built a few of these thus far and I can tell you that it is one of the most fun 3D planes that you will ever have the privilage to fly, not to mention very durable and affordable. So sit back and enjoy thisopcorn:, as I built this from blueprint (no kit).View attachment 6861
The first step is to cut two airplane kits, build one of them and give the other one to your buddy. After about 6 months or so harass your buddy about him not building his yet, then agree to build it for him
Ok so lay all your parts out and cover your prints with wax paper over the build table, I used the pink foam from Home Depot on my table so I can pin the parts to. Crack open a beer and study the prints. Remember this is a scratch build so if you want to make any mods to the origional design, this is the time to plan it out. Since i did this months before, I wanted to show you just how I cut the parts out using the blueprints. Fiirst, trace them onto wax paper. Then use some spray adhesive to apply them to the wood to be cut (also apply to multiple peices of wood so as to cut duplicats ie right and left side ribs). This is a temporary glue up and is to be removed after you cut the tracing out and seperate the duplicate parts. I Cut the tracings out with a scroll saw but it can also be cut with a #11 Exacto blade. This is rapidly becoming a lost art due the the ARF planes being more in demand, but is not hard to do. Before long you have a kit.
Glue up nose/engine mount block and dont be afraid to use clamps! A strong airplane depends on a good glue joint. All the glue in the world will not make up for a bad glue joint. I glued up some duplicate parts I cut to make up the thickness i needed since I did not have the correct size wood (so I improvised
) Now here is a unique part of the design of this plane, there is a 1/2 inch hollow tube running through the center of the wing and the length of the fuse. We must build the inboard wing ribs to allow a channel for this tube to fit.
Now comes building the wing. Yay! I love building wings!:bouncy: Basically, you build your main spar and doubler on the plans and place them onto the wing prints with the bottom main spar bending up from the table. This will allow for the wing taper when you start laying down the ribs. Assemble all the ribs upper and lower spar in place and square it all up on the trailing edge so you will have a nice straight hinge line, then glue it all together ensuring that the ribs are all pinned down to the table. Glue the leading edge to both wing halves.
Now I glued the wing sheeting from the leading edge to the main spars although the prints are olny shown sheeted up to the sub spars. Glue the LE of the sheeting to the LE spar with CA, then moisten the sheeting with water and form it around the profile of the ribs. I like to use Tite Bond wood glue for this since it gives me time to work the sheeting. Again clamp it like theres no tomorrow! Remember that the olny good glue joint is a tight one! Remove from the building table and sheet the other side.
Build the ailerons to the Prints. Notice the "dog eared" tips. This is so you dont rip them off as easily on those low high AOA knife edge circuits, or clipping them on rolling harriers done the right way
Now we have built the nose block, wing and ailerons!:thumbup: More to come.
Attachments
Last edited by a moderator: