njswede
150cc
We've all done it. A screw is a little dirty or has some slight deformation and we try to force it in and... POP... the blind nut on the other side comes loose. This can be a pain, since they are typically located in areas you can't reach. And this is especially true for the blind nuts holding the SFGs in place!
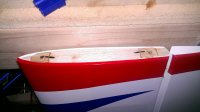
So when I popped BOTH blind nuts on my 3DHobbyShop 72" Extra from using metric instead of SAE screws, I thought I was in for a long and difficult repair having to cut off the entire side of the wing tip and rebuild. But when I cut open the area around the blind nut, I noticed there's a former right behind there that would make a nice substrate for a patch repair, so I took the easier route. Here's what I did:

Feels stronger and sturdier than the original!

So when I popped BOTH blind nuts on my 3DHobbyShop 72" Extra from using metric instead of SAE screws, I thought I was in for a long and difficult repair having to cut off the entire side of the wing tip and rebuild. But when I cut open the area around the blind nut, I noticed there's a former right behind there that would make a nice substrate for a patch repair, so I took the easier route. Here's what I did:
- Remove the covering from the side of the wing tip.
- Cut away the damaged area and a bit more to make room for a big enough patch.
- Cut patches from a balsa sheet that fits the openings I just made. I also sprayed them with some thin CA to prevent them from cracking when I drilled them.
- Dry fit the patches into the openings.
- Use an assistant or painters tape to hold the SFG into the desired position and drill holes in the patches through the holes in the SFG (using the SFG as a template)
- Fill the hole of the blind nuts with Vaseline. Be careful of spills, as they will prevent the glue from adhering.
- Apply a small amount of epoxy in the hole you just drilled in the patch and around the area where you're installing the blind nut. The idea is to glue the blind nut in place so it doesn't come loose again.
- Apply a generous amount of epoxy on the former behind the patch and on the edges of the patch and install it.
- Sand down the patch to make it flush and even.
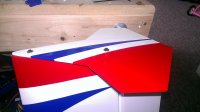
- Reapply the covering!

Feels stronger and sturdier than the original!

Last edited by a moderator:
