You are using an out of date browser. It may not display this or other websites correctly.
You should upgrade or use an alternative browser.
You should upgrade or use an alternative browser.
Sport CARF Pitts - Engine Upgrade
- Thread starter reyn3545
- Start date
reyn3545
100cc
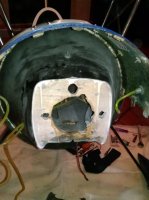
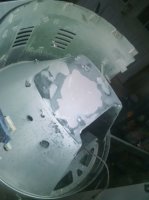
OK.. got a lot done over the past few days. I was able (finally) to separate the original plywood from the plastic motor dome, then sand all the residual glue off of the face. I smoothed out the plywood on the back side of the plastic motor dome as well as I could, and glued a new aircraft grade plywood plate to the back side of the original back plate.
Then, when the glue set up, I stood the airplane on its tail in my basement (it's raining outside today) so that the repair area would face upward, and filled in the large holes with bondo. I selected bondo because it doesn't add a ton of weight, it molds well to the existing surface, and it drills easily for the new motor mounting holes.
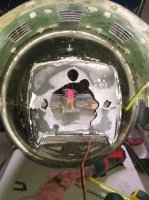
Once the bondo dried, I sanded it down, nothing perfect required here, then glued another plate of aircraft ply on the front of the motor dome. I still need to re-paint the black plastic area, and I'll go over the new wood with a few coats of West Systems Epoxy, but that should complete the firewall/motor mount re-work. On to mounting the engine!
Then, when the glue set up, I stood the airplane on its tail in my basement (it's raining outside today) so that the repair area would face upward, and filled in the large holes with bondo. I selected bondo because it doesn't add a ton of weight, it molds well to the existing surface, and it drills easily for the new motor mounting holes.
Once the bondo dried, I sanded it down, nothing perfect required here, then glued another plate of aircraft ply on the front of the motor dome. I still need to re-paint the black plastic area, and I'll go over the new wood with a few coats of West Systems Epoxy, but that should complete the firewall/motor mount re-work. On to mounting the engine!
Attachments

Last edited:
reyn3545
100cc
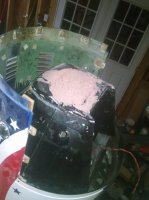
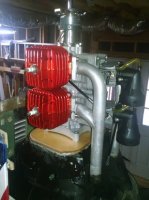
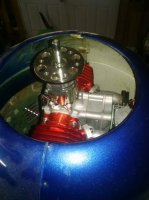
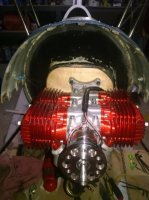
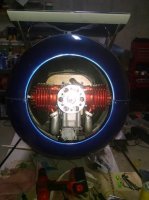
All done now. Well, the holes are drilled, anyway. I'll have to remove the motor again to install the canisters, throttle and probably a few other things, but the hard part is done.
I stood the plane up on its tail, set the motor on the new motor dome, leveled the cylinders with the fuselage, then installed the cowl. I used a piece of string, measuring from the propshaft to the cowl. When the measurements were equal all around the cowl, I removed the cowl, marked the engine location on the firewall, removed the engine and drilled out the mounting holes.
All in all, pretty simple, and it turned out looking better than I expected. I need to paint the black plastic again to cover up some of the leftover glue and fiberglass from the old motor dome extension.
Attachments
Jetpainter
640cc Uber Pimp
Looking good Mike! Can the average man handle 4 redheads at once?")
dhal22
GSN Sponsor Tier 1
That engine will yank that puppy around like a rag doll!
That's why I fly 3W.