• If you are new to GiantScaleNews.com, please register, introduce yourself, and make yourself at home.

    We're 1st in Giant Scale RC because we've got the best membership on the internet! Take a look around and don't forget to register to get all of the benefits of GSN membership!

    Welcome!

Brand New PAU........Viper-ST Announced!!!!!!!!

Terryscustom

640cc Uber Pimp
Ohhhh man, you're gonna love the HV setup! No more blowback!

I have never had blowback on anything, it's more so that I can carry more capacity for the same weight and get more flights per charge as well as some of the obvious benefits like holding torque and speed.

I got my parts painted. I used a catalyzed base coat of white because light colors are a bastard to match. UPS truck showed up and the paint was not cold so I opened it up and started spraying color! Thanks again Tyler, you rock!!! Painting is easy but mixing and matching is an art as I see it.

So, clear is on and curing......time to get back to building!!!!! (after work.....:().
_DSC0382.JPG
_DSC0383.JPG
 

Attachments

  • _DSC0378.JPG
    _DSC0378.JPG
    57.2 KB · Views: 228
  • _DSC0379.JPG
    _DSC0379.JPG
    65.4 KB · Views: 229
  • _DSC0380.JPG
    _DSC0380.JPG
    61.8 KB · Views: 247
  • _DSC0381.JPG
    _DSC0381.JPG
    68.3 KB · Views: 233
I went with Savox 1270's all around except rudder is getting a 2230. I don't know how many hundred flights I have on my other planes with 1283's and 1230 on rudder and I just like the setup. 1270's will give me just a little more and I'll be running unregulated 2S into the AR12120 RX.
Great servo setup Terry! :) You will like them.
 

Terryscustom

640cc Uber Pimp
Well another long long day. Paint cured nicely and looks super after un-masked. Then I worked on hinging the rest of the surfaces.

Nothing too magical here but I do have a couple of tips. I am using epoxy to hinge this plane, so when doing that I will be mixing several small batches of epoxy. I use a syringe to put the epoxy in the holes and also on the hinge itself. I keep a small cup with a few ounces of denatured alcohol nearby and between batches of epoxy I put the syringe in there and fill it with alcohol. This cleans it out so you can use one syringe for the entire job.

Also I described my method of lubing the hinges to a couple people recently and they both had the same reaction so I thought I'd put up a little video. All you need is a "soda" can, some type of torch and Vaseline. The video pretty much shows the rest but I will add that if you note I am only dunking the very middle of the hinge. Don't dunk to too deep to get Vaseline up on the shaft of the hinge:

_DSC0404.JPG
_DSC0405.JPG
 

Attachments

  • _DSC0384.JPG
    _DSC0384.JPG
    127.1 KB · Views: 313
  • _DSC0385.JPG
    _DSC0385.JPG
    119.8 KB · Views: 264
  • _DSC0386.JPG
    _DSC0386.JPG
    80.3 KB · Views: 303
  • _DSC0387.JPG
    _DSC0387.JPG
    82 KB · Views: 276
  • _DSC0388.JPG
    _DSC0388.JPG
    124.3 KB · Views: 270
  • _DSC0389.JPG
    _DSC0389.JPG
    98.5 KB · Views: 281
  • _DSC0390.JPG
    _DSC0390.JPG
    74.3 KB · Views: 303
  • _DSC0391.JPG
    _DSC0391.JPG
    78.8 KB · Views: 262
  • _DSC0392.JPG
    _DSC0392.JPG
    76.7 KB · Views: 271

Terryscustom

640cc Uber Pimp
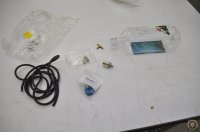
Time to build a fuel tank. I've built a lot of PSP fuel tanks and never had one leak, fault in any way. Here is how I do it:

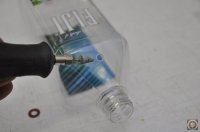
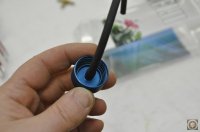
- The O-ring fitting has an allen head in it so it's easy to hold.
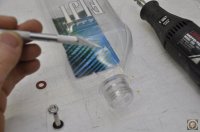
- Decide where you want your fitting and use a sharp hobby knife to make about a 1/8" square hole.
- Use a tapered carbide dremel tool to enlarge the hole so it is JUST large enough for the threads to slide through, the threads should not "bite" and thread through the hole. If you get the hole too large........drink another bottle of water and start over.
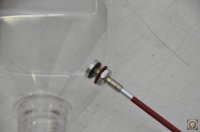
- Install the fitting from the inside, install the washer and nut, tighten until snug.
- I use Viton inside the tank. The barbs on the cap itself are very sharp and the fitting is larger than average so I don't use any type of zip tie, you can if it makes you happy.
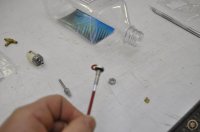
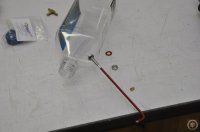
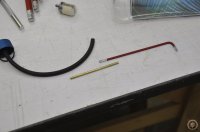
- I like to install a 3" section of brass tubing inside the viton hose to keep it from flopping towards the front of the tank too far. If it is difficult I put a drop of redline in the hose and then it slides in easily. Push it in with an allen wrench to where you want it.
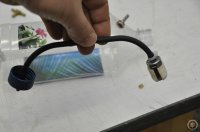
- I like the extra large felt clunks from taildraggerrc.com. I do use a zip tie on this because the barb is kinda smooth.
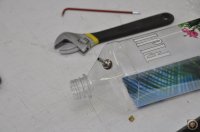
- Make sure the O-ring is in the cap and install on the bottle tightly.

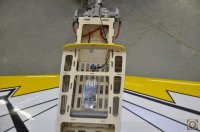
I like a two line system to save weight and the sheer volume of hoses, fittings etc. required. It's always been effective for me, just make sure you use a quality fuel dot and a good quality "T" fitting a couple inches in front of the tank.
_DSC0403.JPG
 

Attachments

  • _DSC0393.JPG
    _DSC0393.JPG
    67.9 KB · Views: 289
  • _DSC0394.JPG
    _DSC0394.JPG
    61.1 KB · Views: 277
  • _DSC0395.JPG
    _DSC0395.JPG
    67.2 KB · Views: 305
  • _DSC0396.JPG
    _DSC0396.JPG
    44.1 KB · Views: 298
  • _DSC0397.JPG
    _DSC0397.JPG
    59.9 KB · Views: 268
  • _DSC0398.JPG
    _DSC0398.JPG
    42.4 KB · Views: 270
  • _DSC0399.JPG
    _DSC0399.JPG
    61.9 KB · Views: 259
  • _DSC0400.JPG
    _DSC0400.JPG
    46.3 KB · Views: 284
  • _DSC0401.JPG
    _DSC0401.JPG
    64.9 KB · Views: 276
  • _DSC0402.JPG
    _DSC0402.JPG
    53.3 KB · Views: 263
  • _DSC0406.JPG
    _DSC0406.JPG
    84.9 KB · Views: 277

Terryscustom

640cc Uber Pimp
Terry ur as slow building this as me getting my shop built! Pick up the pace.
When are these for sale to the public

Sorry, time is limited so I can't do my normal two day ARF build. With luck I'll get done earlier with work today, servos should be here tomorrow.

@Islandflyer will have to answer the availability once we get flight testing done. This is great timing for flight testing since Nall is coming and lots of events in June.
 
Top