You are using an out of date browser. It may not display this or other websites correctly.
You should upgrade or use an alternative browser.
You should upgrade or use an alternative browser.
AJ Laser 230z 73" Build Thread
- Thread starter AKNick
- Start date
BirdStrike
30cc
Can any of you guys please shed some light on how the rudder hinges work or are mounted.I cant seem to find any of the provided hardware to hinge the rudder and its different from any plane I have built in the past. Thanks
3dmike
640cc Uber Pimp
It looks like normal hinges. Check out [MENTION=335]SupaTim[/MENTION] 's build here: http://www.3drcforums.com/showpost.php?p=80046
AKNick
640cc Uber Pimp
Do you have V1 or V2? The old version (V1) uses epoxy as below:
V2 has a removable rudder... I am unfamiliar with this setup.
Check out post #27 on this thread. Tim didn't really cover it per say the rudder, but rudder and elevator are hinged the same way. Look at his post #3 on hinging through his build log.


http://www.3drcforums.com/showthread.php?3536-AJ-Laser-230z-73-quot-Build-Thread/page3
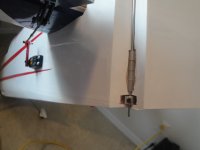
Rudder Attachment:
Attached the control horns as I previously mentioned. I used a pin to dub on some petroleum jelly so the epoxy wouldn't get into the hinge itself, most regular people use Vaseline... I just didn't have some on hand so I improvised. Then I proceeded to dub on the epoxy on the hinge pin and basically filled the hole it goes into as best I can. The idea is that you smear the epoxy to make contact with all the internal wood and hinge pin. Move the rudder around to make sure the pins are tracking strait and that you get full deflection. Note that I put a piece of folded paper in-between the rudder and the top of the vertical to make sure it doesn't set up resting on top of the rudder... This is more of an issue with pinned-flat hinges or working with old CA... I used lacquer thinner to remove the excess epoxy from the hinge area. Tape it all in place and let it fully cure up. I always leave my mixed up epoxy near my project to use as a reference for how set up it is before I remove the tape and start wagging the tail, presuming a knife edge position, and making airplane noises.... okay maybe just in my head at this time.
AJ Laser Manual:
http://www.aj-aircraft.com/assets/images/Downloads/AJ Aircraft 73 inch Laser.pdf
V2 has a removable rudder... I am unfamiliar with this setup.
Check out post #27 on this thread. Tim didn't really cover it per say the rudder, but rudder and elevator are hinged the same way. Look at his post #3 on hinging through his build log.
http://www.3drcforums.com/showthread.php?3536-AJ-Laser-230z-73-quot-Build-Thread/page3
Rudder Attachment:
Attached the control horns as I previously mentioned. I used a pin to dub on some petroleum jelly so the epoxy wouldn't get into the hinge itself, most regular people use Vaseline... I just didn't have some on hand so I improvised. Then I proceeded to dub on the epoxy on the hinge pin and basically filled the hole it goes into as best I can. The idea is that you smear the epoxy to make contact with all the internal wood and hinge pin. Move the rudder around to make sure the pins are tracking strait and that you get full deflection. Note that I put a piece of folded paper in-between the rudder and the top of the vertical to make sure it doesn't set up resting on top of the rudder... This is more of an issue with pinned-flat hinges or working with old CA... I used lacquer thinner to remove the excess epoxy from the hinge area. Tape it all in place and let it fully cure up. I always leave my mixed up epoxy near my project to use as a reference for how set up it is before I remove the tape and start wagging the tail, presuming a knife edge position, and making airplane noises.... okay maybe just in my head at this time.
AJ Laser Manual:
http://www.aj-aircraft.com/assets/images/Downloads/AJ Aircraft 73 inch Laser.pdf
Casualplay
30cc
Pushrods revisited
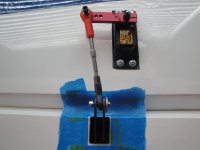
This build has been pretty easy thanks to AKNick's thread and the Mfg. supplied PDF. My only frustration with the "kit" so far is the supplied ball links - why not just use standard sized 4-40??! :cursing:
At any rate, I tried Nick's method of heating the pushrods up and threading the supplied ball links onto them. I was successful but mine were showing signs of stress and I was afraid they would split given time and vibration.
I solved the problem by buying a 4-40 tap and tapping the supplied ball links and using them with the Redwing RC rods Nick specifies in post #18....on the other end I used Dubro 4-40 ball links and SWB arms - the links now appear to be bulletproof.
Attachments
BirdStrike
30cc
Thanks for the responds guys. I must be missing something simple. Mine is a version 2 with the removable rudder. It's not covered in the instructions or any build log that I have seen so far.
BirdStrike
30cc
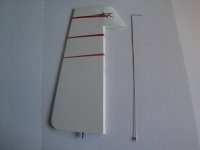
Okay guys I figured it. It was simple lol. I just had to look in the box a little harder. There is a rod that runs the same height as rudder and slides down the hinges locking it in. Thanks for the help!
AKNick
640cc Uber Pimp
ok Good!! @BirdStrike would you mind trying to post a picture of the parts with the removable rudder? maybe line them up where they'd go on the stab?
@Casualplay I don't know why they supply anything other than 4-40... it's pretty frustrating when you'd think that the mfgr should have a pretty good idea that most of their customers would change to 4-40 hardware. I don't like how you would have to modify some control horn hinge slot to accommodate the 4-40 hardware... just can't win I guess:cursing:
I really like the tap idea... I have one just sitting around too!!:facepalm:
oh and you are too nice! I'm glad you like my buildin tips
Last edited by a moderator:
Casualplay
30cc
Rudder
Nick,
The V2 rudder is pretty simple, it's got old school heavy duty plastic hinges with a single removable pin. I had the same question regarding the rudder and here is what AJ said when I emailed them on the subject:
"~Subject: Rudder hinge pin
Hi Trent, We usually place a small piece of clear tape on top of the rudder, or a small wheel collar on the bottom of the hinge pin.
Thanks, Joe
Sincerely,
AJ Aircraft"
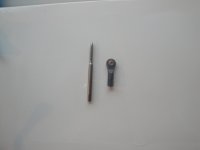
There is a slot in the top of the rudder, the pin is inserted from the very top down through the balance tab an into the first (top) hinge - then through the remaining two hinges. I found a small wheel collar in my parts bin so I'll end up installing a collar on the bottom of the pin and clear packing tape over the top. (I tried white Monokote but it didn't work so well)
Nick,
The V2 rudder is pretty simple, it's got old school heavy duty plastic hinges with a single removable pin. I had the same question regarding the rudder and here is what AJ said when I emailed them on the subject:
"~Subject: Rudder hinge pin
Hi Trent, We usually place a small piece of clear tape on top of the rudder, or a small wheel collar on the bottom of the hinge pin.
Thanks, Joe
Sincerely,
AJ Aircraft"
There is a slot in the top of the rudder, the pin is inserted from the very top down through the balance tab an into the first (top) hinge - then through the remaining two hinges. I found a small wheel collar in my parts bin so I'll end up installing a collar on the bottom of the pin and clear packing tape over the top. (I tried white Monokote but it didn't work so well)
Attachments
Last edited by a moderator: