Kevin-Young
70cc twin V2
So Yesterday was the sit and watch glue dry kind of day
With the fuselage sides pretty much done it was time to assemble the motorbox. When assembling the motorbox we use the Loctite Hysol 9462 epoxy. The hysol is awesome because you can fully assemble the motorbox and then just go back and make a fillet with the hysol on all your glue joints and it will be perfect strong and looks clean.
So we will start with some of the pictures of the motorbox parts first.
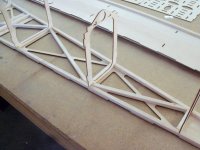
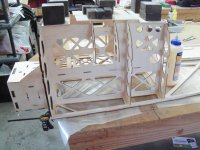
Picture #1 is the motorbox sides. The sides are offset for three degrees right thrust and 1 degree up thurst. You will also notice that the sides have areas where you can run velcro strap through them if you choose to mount batteries or something up in that area.

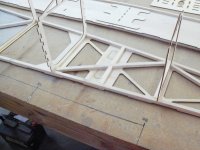
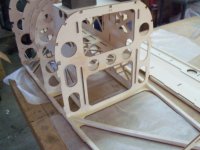
Picture #2A The F1 former which the motorbox sides slide into and get tabbed into. Because the thrust line on the MX2 and Giles is high we use a step between the front motorbox floor and the fuel tank floor so in Picture #2B you can see the step and also the top of the F1 former which ends up being used on the Hatch.


Picture #3 is the firewall. Again it is offset for right thrust and upthrust.

Picture #4A and #4B are the motorbox top plate and bottom plate. As you can see the top plate has a removable hatch so you can get to a servo if you mount it up front , ignition batteries, ignitions or whatever else you may choose.


Picture #5 is the fuel tank floor. Again at the front it has slots for mounting different items if you choose and then down the sides you will also see slots for securing your fuel tank if you choose to mount it with velcro.

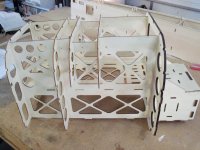
Picture #6 is the F2 former which tabs into the motorbox sides, top plate, and fuselage sides. This former is near the front of the wing so it give support for the front wing mounting bolts. (pictured is actually the standard kit version former and not the CS version which is notched for wing doubler on the fuse sides. AKA, the old man grabbed the wrong former to take a picture of http://www.GiantScaleNews.com/forums/images/smilies/200.gif)

Picture #7 is the F3 former which again tabs into the motorbox sides, top plate, and fuselage sides. In addition the front most fuselage floor also tabs into it.

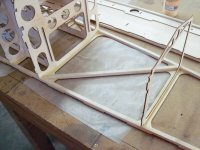
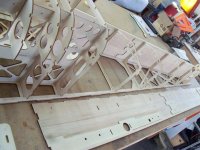
Picture #8 is the Landing gear formers. Basically they are just there to hold shape between the F1 and F2 formers when the bottom gets sheeted.

With the fuselage sides pretty much done it was time to assemble the motorbox. When assembling the motorbox we use the Loctite Hysol 9462 epoxy. The hysol is awesome because you can fully assemble the motorbox and then just go back and make a fillet with the hysol on all your glue joints and it will be perfect strong and looks clean.
So we will start with some of the pictures of the motorbox parts first.
Picture #1 is the motorbox sides. The sides are offset for three degrees right thrust and 1 degree up thurst. You will also notice that the sides have areas where you can run velcro strap through them if you choose to mount batteries or something up in that area.
Picture #2A The F1 former which the motorbox sides slide into and get tabbed into. Because the thrust line on the MX2 and Giles is high we use a step between the front motorbox floor and the fuel tank floor so in Picture #2B you can see the step and also the top of the F1 former which ends up being used on the Hatch.
Picture #3 is the firewall. Again it is offset for right thrust and upthrust.
Picture #4A and #4B are the motorbox top plate and bottom plate. As you can see the top plate has a removable hatch so you can get to a servo if you mount it up front , ignition batteries, ignitions or whatever else you may choose.
Picture #5 is the fuel tank floor. Again at the front it has slots for mounting different items if you choose and then down the sides you will also see slots for securing your fuel tank if you choose to mount it with velcro.
Picture #6 is the F2 former which tabs into the motorbox sides, top plate, and fuselage sides. This former is near the front of the wing so it give support for the front wing mounting bolts. (pictured is actually the standard kit version former and not the CS version which is notched for wing doubler on the fuse sides. AKA, the old man grabbed the wrong former to take a picture of http://www.GiantScaleNews.com/forums/images/smilies/200.gif)
Picture #7 is the F3 former which again tabs into the motorbox sides, top plate, and fuselage sides. In addition the front most fuselage floor also tabs into it.
Picture #8 is the Landing gear formers. Basically they are just there to hold shape between the F1 and F2 formers when the bottom gets sheeted.