GSNadmin
Staff member
Here are a few of our favorite tips for building, staying organized and making the most out of everyday items. What are some of your go-to tips and tricks? Share them in the comments section and you could win a $50 gift certificate for BSI glue!
Head over Heels
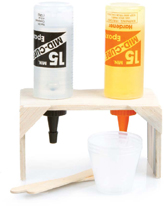
When it comes to mixing and applying epoxy glue, you can do the job much quicker if you keep your bottles upside down. Make a simple holding fixture from some scrap wood and place the bottles in holes drilled through the top shelf. If your workshop is not heated, use a heat gun or hair dryer to heat the bottles before squeezing the resin into a disposable mixing cup.
Using What’s at Hand
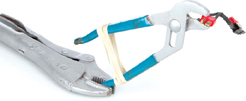
When you are in a pinch and need an extra set of hands or a holding jig to make a soldering job easier, try this. Use a set of vise grips to hold a pair of offset pliers as shown. The vise grips are heavy enough to make a stable base and a rubber band wrapped around the pliers handles allows them to clamp your work without slipping.
52 Squeegees
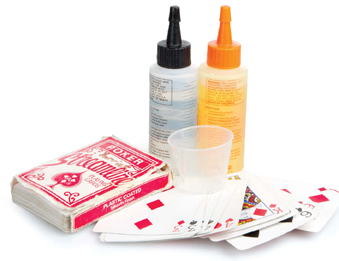
When it comes to spreading resin or epoxy glue, nothing beats a plastic laminated playing card. Cards are stiff enough to pull the resin, can bend to apply resin over rounded surface and are cheap enough to be disposable after each use. No cleanup needed!
Custom Tool Holder
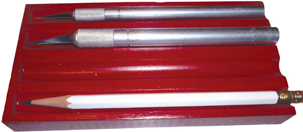
Being organized at the workbench saves time and minimizes hangar rash when you accidentally place a wing of other unprotected part on top of something sharp. Cut a piece of 1-inch thick board to a 3-inch width and about 6 inches long. Route four grooves into the top surface and leave about a ¼-inch space between them. Attach small rubber cabinet-door pads to the bottom and you have a nice convenient place to hold your hobby knives, pencils or other round-handled tools so they won’t roll off your workbench. A painted surface is optional.
Internal switch
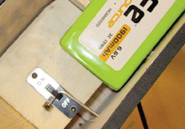
Here’s a simple way to keep the outside of your model looking clean and neat. Instead of cutting a large opening in the side of the fuselage and mounting the radio switch externally, mount the switch internally on a plywood tray and then attach a thin piece of music wire to it. Drill a hole in the switch toggle, and bend a 90-degree “L” into the end of the wire. Drill a small hole in the fuselage side, slip the wire into the hole in the switch toggle and use a lock collar to secure it. Add another 90-degree bend on the outer end of the wire and sliding the wire in and out to activate the switch will be easy.
Color coding
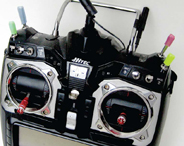
Here’s a trick for when you start flying more advanced airplanes, gliders or helicopters that require various auxiliary mixes and functions. Often it is necessary to find and activate various switches on your transmitter to control the functions of your model. By slipping short lengths of different colored fuel tubing over the switches, the search for that specific switch is much easier while dividing your attention between the switch and flying the model.
Straight surfaces
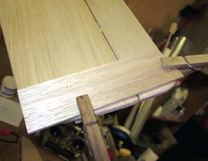
The best way to set up your model for maximum performance and response to control inputs is to have all your control surfaces centered at their neutral positions without the use of trim or subtrim adjustments using your programmable transmitter. I like to make mechanical adjustments when you are building or setting up a model. I use a piece of scrap balsa and a couple of clothespins to fix the surfaces to neutral. Now you can make up and install your linkages without guessing at the center position. Do this along with the servo powered with the receiver so it is also in neutral position.
No sand repair
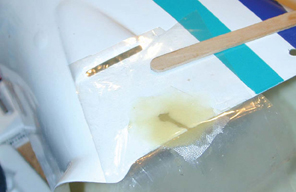
Sooner or later, most fiberglass cowls crack or become damaged when the screw heads holding them in place chafe through and enlarge the holes. Clean and then lightly sand the damaged surface. Next, mix up a mixture of 20-minute epoxy and some microballoons, (or filler made from finely chopped-up fiberglass cloth) and then apply it to the damaged area. Let it fill up the crack or enlarged hole. Now place a piece of sandwich bag over both sides of the repair and squeegee the resin out until it is smooth. Let it dry overnight, drill a new hole and lightly sand with fine sandpaper. Shoot some spray paint on it and the repair will be almost impossible to see.
MAGNETIC SCREWDRIVER


The best way to reach into model airplanes and install servo screws is with a magnetic screwdriver. Of course, you can also make your own simply by placing an inexpensive button magnet (available at RadioShack) on the side of your screwdriver. This way, the screw stays on the tip and you can guide it into the servo grommet and attachment hole. The magnets are also handy for gathering screws on the workbench so they don’t roll around and get lost.
SERVO TAPE TIPS
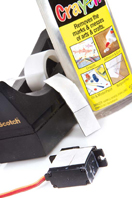
A friend of mine lost his plane recently because the tape on his elevator servo came loose during flight. When I use double-side foam servo tape (I use 3M attachment tape), I always clean the servo case with some rubbing alcohol and then apply some clear tape to the case before applying the foam tape. I also make sure the surface to which I stick the servo is clean for a proper bond. If your servo case is dirty and has leftover foam tape adhesive in it, be sure to clean it before reinstalling the servo. I have found the Crayon Away (available at Walmart) works great for removing that leftover tape residue.
Model Airplane News - The #1 resource for RC plane and helicopter enthusiasts featuring news, videos, product releases and tech tips.
Continue reading...
Head over Heels
When it comes to mixing and applying epoxy glue, you can do the job much quicker if you keep your bottles upside down. Make a simple holding fixture from some scrap wood and place the bottles in holes drilled through the top shelf. If your workshop is not heated, use a heat gun or hair dryer to heat the bottles before squeezing the resin into a disposable mixing cup.
Using What’s at Hand
When you are in a pinch and need an extra set of hands or a holding jig to make a soldering job easier, try this. Use a set of vise grips to hold a pair of offset pliers as shown. The vise grips are heavy enough to make a stable base and a rubber band wrapped around the pliers handles allows them to clamp your work without slipping.
52 Squeegees
When it comes to spreading resin or epoxy glue, nothing beats a plastic laminated playing card. Cards are stiff enough to pull the resin, can bend to apply resin over rounded surface and are cheap enough to be disposable after each use. No cleanup needed!
Custom Tool Holder
Being organized at the workbench saves time and minimizes hangar rash when you accidentally place a wing of other unprotected part on top of something sharp. Cut a piece of 1-inch thick board to a 3-inch width and about 6 inches long. Route four grooves into the top surface and leave about a ¼-inch space between them. Attach small rubber cabinet-door pads to the bottom and you have a nice convenient place to hold your hobby knives, pencils or other round-handled tools so they won’t roll off your workbench. A painted surface is optional.
Internal switch
Here’s a simple way to keep the outside of your model looking clean and neat. Instead of cutting a large opening in the side of the fuselage and mounting the radio switch externally, mount the switch internally on a plywood tray and then attach a thin piece of music wire to it. Drill a hole in the switch toggle, and bend a 90-degree “L” into the end of the wire. Drill a small hole in the fuselage side, slip the wire into the hole in the switch toggle and use a lock collar to secure it. Add another 90-degree bend on the outer end of the wire and sliding the wire in and out to activate the switch will be easy.
Color coding
Here’s a trick for when you start flying more advanced airplanes, gliders or helicopters that require various auxiliary mixes and functions. Often it is necessary to find and activate various switches on your transmitter to control the functions of your model. By slipping short lengths of different colored fuel tubing over the switches, the search for that specific switch is much easier while dividing your attention between the switch and flying the model.
Straight surfaces
The best way to set up your model for maximum performance and response to control inputs is to have all your control surfaces centered at their neutral positions without the use of trim or subtrim adjustments using your programmable transmitter. I like to make mechanical adjustments when you are building or setting up a model. I use a piece of scrap balsa and a couple of clothespins to fix the surfaces to neutral. Now you can make up and install your linkages without guessing at the center position. Do this along with the servo powered with the receiver so it is also in neutral position.
No sand repair
Sooner or later, most fiberglass cowls crack or become damaged when the screw heads holding them in place chafe through and enlarge the holes. Clean and then lightly sand the damaged surface. Next, mix up a mixture of 20-minute epoxy and some microballoons, (or filler made from finely chopped-up fiberglass cloth) and then apply it to the damaged area. Let it fill up the crack or enlarged hole. Now place a piece of sandwich bag over both sides of the repair and squeegee the resin out until it is smooth. Let it dry overnight, drill a new hole and lightly sand with fine sandpaper. Shoot some spray paint on it and the repair will be almost impossible to see.
MAGNETIC SCREWDRIVER
The best way to reach into model airplanes and install servo screws is with a magnetic screwdriver. Of course, you can also make your own simply by placing an inexpensive button magnet (available at RadioShack) on the side of your screwdriver. This way, the screw stays on the tip and you can guide it into the servo grommet and attachment hole. The magnets are also handy for gathering screws on the workbench so they don’t roll around and get lost.
SERVO TAPE TIPS
A friend of mine lost his plane recently because the tape on his elevator servo came loose during flight. When I use double-side foam servo tape (I use 3M attachment tape), I always clean the servo case with some rubbing alcohol and then apply some clear tape to the case before applying the foam tape. I also make sure the surface to which I stick the servo is clean for a proper bond. If your servo case is dirty and has leftover foam tape adhesive in it, be sure to clean it before reinstalling the servo. I have found the Crayon Away (available at Walmart) works great for removing that leftover tape residue.
Model Airplane News - The #1 resource for RC plane and helicopter enthusiasts featuring news, videos, product releases and tech tips.
Continue reading...