GSNadmin
Staff member
Here’s a great workshop technique from editor Gerry Yarrish’s workshop. The products may have changed but today, painting your model airplane with “rattle can” spray paint is a less expensive alternative than using an air compressor and an automotive touch-up gun or a HVLP (High Volume, Low Pressure) rig.
When you start building models that have formed plastic or fiberglass parts such as the engine cowl, wingtips, or wheel pants, you are faced with the additional task of painting them to match the rest of your model. Spray paint is a convenient and simple way to finish those formed parts, but unless you take the time to prepare them, your new paint job can peel or chip away after only a few flights. Here’s a surefire way to achieve a long-lasting, attractive paint job with a minimum of effort.

Basic things you’ll need include 150- and 220-grit sandpaper, vinyl electrical tape and paper masking tape, a sharp hobby knife, paper towels and denatured alcohol. You’ll also need masking paper (wrapping paper or doubled over newspapers) and an automotive tack cloth. Whenever possible, use the same brand of paint, primer and clear coat. Here, I am using Coverite 21st Century white, light red, white primer and gloss clear.
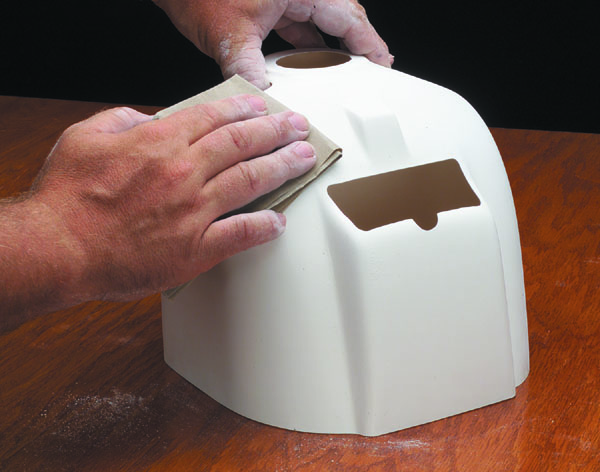
1. The first step is to wash your hands to remove any body oils from your fingers before you begin sanding your part (here, an engine cowl for my Giantscaleplanes.com Super Decathlon). Sand with 150-grit paper, and remove all the parts’ surface gloss. Get into all the small corners, and smooth the inside edges of any openings. Wipe off the part, and check to makes sure that there aren’t any shiny spots. Then sand the cowl again with 220 sandpaper. Sanding the part gives the primer something to “bite” into and helps the finish adhere to the part.
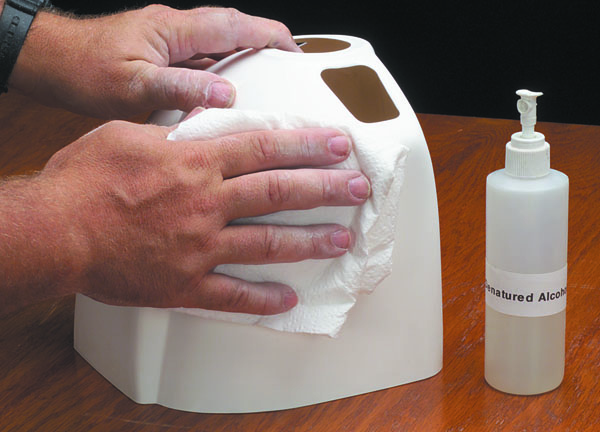
2. Wipe off the cowl again and then use denatured alcohol to degrease its surface. Even fingerprints can cause the finish to peel.

3. Before you spray on the primer, make a hook out of a wire coat hanger to hang the part on. Shake the can vigorously until you hear the little mixing ball rattle, then apply the primer in several light mist coats. Allow each coat to dry for a minute or two before you apply the next. While spraying, hold the can about 10 to 12 inches away from the part.
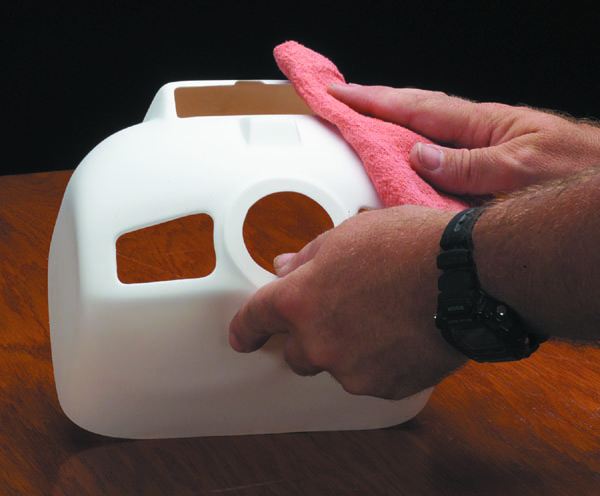
4. After the part has dried for a few hours, wipe it down with a tack cloth to remove any dust from the surface. When handling the part, try to hold it from the inside to minimize finger marks on the outside.

5. Hang the part again, and start applying the base coat—in this case, high-gloss white. Whenever you paint a multicolored part, always start with the lighter colors and add the darker on top. Also, if you paint a single, bright color such as yellow, orange, or red, apply a white base coat to the part first; this really makes the color coat shine.

6. Prepare your masking tape by cutting the electrical tape into thin 1/4-inch strips. The upper red portion of my engine cowl has two rounded front corners that require the masking tape to be bent around them. Thin strips make this possible. Vinyl flex tape can also be used, but electrical tape is less expensive if you are doing a lot of masking and it is readily available at the hardware store.

7. After the paint has dried overnight, place the cowl on the model, making certain it’s positioned correctly relative to the spinner and firewall. Use a straightedge to draw light pencil guidelines so the painted portions will match the trim design on the fuselage.

8. Using the guideline as a reference, apply the electrical tape to the outside or “masked” side of the guideline. Do not stretch the tape along straight lines, and only stretch it lightly along curved edges. If the tape is stretched too much, it will lift before you have finished painting the part.

9. Check the tape to make sure it’s correctly positioned. If you don’t like it, remove it and reapply it until it’s right.

10. Mask the rest of the cowl with paper masking tape. Begin along the electrical tape, and work away from the paint edge until you have about 2 inches of masked area.

11. Use paper to mask the rest of the cowl, and make sure everything is completely covered. Use your thumbnail to burnish the electrical tape down tightly. Double-check the curved edges to make certain the tape hasn’t lifted out of place.

12. Cover your work surface with paper, and prop up the cowl with a couple of paper cups to lift it from the bench. This will prevent the paint from “gluing” the part to the paper and marring the finish. Now apply the trim color to the unmasked portion of the cowl. Apply the paint in very light mist coats, and allow it to dry for a minute or two before you apply more paint.

Here, you see the first mist coat. Note that it does not completely cover the white base coat. Apply several more light coats until the white is no longer visible.

This is what the red looks like after six or seven mist coats have been applied. Now let the paint set for about 10 minutes then carefully remove your masking tape.
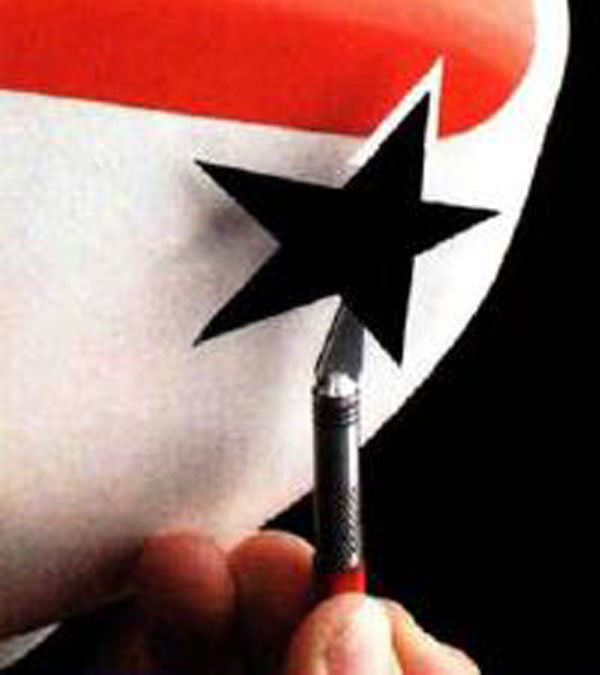
13. After the paint has dried overnight, apply your trim graphics. Here, I am applying the black star to the cowl. Note the small triangle of white I added to the top point of the star. This little trick makes it unnecessary to mask off the red portion where the star would rest.

14. Here, I am applying the two black pinstripes that finish the trim design. Once you have finished with all the trim work, wipe the cowl with a tack cloth and hang it on the wire hanger again and apply several light clear coats to seal everything into place. Allow the clear coat to dry overnight, and you’ll be ready to attach the cowl to your model.
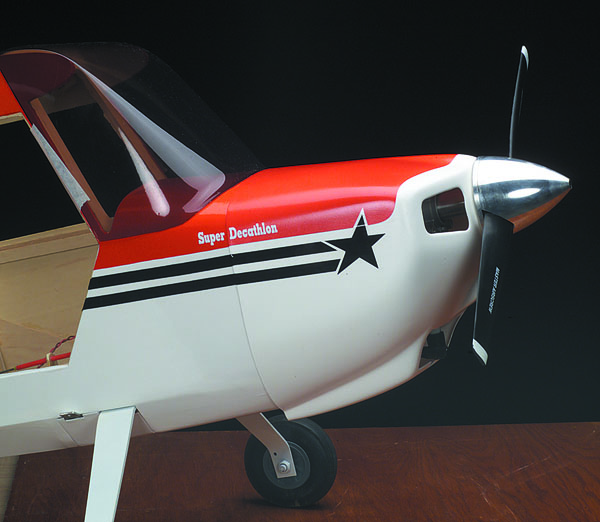
Here is the finished cowl on the Super Decathlon. Painting with spray cans is very easy, and the results are impressive if you take the time to do the job right. A clear coat really makes the finish shine and seals all the trim edges at the same time. Give Rattle Cans a try; you’ll love the results this spray paint technique provides.
Model Airplane News - The #1 resource for RC plane and helicopter enthusiasts featuring news, videos, product releases and tech tips.
Continue reading...
When you start building models that have formed plastic or fiberglass parts such as the engine cowl, wingtips, or wheel pants, you are faced with the additional task of painting them to match the rest of your model. Spray paint is a convenient and simple way to finish those formed parts, but unless you take the time to prepare them, your new paint job can peel or chip away after only a few flights. Here’s a surefire way to achieve a long-lasting, attractive paint job with a minimum of effort.
Basic things you’ll need include 150- and 220-grit sandpaper, vinyl electrical tape and paper masking tape, a sharp hobby knife, paper towels and denatured alcohol. You’ll also need masking paper (wrapping paper or doubled over newspapers) and an automotive tack cloth. Whenever possible, use the same brand of paint, primer and clear coat. Here, I am using Coverite 21st Century white, light red, white primer and gloss clear.
1. The first step is to wash your hands to remove any body oils from your fingers before you begin sanding your part (here, an engine cowl for my Giantscaleplanes.com Super Decathlon). Sand with 150-grit paper, and remove all the parts’ surface gloss. Get into all the small corners, and smooth the inside edges of any openings. Wipe off the part, and check to makes sure that there aren’t any shiny spots. Then sand the cowl again with 220 sandpaper. Sanding the part gives the primer something to “bite” into and helps the finish adhere to the part.
2. Wipe off the cowl again and then use denatured alcohol to degrease its surface. Even fingerprints can cause the finish to peel.
3. Before you spray on the primer, make a hook out of a wire coat hanger to hang the part on. Shake the can vigorously until you hear the little mixing ball rattle, then apply the primer in several light mist coats. Allow each coat to dry for a minute or two before you apply the next. While spraying, hold the can about 10 to 12 inches away from the part.
4. After the part has dried for a few hours, wipe it down with a tack cloth to remove any dust from the surface. When handling the part, try to hold it from the inside to minimize finger marks on the outside.
5. Hang the part again, and start applying the base coat—in this case, high-gloss white. Whenever you paint a multicolored part, always start with the lighter colors and add the darker on top. Also, if you paint a single, bright color such as yellow, orange, or red, apply a white base coat to the part first; this really makes the color coat shine.
6. Prepare your masking tape by cutting the electrical tape into thin 1/4-inch strips. The upper red portion of my engine cowl has two rounded front corners that require the masking tape to be bent around them. Thin strips make this possible. Vinyl flex tape can also be used, but electrical tape is less expensive if you are doing a lot of masking and it is readily available at the hardware store.
7. After the paint has dried overnight, place the cowl on the model, making certain it’s positioned correctly relative to the spinner and firewall. Use a straightedge to draw light pencil guidelines so the painted portions will match the trim design on the fuselage.
8. Using the guideline as a reference, apply the electrical tape to the outside or “masked” side of the guideline. Do not stretch the tape along straight lines, and only stretch it lightly along curved edges. If the tape is stretched too much, it will lift before you have finished painting the part.
9. Check the tape to make sure it’s correctly positioned. If you don’t like it, remove it and reapply it until it’s right.
10. Mask the rest of the cowl with paper masking tape. Begin along the electrical tape, and work away from the paint edge until you have about 2 inches of masked area.
11. Use paper to mask the rest of the cowl, and make sure everything is completely covered. Use your thumbnail to burnish the electrical tape down tightly. Double-check the curved edges to make certain the tape hasn’t lifted out of place.
12. Cover your work surface with paper, and prop up the cowl with a couple of paper cups to lift it from the bench. This will prevent the paint from “gluing” the part to the paper and marring the finish. Now apply the trim color to the unmasked portion of the cowl. Apply the paint in very light mist coats, and allow it to dry for a minute or two before you apply more paint.
Here, you see the first mist coat. Note that it does not completely cover the white base coat. Apply several more light coats until the white is no longer visible.
This is what the red looks like after six or seven mist coats have been applied. Now let the paint set for about 10 minutes then carefully remove your masking tape.
13. After the paint has dried overnight, apply your trim graphics. Here, I am applying the black star to the cowl. Note the small triangle of white I added to the top point of the star. This little trick makes it unnecessary to mask off the red portion where the star would rest.
14. Here, I am applying the two black pinstripes that finish the trim design. Once you have finished with all the trim work, wipe the cowl with a tack cloth and hang it on the wire hanger again and apply several light clear coats to seal everything into place. Allow the clear coat to dry overnight, and you’ll be ready to attach the cowl to your model.
Here is the finished cowl on the Super Decathlon. Painting with spray cans is very easy, and the results are impressive if you take the time to do the job right. A clear coat really makes the finish shine and seals all the trim edges at the same time. Give Rattle Cans a try; you’ll love the results this spray paint technique provides.
Model Airplane News - The #1 resource for RC plane and helicopter enthusiasts featuring news, videos, product releases and tech tips.
Continue reading...