• If you are new to GiantScaleNews.com, please register, introduce yourself, and make yourself at home.

    We're 1st in Giant Scale RC because we've got the best membership on the internet! Take a look around and don't forget to register to get all of the benefits of GSN membership!

    Welcome!

3D Splitting Cowls made easy

Terryscustom

640cc Uber Pimp
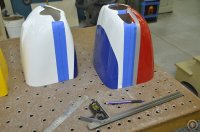
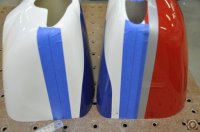
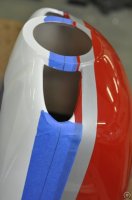
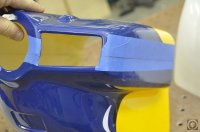
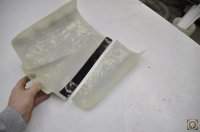
I have a few victims lined up and will be splitting cowls. I've done this quite a bit and answered lots of questions on it so thought I would do a little thread and show some steps. It really is super easy.

Three of the cowls I have are getting 70cc twins and in the 60cc size planes most are not splitting the cowl. I personally like all my cowls split because it is so much easier to get a really nicely cut cowl for exhaust, baffling is so much easier, etc. etc.

I got side-tracked on other projects most of the day so this will take place tomorrow but I thought I'd start the thread now and get a few things started.

_DSC0003.JPG
 

Capt.Roll

70cc twin V2
Sweet Terry..........perfect timing. I'd like to split the cowl on my 104" EF Extra 300 and just didn't know how to get started; I would like for it to look nice.
 

dhal22

GSN Sponsor Tier 1
Excellent. I've seen and have some ideas on splitting my 100cc Yak cowl but always happy to see instruction 1st hand.


David
 

Terryscustom

640cc Uber Pimp
No problem, I'm doing a 91" EF Extra, 88" EF Edge, 89" AJ Slick, GP Cap and my prototype cap cowl is already in two pieces but I need to install the lip. As long as I'm making a mess tomorrow I'm going to try my hand at making a wing tube sleeve for the 88" Edge as well.
 

ericb

Team WTFO
GSN Contributor
Awesome. You always have a way of making things like this doable for the rest of us. Lots of times it is just knowing where to start.
 

Terryscustom

640cc Uber Pimp
Awesome. You always have a way of making things like this doable for the rest of us. Lots of times it is just knowing where to start.

You know, I think that's just exactly it. Someone recently made a comment about over thinking things and another comment about spending a couple of days deciding how to complicate things. I guess my problem is I'm not afraid to fail.....just start over if you do. So do some research, gather the correct materials and tools and dig in.

Will hit this after lunch tomorrow, it's super super easy. Trust me. I will be using PVA that I know that not everyone has interest in purchasing so I'm also going to do a small sample with Pam cooking spray. I've heard that it works well as a non-stick agent for doing this, so I'll see if it works for you!
 

Terryscustom

640cc Uber Pimp
I got a little side-tracked on several projects today but I did get the cowls split and they are ready to tape back up and do some glassing. I got a cool idea from @Flyrcjoe today that wanted to share. I've done lots of cowls but I understand that not everyone wants to go out and buy PVA just to do this. He mentioned that he has used electrical tape! That genius, because it is sticky enough to stay in place, smooth on one side and easily removed! So I have a really crappy cowl that came with a kit and I will never use......I sliced it in half and will do a sample to test it.

So the whole cowl split thing is very simple. I made a two minute video and in real time I literally split four cowls, and applied PVA in less than half-hour. Tomorrow I will tape and join them back together that will take less than an hour. I cut a pile of tabs that will be used to join the cowl halves after the glass lip is installed.

1 - Put tape where you want to cut. This gives you a place to draw a line and also will keep the ARF paint from chipping as much as possible when you cut.
2 - Use a square to draw a straight line for as far as you can, then continue the line around to the front.
3 - Use a thin kerf pull saw and use long strokes with light pressure with the saw at a very shallow angle. This keeps the blade in the cut and keeps the cut straight as possible.
4 - I sprayed the top half of the cowl with PVA mixed 40:1 with alcohol and shot at 60psi. The alcohol keeps the PVA from spraying out like silly string and the high pressure atomizes it nicely. PVA is alcohol based so it dries very fast and will wash off with water when we are done.
 

Attachments

  • _DSC0021.JPG
    _DSC0021.JPG
    98.3 KB · Views: 865
  • _DSC0022.JPG
    _DSC0022.JPG
    61.6 KB · Views: 849
  • _DSC0023.JPG
    _DSC0023.JPG
    29.1 KB · Views: 882
  • _DSC0024.JPG
    _DSC0024.JPG
    70.4 KB · Views: 832
  • _DSC0025.JPG
    _DSC0025.JPG
    108 KB · Views: 874
  • _DSC0026.JPG
    _DSC0026.JPG
    75.5 KB · Views: 870
  • _DSC0027.JPG
    _DSC0027.JPG
    110.1 KB · Views: 854
  • _DSC0028.JPG
    _DSC0028.JPG
    63.5 KB · Views: 863
Top