GSNadmin
Staff member
Some cheap DYI tips for the workshop and field
Words And Photos By Steve Mills
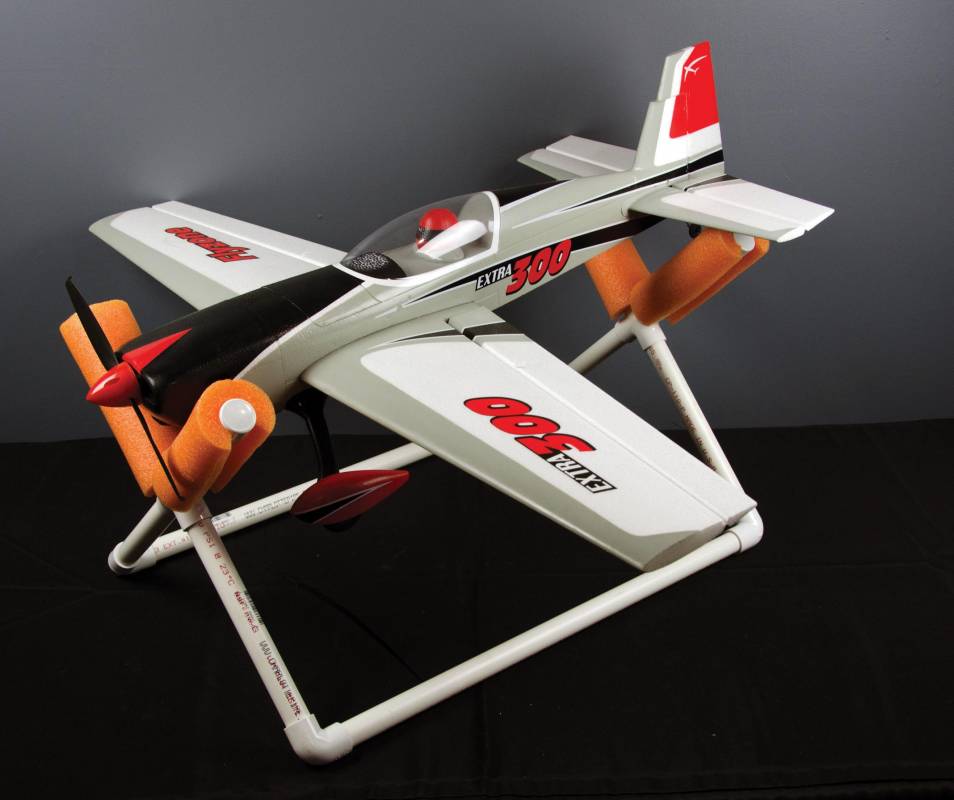
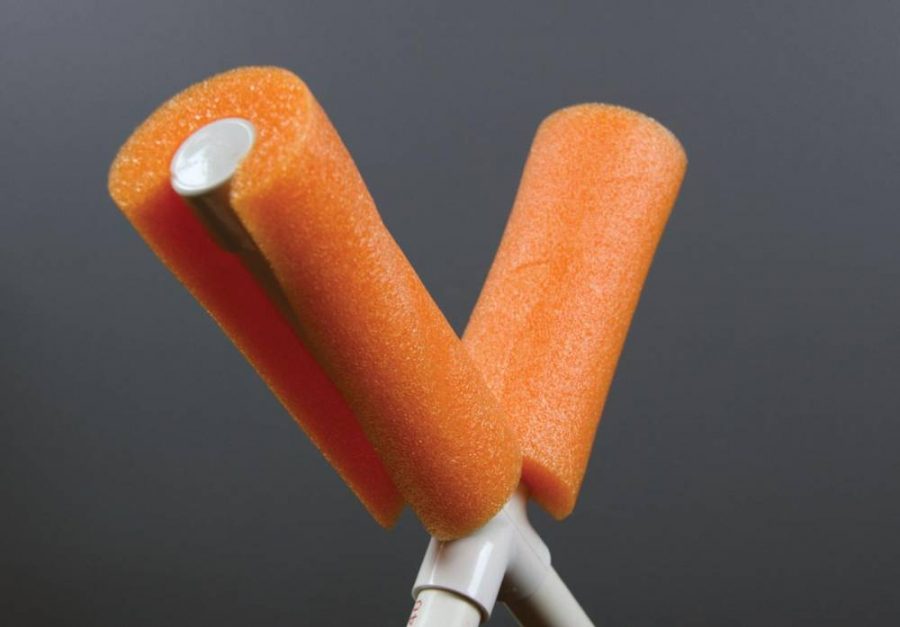
This stand can easily hold your smaller parkflyer airplanes.
As our shops and hangars fill up with projects and completed air- frames we often find ourselves tripping over our planes. You might even find yourself doing more repairs from hangar rash rather than dumb thumbs. Or perhaps you’re trying to figure out the best way to safely transport your airplane to the field without it rolling around and tipping over onto something. Well, there is a cheap and versatile material that can help you solve many of your workshop and field issues. PVC or Polyvinyl Chloride is generally used for plumbing, but let’s look at some easy ways to use it for our RC models.

MATERIALS NEEDED
1 – 10-ft. PVC pipe
4 – 90 degree elbows
2 – 4-way cross pieces
4 – End cap pieces
1 – Pool noodle
PVC can be found at most home centers in various lengths and diameters. For our pur- poses we used mostly 3?4-inch pipe that can be purchased in 10 foot lengths for around $3.00 in the U.S. PVC pipe is fairly rigid which is good for support, but you can also find many kinds of connectors in various angles and dividers to help form various shapes from the PVC pipe. Combine this with some foam wrapping from some pool noodles and you can both support and protect your models in the shop, car and at the field. The PVC pipe can be glued together, secured with screws or just tight fit with friction depending on the need for strength of the connection. You need very few tools to work with PVC. The bare minimum would be a hand saw or PVC pipe cutter, a marker and tape measure. So for about $10 in materials and a few tools you likely already have we, can get started building a few PVC items for your RC shop.
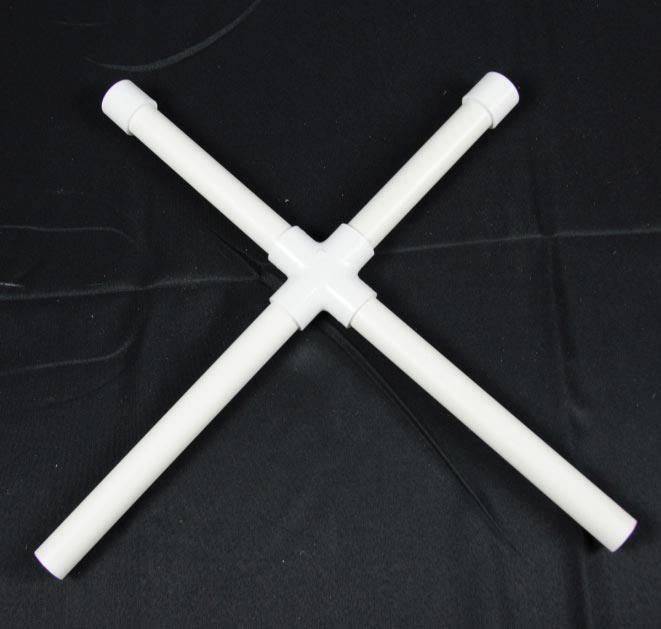
Assembled cross pieces.
One of the easiest tools to make is the PVC wall rack for securing your airplanes to the wall. This just requires a few T connectors and various lengths of straight PVC. You should glue all these connections together so the rack is not able to work loose and make your planes fall. Be sure to secure it into the wall on the studs or another firm backing so it does not just pull out of drywall. The great thing here is you can vary the height of the spaces for different size planes and wings. For about $10.00 you can make two or three racks to hold many airplanes. For extra security you can put foam on the PVC arms or even 90 degree connectors with a short upright to act as a hook to keep the plane or wing from sliding out.
The most useful tool from PVC would be an airplane stand. Many people have built PVC stands and there are many designs out there. So feel free to be creative and customize the stand to your needs. We’ll walk through the steps of building a basic stand and then let you run with it from there.
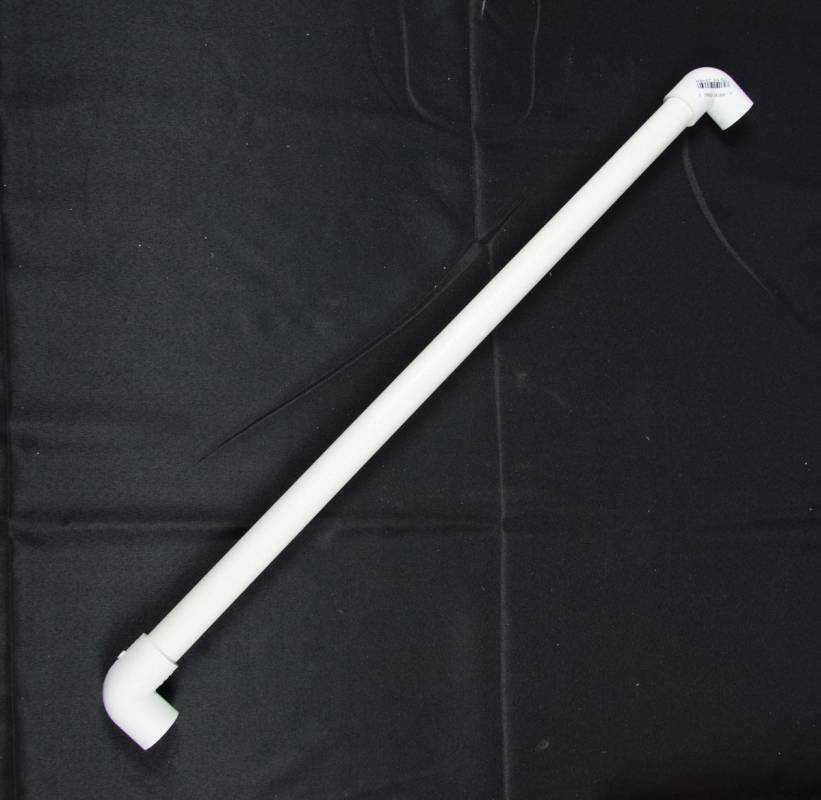
Put the 90 degree elbows on the ends of the two 20” pieces.
Start by measuring the aircraft you want to hold in the stand. This will determine the length of the long pieces of PVC. We found that using around 20-inch lengths that you could get all the pipe from a single 10-foot piece of PVC and it would hold most planes from parkflyers up to .60 sized airplanes. With the lengthwise pieces cut it’s time to focus on the height. We wanted to make sure that we could flip the plane upside down and not hit the tail on the table or ground so we went with 12-inch bars for the legs. For the upper cradle pieces we cut them to seven inches to use up the rest of the 10-inch PVC pipe.
Start by assembling the two cross pieces. Take your four-way cross piece and insert the two twelve-inch pieces on bottom and the seven-inch pieces on top with the end caps on as well.
Set these pieces aside and take the two 20-inch pieces and put the 90 degree elbows on the ends. Using a flat surface make sure both elbows are aligned and not twisted.
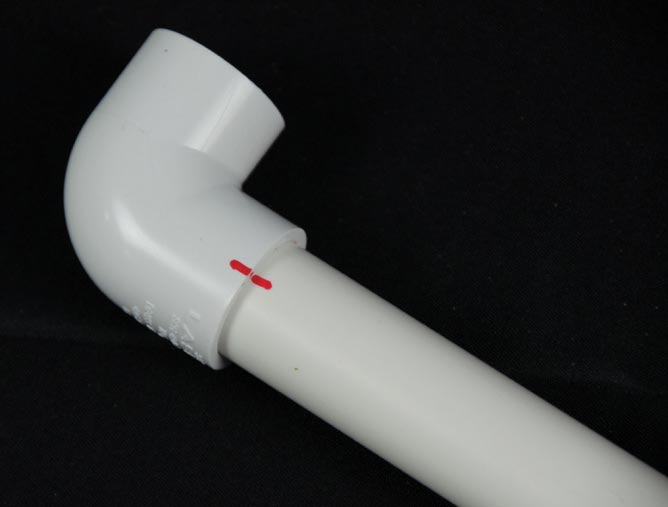
Use a marker to guide lines to help align the connections when gluing.
Attach the two bottom runners to the 12-inch ends of the cross pieces. Set the entire stand on a flat surface and make sure everything is lined up and not twisted. When you’re happy with the alignment you can choose to leave it with just a friction fit or glue it permanently. If you want to glue it permanently use a marker to make guides to help realign the connections because the glue sets up fast.
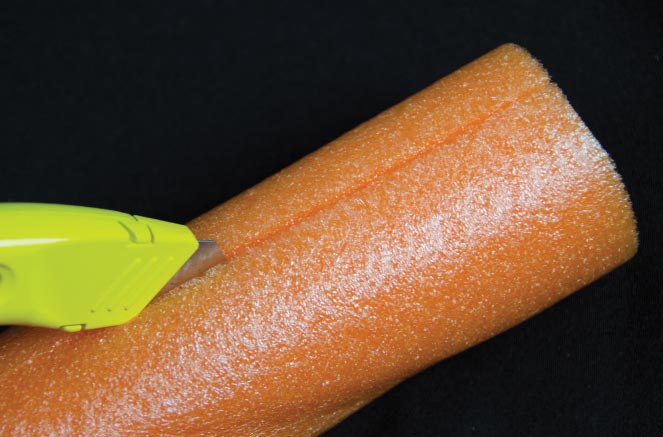
To add protection to your models it’s best to cover the PVC pipe with something to give it some grip and prevent scratching. For 1?2-inch PVC, pool noodles work really well. Just cut the noodle to the length you need and then cut a slit down the length of it. Then slide it on the PVC cradle.
Now you have a simple stand for use at home or at the field! The best part is that with all the different types of PVC connec- tors you can really use it to customize the stand to your liking. You can also create dif- ferent racks for holding wings, accessories or even make a small fuse stand to help hold it secure in your vehicle or trailer. My friend Phil makes one for each of his giant scale warbirds. Using the wing bolts as anchor points for the PVC stand he attaches the PVC cradle to the plane and then can bolt the cradle to the trailer shelf to keep his planes secured on the way to and from the field. Another popular PVC tool is a wall mounted airplane rack. Just get a bunch of three-way T connectors and another length of PVC pipe and you can get all your park- flyers off the kitchen table and onto the shop wall. Get creative and play around with this cheap material and see how it can help keep your models safe!
The post Get Organized with PVC appeared first on Fly RC Magazine.
Continue reading...
Words And Photos By Steve Mills
This stand can easily hold your smaller parkflyer airplanes.
As our shops and hangars fill up with projects and completed air- frames we often find ourselves tripping over our planes. You might even find yourself doing more repairs from hangar rash rather than dumb thumbs. Or perhaps you’re trying to figure out the best way to safely transport your airplane to the field without it rolling around and tipping over onto something. Well, there is a cheap and versatile material that can help you solve many of your workshop and field issues. PVC or Polyvinyl Chloride is generally used for plumbing, but let’s look at some easy ways to use it for our RC models.
MATERIALS NEEDED
1 – 10-ft. PVC pipe
4 – 90 degree elbows
2 – 4-way cross pieces
4 – End cap pieces
1 – Pool noodle
PVC can be found at most home centers in various lengths and diameters. For our pur- poses we used mostly 3?4-inch pipe that can be purchased in 10 foot lengths for around $3.00 in the U.S. PVC pipe is fairly rigid which is good for support, but you can also find many kinds of connectors in various angles and dividers to help form various shapes from the PVC pipe. Combine this with some foam wrapping from some pool noodles and you can both support and protect your models in the shop, car and at the field. The PVC pipe can be glued together, secured with screws or just tight fit with friction depending on the need for strength of the connection. You need very few tools to work with PVC. The bare minimum would be a hand saw or PVC pipe cutter, a marker and tape measure. So for about $10 in materials and a few tools you likely already have we, can get started building a few PVC items for your RC shop.
Assembled cross pieces.
One of the easiest tools to make is the PVC wall rack for securing your airplanes to the wall. This just requires a few T connectors and various lengths of straight PVC. You should glue all these connections together so the rack is not able to work loose and make your planes fall. Be sure to secure it into the wall on the studs or another firm backing so it does not just pull out of drywall. The great thing here is you can vary the height of the spaces for different size planes and wings. For about $10.00 you can make two or three racks to hold many airplanes. For extra security you can put foam on the PVC arms or even 90 degree connectors with a short upright to act as a hook to keep the plane or wing from sliding out.
The most useful tool from PVC would be an airplane stand. Many people have built PVC stands and there are many designs out there. So feel free to be creative and customize the stand to your needs. We’ll walk through the steps of building a basic stand and then let you run with it from there.
Put the 90 degree elbows on the ends of the two 20” pieces.
Start by measuring the aircraft you want to hold in the stand. This will determine the length of the long pieces of PVC. We found that using around 20-inch lengths that you could get all the pipe from a single 10-foot piece of PVC and it would hold most planes from parkflyers up to .60 sized airplanes. With the lengthwise pieces cut it’s time to focus on the height. We wanted to make sure that we could flip the plane upside down and not hit the tail on the table or ground so we went with 12-inch bars for the legs. For the upper cradle pieces we cut them to seven inches to use up the rest of the 10-inch PVC pipe.
Start by assembling the two cross pieces. Take your four-way cross piece and insert the two twelve-inch pieces on bottom and the seven-inch pieces on top with the end caps on as well.
Set these pieces aside and take the two 20-inch pieces and put the 90 degree elbows on the ends. Using a flat surface make sure both elbows are aligned and not twisted.
Use a marker to guide lines to help align the connections when gluing.
Attach the two bottom runners to the 12-inch ends of the cross pieces. Set the entire stand on a flat surface and make sure everything is lined up and not twisted. When you’re happy with the alignment you can choose to leave it with just a friction fit or glue it permanently. If you want to glue it permanently use a marker to make guides to help realign the connections because the glue sets up fast.
To add protection to your models it’s best to cover the PVC pipe with something to give it some grip and prevent scratching. For 1?2-inch PVC, pool noodles work really well. Just cut the noodle to the length you need and then cut a slit down the length of it. Then slide it on the PVC cradle.
Now you have a simple stand for use at home or at the field! The best part is that with all the different types of PVC connec- tors you can really use it to customize the stand to your liking. You can also create dif- ferent racks for holding wings, accessories or even make a small fuse stand to help hold it secure in your vehicle or trailer. My friend Phil makes one for each of his giant scale warbirds. Using the wing bolts as anchor points for the PVC stand he attaches the PVC cradle to the plane and then can bolt the cradle to the trailer shelf to keep his planes secured on the way to and from the field. Another popular PVC tool is a wall mounted airplane rack. Just get a bunch of three-way T connectors and another length of PVC pipe and you can get all your park- flyers off the kitchen table and onto the shop wall. Get creative and play around with this cheap material and see how it can help keep your models safe!
The post Get Organized with PVC appeared first on Fly RC Magazine.
Continue reading...