GSNadmin
Staff member
There is no doubt that many aerobatic enthusiasts are interested in performing extreme moves. It is important however, to build your aerobatic sequences on a solid foundation. Years ago, when I first became interested in aerobatics, 3D flying did not exist. Instead, we concentrated on precision aerobatics and honed our skills while competing at various Pattern (nsrca.org) and International Miniature Aerobatic Club or IMAC (mini-iac.com) competitions. By studying how the other guys flew and flying different routines, we improved our skills, and learn how to properly position our aircraft at all times throughout a maneuver or sequence.
The reason I am explaining this is simple. Too many times, I see pilots trying different and extreme maneuvers and oftentimes the airplane is in control, but not the pilot. To become really successful we must stay in control and this requires lots of practice.
Maneuver breakdown
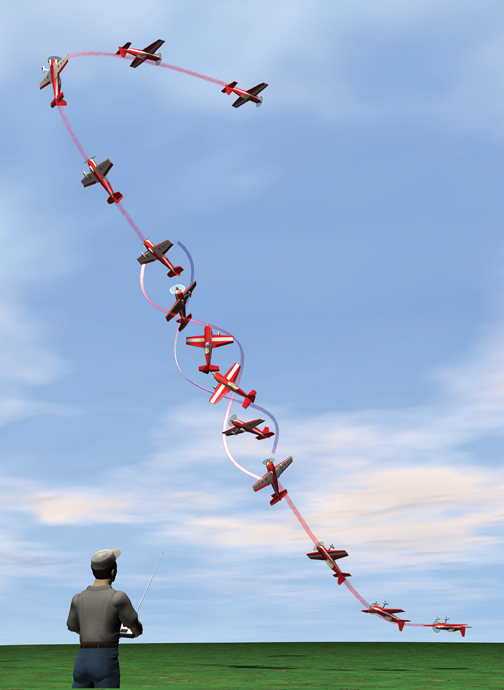
With placement and precision in mind, let’s talk about the second maneuver of the 2012 IMAC Advanced Routine. For this maneuver, the pilot enters from inverted flight and pushes to establish a 45-degree climb then he performs 1½ negative snaps. After the snap, another line segment (equal to the first line) is then executed. Once the maneuver is complete, the pilot must pull 135-degrees to exit in inverted straight and level flight.
This is a good maneuver to help teach you how to perform cleanly while being aware of any corrections being needed for maximum points. As with most maneuvers, with lots of practice, you learn to correct subconsciously which is the goal for anyone wanting to be a serious aerobatic and or 3D pilot.
First things first
Let’s take a look at your aircraft. For this maneuver, we will take the setup of my Extreme Flight 48-inch MXS airframe, which has unlimited vertical power. Each airplane has a different power-to-weight ratio so remember to take the throttle percentages I mention as a baseline and adjust to your specific aircraft. I also use a Flight Mode which simply means that all of my rates can be found on one switch. I use my low-rate setting for precision maneuvers that don’t involve snaps or spins. In this case, I utilize low-rates for the push to a 45-degree climb as well as the pull to the inverted exit after the 1½ negative snap roll have been performed. For the snap roll I use mid-rate setting since my transmitter has three rates. If your transmitter has two rates, I would make this my second rate provided that you use the recommended settings given below.
As a starting point for the low-rate setting, I recommend 15 degrees of aileron deflection with 20% exponential, 12 degrees of elevator deflection with 25% exponential, and 35 degrees of rudder deflection with 50% exponential. For the snap rate settings, I recommend 30 degrees of aileron deflection with 45% exponential, 25 degrees of elevator deflection with 45% exponential and 30 degrees of rudder deflection with 45% exponential.
Sometimes people don’t want to switch rates in a given flight. No worries! What works for one person does not always work for everyone else. If you prefer to only use one rate for all precision flying, you may have to use control surface deflections that are similar to my “Snap Rate,” but add more exponential so that your airplane performs more smoothly. All pilots have a different preference on how they want their airplane to perform. Having an airplane that is too “twitchy” will only make a maneuver more difficult to perform consistently so you’ll have to adjust either your control deflections or your expo settings.
To check rates, make test flights and flip to your “low rate” setting. Move the aileron stick to its maximum. If the roll rate is too slow for your liking, increase the dual rate. If however, you feel that the airplane responds to quickly around neutral but the endpoint (dual rate value) feels good, increase the exponential setting. Perform this flight test for all control surfaces and for various rates.
Enter Inverted straight and level
1 Apply about 80% power and push to an inverted 45-degree upline.
2 After a straight line segment of about 75 feet, switch rates and perform 1 1/2 negative snap roll.
3 After the snap, switch rates to low, reduce throttle and maintain straight, upright line segment (75 feet).
4Pull up-elevator to perform 135 degree radius and establish inverted flight.
Exit Inverted straight and level
Maneuver overview
Climb to a safe altitude, roll to inverted, line up for the maneuver flying parallel to the runway and apply about 80% throttle. Push gently and establish a 45-degree inverted climb. After the radius and the climb is established, note the flight distance before the 1½ negative snap is started. You will have to fly a similarly long inverted flight segment after the snap roll. I usually count to myself and for this maneuver, a two-second segment seems about right. Flip to your Snap Mode and, all at the same time, apply down-elevator and opposite rudder and aileron. After the snap segment is complete, neutralize your inputs to establish a 45-degree upright climb. If you fly at a constant speed, then count to yourself again for two seconds. Now, pull 135 degrees to exit the top of the maneuver straight, level and inverted.
By the numbers
STEP 1: Enter the maneuver inverted and parallel to the runway. When ready, make sure that you apply at least 80% throttle and push down-elevator, ever so slightly, to perform a smooth radius and establish the 45-degree inverted climb.
STEP 2: After a line segment of about two seconds (about 75 feet in length,) flip to “mid-rate” and perform a 1½ negative snap roll. The key to performing the snap roll properly is timing and setup. If your airplane becomes too “deep” in pitch and is difficult to stop constantly on a 45-degree climb, you may need to dial the elevator rates down a touch. Also, for this segment of the maneuver, you may need to either increase or decrease the throttle to maintain constant flight speed.
STEP 3: After the snap roll, flip back to the “low-rate” setting, and perform a line segment that is equal in length to the first. Balance the throttle, as needed, so that the airplane maintains a constant flight speed and apply rudder input, if needed, to keep a constant heading. In a crosswind, you may notice the nose of the aircraft drifting into the wind. You will have to use just enough rudder to correct.
STEP 4: Exit at the top by pulling 135 degrees to establish inverted level flight. It will be necessary to hold a touch of down elevator to keep the altitude constant. You model’s CG location with affect how much down elevator is needed. Nose-heavy airplanes require more elevator input.
Like I mentioned earlier, it is important to take small steps to accomplish your goals and perfect a new maneuver.
BY JOHN GLEZELLIS; ILLUSTRATION BY FX MODELS
Model Airplane News - The #1 resource for RC plane and helicopter enthusiasts featuring news, videos, product releases and tech tips.
Continue reading...
The reason I am explaining this is simple. Too many times, I see pilots trying different and extreme maneuvers and oftentimes the airplane is in control, but not the pilot. To become really successful we must stay in control and this requires lots of practice.
Maneuver breakdown
With placement and precision in mind, let’s talk about the second maneuver of the 2012 IMAC Advanced Routine. For this maneuver, the pilot enters from inverted flight and pushes to establish a 45-degree climb then he performs 1½ negative snaps. After the snap, another line segment (equal to the first line) is then executed. Once the maneuver is complete, the pilot must pull 135-degrees to exit in inverted straight and level flight.
This is a good maneuver to help teach you how to perform cleanly while being aware of any corrections being needed for maximum points. As with most maneuvers, with lots of practice, you learn to correct subconsciously which is the goal for anyone wanting to be a serious aerobatic and or 3D pilot.
First things first
Let’s take a look at your aircraft. For this maneuver, we will take the setup of my Extreme Flight 48-inch MXS airframe, which has unlimited vertical power. Each airplane has a different power-to-weight ratio so remember to take the throttle percentages I mention as a baseline and adjust to your specific aircraft. I also use a Flight Mode which simply means that all of my rates can be found on one switch. I use my low-rate setting for precision maneuvers that don’t involve snaps or spins. In this case, I utilize low-rates for the push to a 45-degree climb as well as the pull to the inverted exit after the 1½ negative snap roll have been performed. For the snap roll I use mid-rate setting since my transmitter has three rates. If your transmitter has two rates, I would make this my second rate provided that you use the recommended settings given below.
As a starting point for the low-rate setting, I recommend 15 degrees of aileron deflection with 20% exponential, 12 degrees of elevator deflection with 25% exponential, and 35 degrees of rudder deflection with 50% exponential. For the snap rate settings, I recommend 30 degrees of aileron deflection with 45% exponential, 25 degrees of elevator deflection with 45% exponential and 30 degrees of rudder deflection with 45% exponential.
Sometimes people don’t want to switch rates in a given flight. No worries! What works for one person does not always work for everyone else. If you prefer to only use one rate for all precision flying, you may have to use control surface deflections that are similar to my “Snap Rate,” but add more exponential so that your airplane performs more smoothly. All pilots have a different preference on how they want their airplane to perform. Having an airplane that is too “twitchy” will only make a maneuver more difficult to perform consistently so you’ll have to adjust either your control deflections or your expo settings.
To check rates, make test flights and flip to your “low rate” setting. Move the aileron stick to its maximum. If the roll rate is too slow for your liking, increase the dual rate. If however, you feel that the airplane responds to quickly around neutral but the endpoint (dual rate value) feels good, increase the exponential setting. Perform this flight test for all control surfaces and for various rates.
Enter Inverted straight and level
1 Apply about 80% power and push to an inverted 45-degree upline.
2 After a straight line segment of about 75 feet, switch rates and perform 1 1/2 negative snap roll.
3 After the snap, switch rates to low, reduce throttle and maintain straight, upright line segment (75 feet).
4Pull up-elevator to perform 135 degree radius and establish inverted flight.
Exit Inverted straight and level
Maneuver overview
Climb to a safe altitude, roll to inverted, line up for the maneuver flying parallel to the runway and apply about 80% throttle. Push gently and establish a 45-degree inverted climb. After the radius and the climb is established, note the flight distance before the 1½ negative snap is started. You will have to fly a similarly long inverted flight segment after the snap roll. I usually count to myself and for this maneuver, a two-second segment seems about right. Flip to your Snap Mode and, all at the same time, apply down-elevator and opposite rudder and aileron. After the snap segment is complete, neutralize your inputs to establish a 45-degree upright climb. If you fly at a constant speed, then count to yourself again for two seconds. Now, pull 135 degrees to exit the top of the maneuver straight, level and inverted.
By the numbers
STEP 1: Enter the maneuver inverted and parallel to the runway. When ready, make sure that you apply at least 80% throttle and push down-elevator, ever so slightly, to perform a smooth radius and establish the 45-degree inverted climb.
STEP 2: After a line segment of about two seconds (about 75 feet in length,) flip to “mid-rate” and perform a 1½ negative snap roll. The key to performing the snap roll properly is timing and setup. If your airplane becomes too “deep” in pitch and is difficult to stop constantly on a 45-degree climb, you may need to dial the elevator rates down a touch. Also, for this segment of the maneuver, you may need to either increase or decrease the throttle to maintain constant flight speed.
STEP 3: After the snap roll, flip back to the “low-rate” setting, and perform a line segment that is equal in length to the first. Balance the throttle, as needed, so that the airplane maintains a constant flight speed and apply rudder input, if needed, to keep a constant heading. In a crosswind, you may notice the nose of the aircraft drifting into the wind. You will have to use just enough rudder to correct.
STEP 4: Exit at the top by pulling 135 degrees to establish inverted level flight. It will be necessary to hold a touch of down elevator to keep the altitude constant. You model’s CG location with affect how much down elevator is needed. Nose-heavy airplanes require more elevator input.
Like I mentioned earlier, it is important to take small steps to accomplish your goals and perfect a new maneuver.
BY JOHN GLEZELLIS; ILLUSTRATION BY FX MODELS
Model Airplane News - The #1 resource for RC plane and helicopter enthusiasts featuring news, videos, product releases and tech tips.
Continue reading...