• If you are new to GiantScaleNews.com, please register, introduce yourself, and make yourself at home.

    We're 1st in Giant Scale RC because we've got the best membership on the internet! Take a look around and don't forget to register to get all of the benefits of GSN membership!

    Welcome!

IMAC First Carden 124" Extra 300 Pro Build

Hi Cam (@orthobird)

Thanks for the information - the more advice the better! I should clarify my plan as I don't intend to actually complete wings/stabs before I build the fuselage:

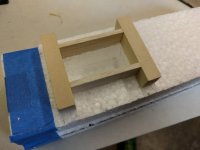
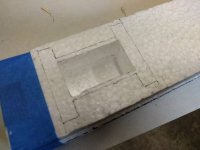
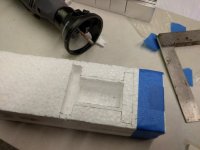
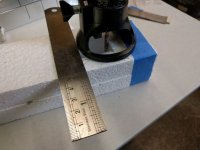
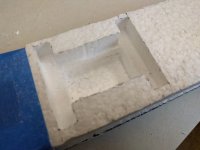
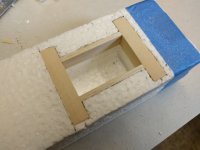
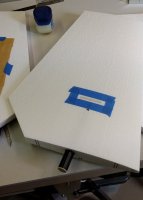
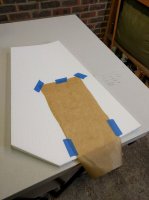
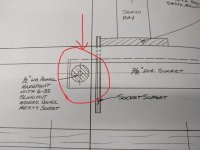
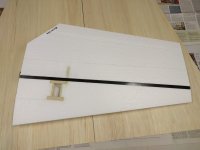
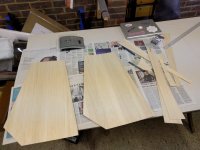
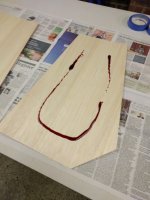
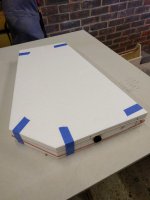
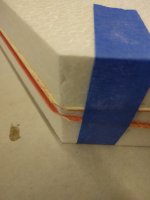
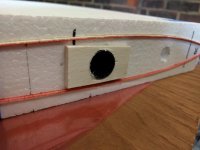
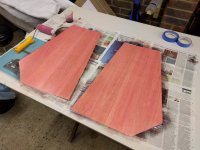
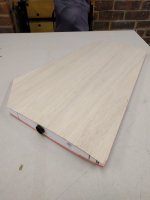
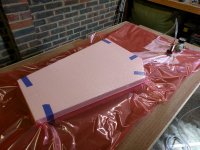
My plan is to prepare (servo boxes, carbon tow, socket supports etc.) and dry fit but NOT glue in the carbon sockets. I will then skin the cores, fit the LE and TE then put the assembly aside. Important to note that I will not cut the control surfaces or fit root caps at this point.

When I have reached this point on both wings/stabs I will have to start the fuselage in order to set incidence, check flush fit and adjust (this is why I won't glue in the socket) etc. before completing wing/stab construction by cutting surfaces, root caps etc.

What do you or anyone else think of this approach - it feels like it should work to me, but I don't want to run myself into a corner so please shout if I am missing it?
 
I've been practicing my technique on some scrap foam, ready for making the servo cutouts in the stabs. In the end I opted for a design that uses 1/8" balsa spacers between the rails to ensure the two rails remain parallel during the fitting. The distance between inner faces of rail is 44m which I found is the minimum distance you can have and still be able to rotate the servo into place. Template and 12 gauge copper wire was made to cut the servo box to the correct depth. The cross-section picture shows me that my depth is just right - these stabs are thin so don't want to take out too much. Cutting of rails/fitting of box in next post.
 

Attachments

  • IMG_20160607_132045.jpg
    IMG_20160607_132045.jpg
    57.8 KB · Views: 620
  • IMG_20160607_131949.jpg
    IMG_20160607_131949.jpg
    61.9 KB · Views: 641
  • IMG_20160607_135935.jpg
    IMG_20160607_135935.jpg
    63.9 KB · Views: 594
  • IMG_20160607_140013.jpg
    IMG_20160607_140013.jpg
    55.9 KB · Views: 600
  • IMG_20160607_135848.jpg
    IMG_20160607_135848.jpg
    62.7 KB · Views: 575
Once the main servo cutout is hot-wired, I have to rout the rails so the servo box can fit flush to the core. The attached photos show my process using a Dremel router attachment + Permagrit fine bit to mark and cut the necessary openings. Overall, am very pleased with the result as the fit is almost perfect! Bit more prep to do and I'll do this to the actual cores.
 

Attachments

  • IMG_20160607_152505.jpg
    IMG_20160607_152505.jpg
    53.4 KB · Views: 586
  • IMG_20160607_152613.jpg
    IMG_20160607_152613.jpg
    51.6 KB · Views: 579
  • IMG_20160607_153248.jpg
    IMG_20160607_153248.jpg
    63.2 KB · Views: 567
  • IMG_20160607_153319.jpg
    IMG_20160607_153319.jpg
    66.2 KB · Views: 601
  • IMG_20160607_153929.jpg
    IMG_20160607_153929.jpg
    53.2 KB · Views: 588
  • IMG_20160607_153850.jpg
    IMG_20160607_153850.jpg
    60.3 KB · Views: 559
I thought that I would do a few tests of gluing sockets and wood rails into foam. I am happy with results of the wood rail, but not very unhappy with the socket - masking tape is welded to the carbon. Certainly not ready to take this step on yet!

I need to find a way to protect both the shuck and the carbon socket from excess PU glue. During the test I deliberately did not wipe away excess foaming and this may be part of the technique, but can anyone share their "best" ways to do this cleanly please?

I did think about applying some Vaseline to the socket to prevent adhesion and use wax paper to protect the shuck. My concern is that glue will get under the wax paper as it won't be possible to seal the edge against the socket cavity.

5b27ea957e16321b6ec265187a0c4ce0.jpg

ad380e4097ae8e4953c98741a13d0237.jpg

4320fa5c2ff2d2af4e26810229740fe6.jpg

68e7925ac21b35770028bc755805cc5e.jpg

e609848162954c97eacd1c9aaf39cb3f.jpg
 
Last edited:
Use wax paper between your wing or stab and the shuck on both top and bottom.

this will be the most critical area to make sure the glue does not go, and the wax paper has to go all the way the length of the phenolic, as it can stick to the shuck, if you do not protect it.

on the root side, you must stand by, for 1st 30 minutes, wiping off excess foam, with a clean cloth or paper towel soaked in alcohol. Doing the trick with the tape, as you demonstrate, will help. But you will have to stay there, also, to make sure the tube does not get pushed out.

Additionally, you may want to do both at same time, and the connect them with the wing tube, on your flat table, so that you assure the tubes are glued in square, all the mean while applying 10 to 20 pound weight on top of each wing.

If any hard glue foam is still there on the root side, when you are done, no biggie. You can then use a Dremel to remove the excess there. This will not be a problem for you!
 
Thank you @orthobird! By the time I read your post and being around 8 hours ahead of you on planet Earth I had already plucked up the courage to take this step on. Luckily the approach I came up with was very similar to what you suggested. I also sprayed water mist onto the socket cutouts and wet the HS SS before gluing to ensure the Gorilla glue activated correctly.

Although from the photos it may look like I did both together, I did not, I just placed them together once the second panel had stopped foaming from the joint. The panels are a credit to Dennis - they went together absolutely flat despite being glued independently. Dennis did assure me this would be the case and that I should do them separately, but I have to admit I was scared to. I wouldn't have space on my bench to do both wings at the same time so I thought I'd test the accuracy on the stab! I am happy with this!

The bad news in today's work is that the socket for the first stab did push out by about 1.5-2mm relative the the other stab which is perfectly seated. I think this is because it was a slightly looser fit in the horizontal stab support but also I was so focused on glue cleaning I forgot to keep pushing it back in until it was too late. I don't think this will be of any significance structurally, but hope it won't cause too much of a problem when I come to install the hard points/stab retaining screw as things won't be truly symmetrical as there must be less depth inside the socket of the first stab.

@ROLLERMAN, I've been reading your excellent build log and I see you used the stab root template originally devised by Dw Dixon. Did you also install the stab retaining screw/hard point shown in the attached photo of that part of the plan, or did you omit that due to using the root template? Most ARTFs only use root cap screws, so I was wondering if the hard point approach is really needed?
 

Attachments

  • IMG_20160613_105914.jpg
    IMG_20160613_105914.jpg
    73.5 KB · Views: 592
  • IMG_20160613_121736.jpg
    IMG_20160613_121736.jpg
    78.8 KB · Views: 579
  • IMG_20160613_122443.jpg
    IMG_20160613_122443.jpg
    91.4 KB · Views: 610
  • IMG_20160613_111256.jpg
    IMG_20160613_111256.jpg
    64.2 KB · Views: 564
  • IMG_20160613_114320.jpg
    IMG_20160613_114320.jpg
    127.6 KB · Views: 593
  • IMG_20160613_125617.jpg
    IMG_20160613_125617.jpg
    186 KB · Views: 584
  • IMG_20160613_131504.jpg
    IMG_20160613_131504.jpg
    154 KB · Views: 616
Last edited:
Both the cores have been prepared for the horizontal stabs. Got the first stab in the vacuum bag and very pleased with the results. For some reason once the stab is skinned you suddenly realise how big this airframe actually is...

Massive thanks for @Terryscustom for his excellent video which helped my first "vac" go smoothly, and to @orthobird for the advice he's been providing me over e-mail.
 

Attachments

  • 01_core.jpg
    01_core.jpg
    128.3 KB · Views: 568
  • 02_skins.jpg
    02_skins.jpg
    173.8 KB · Views: 560
  • 03_glue.jpg
    03_glue.jpg
    93.9 KB · Views: 545
  • 04_apply1.jpg
    04_apply1.jpg
    82.5 KB · Views: 498
  • 06_package.jpg
    06_package.jpg
    81.9 KB · Views: 551
  • 07_corners.jpg
    07_corners.jpg
    54.5 KB · Views: 537
  • 08_protector.jpg
    08_protector.jpg
    109.1 KB · Views: 529
  • 05_apply2.jpg
    05_apply2.jpg
    222.1 KB · Views: 501
  • 10_finished.jpg
    10_finished.jpg
    63.4 KB · Views: 517
  • 09_bag.jpg
    09_bag.jpg
    223.4 KB · Views: 549
Both horizontal stabs safely out the bag and pleased with result. Only not to self for future might be to rout a very shallow groove for the unidirectional carbon as you can feel a slight ridge through the skin as you run fingers over it. Not visible and won't affect flight performance, but any tricks on how to cut a long, shallow groove like this in foam would be good to hear.

Going to make a start on the wing cores now taking the knowledge I've learned from the stabs with me. All I've done so far is unpacked and labelled them - plenty of markings such as "servo cut out OTHER side" to ensure I don't do anything silly!

IMG_20160705_172326.jpg IMG_20160705_173214.jpg
 
Top