• If you are new to GiantScaleNews.com, please register, introduce yourself, and make yourself at home.

    We're 1st in Giant Scale RC because we've got the best membership on the internet! Take a look around and don't forget to register to get all of the benefits of GSN membership!

    Welcome!

Bavarian Demon Cortex

willig10

New to GSN!
All:
Been studying the quick start guide and now I am a little confused.

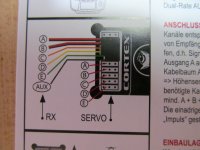
1. Looking at the picture of the gyro in the quick start guide, where you hook up the wires from the servo to the cortex they are lettered ABCDE and aux. then from the gyro the servo wires get connected to the other side as ABCDE.

2. the bind plug gets hooked up to position "A".

3 Position A through position D are a three pin connection. Position E is a two pin connection.

4. If the gyro is supposed to match the servo connections ABCDE why is there receiver lead going into position A?

5. Position E is a two pin slot while the rest are three pin slots.

6 After the learning process the bind plug gets removed, what goes in it's place?

Thanks for your help

Glenn
 

AKfreak

150cc
Nothing goes in the bind plug after you teach the unit. However the USB goes there when you are programming. As far as t ABCDE AUX you can put any channel you want in any one of the slots, as long as they match on the Gyro and the Receiver. A&B are three wire plugs (I think) the rest are just signal and ground then a single AUX. Again it doesn't matter what channel is used where, they just need to match on the servo wine in to the gyro and it's corresponding letter to the rx.

Example A (wire lead) on the Cortex could go to the Aileron CH of the RX, but you would need to put the Aileron Servo lead in the empty slot A of the Gyro. Then B could be the Elevator, C the Rudder, ect.. As long each letter matches the same channel it doesn't mater which order you populate the channels. It's so easy that it seems difficult, its like there has to be more to it, but there isn't.

Follow the quick guide and it shows everything, and its color coded. The artwork shows the direction of the signal wire, it faces toward the Demon Logo, which also faces forward in the place by default .

The only time you use the bind plug, is when you teach the gyro (learn mode). It teaches the gyro what control surface is what, as well as the direction. It learns from a series of stick movements when you power it up with the bind plug in place. Here let me tell you what to do.

Power it up with the bind plug in, and you will get Two little bumps on the control surfaces. That means you are in learn mode. You give right Aileron and hold it, and you will get one Bump, let go(center the stick). Then you go left Aileron and Hold it, and you get Two bumps (release). Next is Forward on the Elevator stick (hold it), followed by a bump (release), then press down on the Elevator (hold it), then Two Bumps happen (release). Then you give Right Rudder (hold it), which is followed by a single bump (release), then Left Rudder (hold it) and you will get Three bumps (release). That's is the end of learn mode, the green LED will flash rapidly, pull the bind plug, and re-power the the plane. It takes 30 seconds total.

Remember to remove the bind plug before you re-power the plane, or you will be in learn mode again. Also make sure you don't have a dual rate on when you are in learn/teaching mode. Just make sure all of your control surfaces are at least 100% travel.

Then you are all done. Well, except for setting the end points on the AUX channel. This is the gain for Bank 1 (Normal Mode) and Bank 2 (Hold Mode). This thing really is simple to set up. It just looks difficult.
 
Last edited by a moderator:

willig10

New to GSN!
Akfreak:
Thanks now one more question. During the learn mode the airplane has to be level correct? I also saw where the airplane has to be still for a few seconds. I am assuming that is right after the bind plug is pulled and the airplane is still level. After the learning mode is complete. and the airplane is sitting on it's tail wheel at the field does it need to be level again during power up or is it ok to be "tail low"?

Thanks. Sorry to keep asking all these questions, I do not have mind eyet and want to be as educated as I can prior to installation. I will be using the gyro on a giant scale P-47 (60cc) and an SBACH (Redwing 30cc).

Really appreciate your help

Glenn
 

AKfreak

150cc
Airplane sitting on tail wheel is fine for programming. The plane just needs to sit for 6 secs after you initialize the system before flight. Do not concern yourself with a low tail wheel.

The only thing you are teaching the gyro is direction of control surface, max throw of the control surface, and which control surface is what connected to the gyro.
 

YellowJacketsRC

70cc twin V2
The gyro is not designed to make the plane fly straight and level. It is designed to make it fly straight, not matter what attitude it is in. It does not care what level is. All you are doing is teaching it the throws of your plane.
 

willig10

New to GSN!
All:
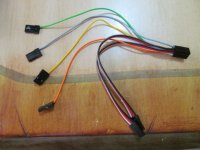
Ok some quick questions. I am enclosing pictures of the wiring loom. On the loom there are 2 each red white and black connectors, one each of orange, yellow, grey and green.

Where do all of these get connected to in the receiver?

Looking at the quick start guide, I see A,B,C,D,E then AUX. Where do these go? Especially the AUX one.

Thanks
Glenn 017 (Medium).JPGWiring Loom.JPG017 (Medium).JPGWiring Loom.JPG
 

willig10

New to GSN!
Ok let me rephrase. A,B,C,D,E, correspond to the servos that were removed from the receiver and now plug into the gyro. I do not know where the AUX grey wire needs to go.

Thanks

Glenn
 
Top