• If you are new to GiantScaleNews.com, please register, introduce yourself, and make yourself at home.

    We're 1st in Giant Scale RC because we've got the best membership on the internet! Take a look around and don't forget to register to get all of the benefits of GSN membership!

    Welcome!

IMAC JTEC Radiowave 3.1m MX2 Build

Kevin-Young

70cc twin V2
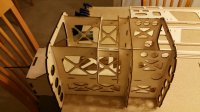
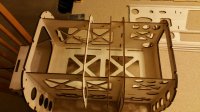
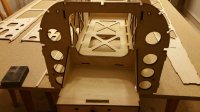
I thought I would start a build thread on the new JTEC Radiowave 3.1m MX2 that I am building for myself. This build is of the first production version of the MX2 so part of the reason for building it is to make sure that everything goes together as well as all of our other aircraft.

As many of you know the 3.1m and 2.8m MX2's were designed by Jerry Hailey, Jason Shulman and myself. We have been flying the prototype version since last May and have been thrilled with how it has performed. Here are some of the specs on the airplane.

Specifications:

Wing Span: 123 inches (3.1m)

Wing Area: 2710 sq inches

Fuselage Length: 113 Inches

Engine: 150cc - 220cc


3.1m MX2 Competition Series Builders Kit Features:

Interlocking Fuselage Design for self aligning & extremely quick building
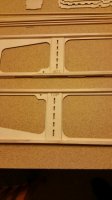
Includes balsa & hardwood materials needed for construction
Premium Fiberglass Cowl & wheel pants
Plug In Foam Wings
Plug In Foam Stabilizers
Foam Vertical Fin & Rudder
Designed For Canister Style or Tuned Pipe Exhaust Systems
Designed to Accommodate 3 Servos Per Wing
Designed to Accommodate 2 Servos Per Elevator Half
Built-in Rudder Tray For Pull-Pull Setup
Optional Bays for Rudder Servos In The Tail
Motor Box with firewall locations for DA-150/170 or DA-200
Carbon Fiber Wing Tube & Tail Tube
 

Kevin-Young

70cc twin V2
The extremely nice thing about the 3.1m MX2 is that it goes together very much like our 3.1m Extra and 2.7m Extra's.

The first step I do when building the airplane is to dry fit the motorbox together and make sure everything fits like I want it to.

The 3.1m MX2 and Extra both have a 3/8" laminated firewall that gets tabbed into the motorbox so that is actually the first item that you will want to glue together. For this I used titebond (carpenters glue) and weight it down for a few minutes so the glue gets a bit tacky.

Once you have the firewall laminated you can slide it back into the motorbox. On the motorbox I used the Hysol 9462 which is awesome because you can glue the motorbox together as one piece and just create a fillet with the glue. If you are using standard epoxy or something else then you would want to glue each joint seperately which takes a whole lot longer.

After I have gone around the motorbox with the hysol I will use some clamps and a bit of weight just to make sure everything dries square. Again, everything is tabbed and self aligning so it would be extremely difficult not to build it square.

Here is some pictures of the motorbox.
 

Attachments

  • 20150129_190117_resized_1.jpg
    20150129_190117_resized_1.jpg
    108.4 KB · Views: 432
  • 20150129_190123_resized_1.jpg
    20150129_190123_resized_1.jpg
    114.4 KB · Views: 486
  • 20150129_190132_resized_1.jpg
    20150129_190132_resized_1.jpg
    99.1 KB · Views: 445

Alky6

150cc
Kevin, I fully expect you'll finish this one long before I finish my 2.7 Extra! LOL. Look forward to learning a bit more! Might be a 2.8m MX2 in my future....
 

Kevin-Young

70cc twin V2
Kevin, I fully expect you'll finish this one long before I finish my 2.7 Extra! LOL. Look forward to learning a bit more! Might be a 2.8m MX2 in my future....

Like I told you on the phone this morning, we are already at about the same spot and I am 3 hours in! :yesss:

But remember I have to try and finish it on a schedule since it is not only my airplane but a display plane.
 

Kevin-Young

70cc twin V2
While the motorbox was drying I used that time to more along to the fuselage sides and fuselage top plate.

Each one of the fuselage sides is two pieces and has a doubler for support. The nice thing is the joint is a dove tail joint so everything aligns easily.

The first thing to do is take some titebond and run it down the edge of both halves to make sure you get a good glue joint between the two halves. Again, I put a little bit of weight on the joint just to make sure everything aligns properly (again there should be no way for it not to but why take the risk).

After the two fuse sides are jointed then I glue the doubler onto the fuse side. The two big things here are 1) make sure you make a left and right side, and 2) use the F5 former to help align the doubler with the fuse side since it is tabbed to go through both the doubler and fuse side.

This picture shows the longerons on the fuse sided already but I do that in a later step.
 

Attachments

  • 20150129_190206_resized_1.jpg
    20150129_190206_resized_1.jpg
    41 KB · Views: 428

Alky6

150cc
Nice touch burning a "TOP" on the doubler. As long as you can see the lettering and it fits in the tabs of F5, then you've got a left and a right. Very cool.
 
Top