• If you are new to GiantScaleNews.com, please register, introduce yourself, and make yourself at home.

    We're 1st in Giant Scale RC because we've got the best membership on the internet! Take a look around and don't forget to register to get all of the benefits of GSN membership!

    Welcome!
  • Unless you are a paid advertiser NO more posting advertisement in the individual vendor forums. You may post in the Manufacturer's Announcements section only but only ONCE a month unless your a paid advertiser.

Extreme Flight RC 91" Yak 54 build

dribar

70cc twin V2
After a long wait, Extreme flight is finally shipping the new EXP version of the Yak 54. I used to fly the 88" version and couldn't wait for this new version to be released. Pretty cool piece of trivia to see that this is the 10-year anniversary for Chris and the Yak. Anyway, mine showed up by carrier yesterday and it was quickly evident that EF puts as much engineering into there packaging as they do their airframes. Everything was double boxed with the inner cardboard 1/4" + thick. Very nice.

My build will not be too fast as I'm still waiting for parts [and finances] to support it. Plans are to set her up with a DA-60 w/smoke; AR9100 power-safe receiver; Savox 1270tg servos everywhere except for the rudder where there will be a big-red-honker Hitec HS-7956SHR rudder servo.

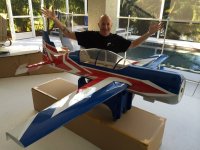
Looking forward to all the ideas to come. Here's some shots of the reveal last night.

IMG_6447.jpg
IMG_3696.jpgIMG_3694.jpgIMG_3722.jpgIMG_3721.jpgIMG_3729.jpgIMG_3726.jpg
 

Attachments

  • IMG_3731.jpg
    IMG_3731.jpg
    407.7 KB · Views: 787
Last edited by a moderator:

dribar

70cc twin V2
The twins are sleeping and I sent my wife off for a massage, so there is a small window for me and the yak. I'm building a little out of sequence because (1) my da-60 won't be here for another month and (2) I need to make sure this fuselage fits in my car with the wheels on. My car is a Lexus CT200 so space is at a premium. My rudder servo and receiver will arrive in a few days so that will be next on my list of things to do. Like I said -- way out of sequence

I unpacked the big bag of hardware and was surprised to see a lot of labeled little bags. No searching for the right bolt. Very nice.

IMG_3738.jpg

My first thing to do was to get the landing gear on. Not too much out of the ordinary here. Four bolts hold it on with the lock nuts on the outside.

IMG_3739.jpg

I used a 7/32 bit to drill out the wheel pants for the axle and a 5/64 for the rotation screw then put the wheels on and set her upright to make sure the pants were aligned where I wanted them. The manual said something about a lock nut for the rotation pin but the little bag labeled "wheel pants" had two little wood screws. They were junk and quickly had a stripped head. I replaced it with a little better screw.

IMG_3743.jpg

Lastly I had to attach the fairings with silicone glue.

IMG_3747.jpgIMG_3745.jpg

That's it -- ready for the car fit test tomorrow.
 

dribar

70cc twin V2
ATTENTION SMALL CAR OWNERS!
It is most likely you can fit this 91" plane in your car.

Without the stabs attached or the canopy on, it fit no problem. That's the good news of the day. Bad news is I have to go fly my MXS until parts show up on Tuesday :) Should have the monster rudder servo and receiver in the mail as well as sealing tape from my friend Xander.

IMG_3760.jpg IMG_3759.jpg

This configuration DID NOT FIT. According to the manual, I need 48" extensions instead of 36".

IMG_3761.jpg

Peace.
 

dribar

70cc twin V2
A little more work today.

Epoxied the control horns on the rudder. The holes that were there were not lined up with the second layer of wood so I had to file them out a bit. No worries there.

IMG_3762.jpg
IMG_3763.jpg
IMG_3764.jpg
IMG_3765.jpg

After swabbing vaseline to the four hinge joints, I epoxied them into the airplane side and let dry. Then I filled the holes in the rudder side with epoxy and put them together. Quick and easy.

IMG_3785.jpg

The tailwheel is typical EF and went together easily. Unfortunately the groove I ground on the tiller side of the shaft was offset and forced the wheel crooked. I don't think I was supposed to file one there but it was easily adjusted.

IMG_3788.jpg

Bad news is when I reached for the rudder mount (that you have to epoxy on), my wife showed me the pile of splinters my dog had created from the piece of ply. So... I need to build a new one. Servo is coming on Tuesday so it will be the next event on the list besides getting a new dog :)
 
Last edited by a moderator:

dribar

70cc twin V2
A few planes ago my wife was watching me try to cut out the Pilot-X face-shield. She said "why don't you just color it in". Nice. Instead of cutting the plastic and gluing it together, try using a thick black permeant marker to just color it in. It works great and takes about three minutes.

IMG_3789.jpg
 

gyro

GSN Contributor
Bad news is when I reached for the rudder mount (that you have to epoxy on), my wife showed me the pile of splinters my dog had created from the piece of ply. So... I need to build a new one. Servo is coming on Tuesday so it will be the next event on the list besides getting a new dog :)

Haven't seen this type of rudder mount on an EF bird before... Sorry the dog munched it :(
 

dribar

70cc twin V2
Quick unboxing video:
[video=youtube;E-bkXzCTG5U]http://www.youtube.com/watch?v=E-bkXzCTG5U[/video]
 

dribar

70cc twin V2
Haven't seen this type of rudder mount on an EF bird before... Sorry the dog munched it
Gyro - I meant to say the rudder servo tray. They include an extra piece of lite ply that you epoxy on top of the cross member to add strength. I'm not too sure I'm even going to add anything there... we'll see. The servo should show up in the mail today.
 
Last edited by a moderator:
Top