• If you are new to GiantScaleNews.com, please register, introduce yourself, and make yourself at home.

    We're 1st in Giant Scale RC because we've got the best membership on the internet! Take a look around and don't forget to register to get all of the benefits of GSN membership!

    Welcome!

Scale Plans built P-51

Red Raider

70cc twin V2
My least favorite thing about plans building is hinging the control surfaces. It’s important on a plane this size to make sure everything is straight. Well that’s true for any plane, but the bigger they are the easier it is for a small misalignment to manifest itself exponentially. 1/4* degree in 12 inches may not be noticeable where as on a 30” aileron it’s called, build another one. So if you build this plane (or any other scratch built project) you’re number one guiding principle has to be keeping it straight. But, I digress.
 
My least favorite thing about plans building is hinging the control surfaces. It’s important on a plane this size to make sure everything is straight. Well that’s true for any plane, but the bigger they are the easier it is for a small misalignment to manifest itself exponentially. 1/4* degree in 12 inches may not be noticeable where as on a 30” aileron it’s called, build another one. So if you build this plane (or any other scratch built project) you’re number one guiding principle has to be keeping it straight. But, I digress.
I agree and since for certain projects I use pin hinges such as Robards, but to get this perfectly aligned and straight, I first make a plywood template, 1/32 ply is good enough for this, then I know I will get the holes on both the wing/Stab/fin and ailerong/elevator/rudder perfectly aligned every time ,
 

Red Raider

70cc twin V2
Back to hingeing. I started in the back. Left elevator half. I like to use the fiber covered plastic hinges. I buy the small sheets (the blue ones) so that I can cut them to the size I want. Usually, about 1” x 1-1/8. Give or take a little, not too critical. Heck some of mine aren’t even exactly square. Everything lined up first time. Wow, 5 hinges, hand cut, right on the center line, both surfaces first time. Even the blind squirrel finds an acorn occasionally. Right elevator, same thing. Hmmm, maybe this isn’t so bad after all. Then came the rudder. The portion below the counterbalance is 1/4” aircraft plywood. Not exactly conducive to cutting a hinge slot with an exacto #11. Not having the right tool, I used a cutoff wheel in my Dremel and cut it just through the plywood enough that I could get one of those small exacto saw blades in. I finished the slots with that and again everything turned out just right. Those of you who’ve followed this thread knows that when everything is turning out well for me that something has to rear its ugly head. As Paul Harvey (an avid modeler as well as a famous radio broadcaster) was famous for saying, stay tuned for “the rest of the story”.
 

Red Raider

70cc twin V2
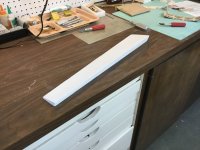
IMG_0058.JPG

This is the right aileron. Perfectly straight. You can see the trailing edge lays flat on the work bench. BTW - The left aileron is just as straight.
 

Red Raider

70cc twin V2
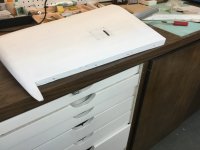
IMG_0059.JPG

This is the left outboard wing panel. Not straight. Not even close. In the middle of the trailing edge, its bowed at least 3/16ths. The aileron would act like a big speed brake with the leading edge sticking above the wing panel nearly tip to tip. So, what took me about 30 minutes, that is, to hinge both elevators and the rudder, my 3 steps forward, I come to this bush league building fiasco as my 2 steps back. And now you know that following my build thread is as much about how NOT to do something even more than it is how TO do something.
 

Red Raider

70cc twin V2
I posted thumbnail pictures, so if you want to see how bad it is, all you have to do is click on the image and then select view in original size.
 

Red Raider

70cc twin V2
I started to post these 2 pictures and solicit input from you guys on how to address this issue. I know someone would've said, hire it built. I wouldn't be offended, because that's my first inclination, but I'm a retired school teacher. So, I'm stuck with what God gave me to work with. Besides, I was using my Ipad and couldn't get the dang pictures to load. Therefore, I was left to my own devices.
 

Red Raider

70cc twin V2
I measured both wing panels. I cut all the ribs at once, cutting left and right sides at the same time, from the same wood using the same template. So the ailerons were the same - the wing panels should've been also. But they weren't. 3-4 ribs right in the center of the trailing edge were as much as 3/16ths too narrow, leaving what appeared to be a bow in the top portion of the trailing edge. I can only assume I imposed the bow with some overly aggressive sanding. Here's what I did:
 

Red Raider

70cc twin V2
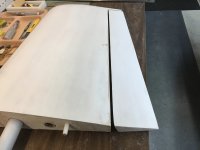
IMG_0060.JPG

I cut the sheeting away from the rear spar and sanded (and sanded and sanded) wedges that would fit into the gap that I created. I used a steel straightedge and 5 clamps. Sighting along the edge, I made 1/2 inch wedges of declining or advancing thickness as necessary to bring the top edge of the sheeting into contact with the straight edge. Then, I glued the snot out of it with thin CA. I don't know if any of you save all your building trash, but I even save the saw dust when I do a lot of scroll saw work. When the first round of CA was sufficiently set, I rubbed the aforementioned saw dust into the remainder of the exposed gap and repeated the snot action. A little work with a sanding block, and I'm a happy little modeler again.
 
Top